Review


Review
- HTML
- CSS
- JavaScript
- Developer Tools
- Functions
- Variables
- P5.js Functions and Variables
- Coordinates
- If Statements
- Animation
- For Loops
- Arrays
- Input
- More Info
- Next: P5.js and Web Development
If you’ve already worked through the Processing, HTML, and JavaScript tutorials, then P5.js should follow pretty logically from what you’ve already learned. But just in case you’ve forgotten some stuff, this tutorial is a quick review of stuff we’ve already learned, frame from a P5.js perspective.
HTML
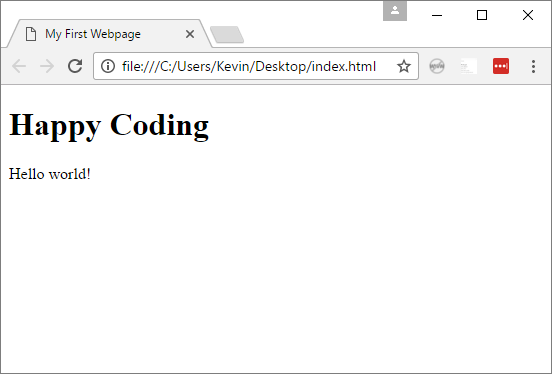
HTML is a markup language that allows programmers to write files that tell a web browser how to display content. HTML uses tags to define content. Here’s an example HTML file:
<!DOCTYPE html>
<html>
	<head>
		<title>My First Webpage</title>
	</head>
	<body>
		<h1>Happy Coding</h1>
		<p>Hello world!</p>
	</body>
</html>
Save this to a file named index.html, and then open it in a web browser to see this page:
There are a bunch of different HTML tags for different types of content. W3Schools and Mozilla Developer Network are great resources for learning more about HTML tags.
CSS
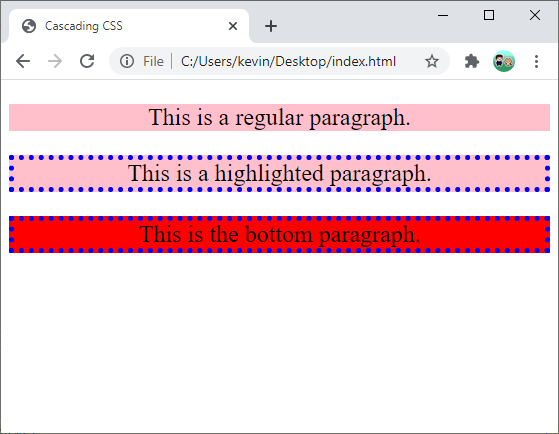
HTML specifies the content of a webpage, and CSS specifies what that content should look like. Here’s an example that uses CSS:
<!DOCTYPE html>
<html>
	<head>
		<title>Cascading CSS</title>
		<style>
			p{
				background-color: pink;
				color: black;
				text-align: center;
			}

			.highlighted{
				border: thick dotted blue;
			}

			#top{
				background-color: red;
			}
		</style>
	</head>
	<body>
		<p id="top" class="highlighted">This is the top paragraph.</p>
		<p class="highlighted">This is a highlighted paragraph.</p>
		<p>This is a regular paragraph.</p>
	</body>
</html>
The <style> tag contains CSS that styles the elements in the HTML. Or we could have put the CSS into a file named styles.css and loaded it using this line:
<link rel="stylesheet" type="text/css" href="styles.css">
Either way, the style page looks like this:
See the Pen by Happy Coding (@KevinWorkman) on CodePen.
Remember that you can select elemnts by class or ID, and differnt styles cascade (in other words, combine) to decide the final styling of an element. Learn more about CSS at the CSS tutorial or on W3SChools or MDN.
JavaScript
HTML specifies content, CSS styles the content, and JavaScript makes that content interactive. JavaScript is used for stuff like user interaction, animation, and fetching dynamic content.
Here’s a basic JavaScript examples:
<!DOCTYPE html>
<html>
	<head>
		<title>JavaScript Example</title>
		<script>

			var clickCount = 0;

			function buttonClicked(){
				clickCount++;
				var clickCountElement = document.getElementById("clickCount");
				clickCountElement.innerHTML = 'Count: ' + clickCount;
				console.log("clickCount: " + clickCount);
			}
		</script>
	</head>
	<body>
		<button onclick="buttonClicked()">Click Me</button>
		<p id="clickCount">Count: 0</p>
	</body>
</html>
This code sets up an onclick event on the <button> element, so the buttonClicked() function is called whenever the user clicks the button.
See the Pen by Happy Coding (@KevinWorkman) on CodePen.
You can also put your JavaScript code in a separate file and load it using this line:
<script src="main.js"></script>
You can use this approach to load JavaScript libraries, which gives you access to the variables and functions in that library. That’s how we’ll load P5.js, which is a JavaScript library.
Developer Tools
If you’re developing JavaScript (and if you’re developing P5.js, then you’re developing JavaScript), then the developer tools are your best friend. In most browsers, you can press the F12 or ctrl+shift+i key to show the developer tools.
The developer tools contains a JavaScript Console tab, and this should be your first stop whenever you’re noticing a strange behavior. In fact, it’s probably a good idea to always have this open, that way you spot errors as soon as they happen.
The developer tools also allow you to inspect HTML elements (which comes in handy when you want to figure out why something looks the way it does) and to debug JavaScript (which comes in handy when you want to step through your code to watch it execute line by line).
I promise that you will encounter a situation where your code isn’t doing what you thought it would, and the answer is almost always in the JavaScript console.
Functions
To create a function in JavaScript, you use the function keyword, then give it a name, then define any parameters it takes, and then define a set of instructions in the body of the function.
function doTheThing(){
	console.log('Doing the thing!');
}

function addTheThings(thingOne, thingTwo){
	var sum = thingOne + thingTwo;
	return sum;
}
The above example included a buttonClicked() function that was called as the onclick event of a <button> element. You can also call functions yourself, or use the <body> element’s onload event to call a function after the page is loaded.
Variables
To create a variable in JavaScript, you use the var keyword, then give it a name, and then give it a value.
var answer = 42;
var message = "Happy Coding";
var yum = 3.14;
You can read more about creating variables in our javascript tutorial.
P5.js Functions and Variables
P5.js is a JavaScript library that provides access to various functions and variables that make it easy to create animated and interactive programs.
P5.js automatically calls certain functions for you, like setup() and draw(). So to write a P5.js program, you define these functions, and then use the variables and functions that P5.js gives you to draw a scene each frame. Here’s a P5.js example:
<!DOCTYPE html>
<html>
	<head>
		<title>P5.js Example</title>
		<script src="https://cdnjs.cloudflare.com/ajax/libs/p5.js/0.5.14/p5.js"></script>
		<script>
			function setup(){
				createCanvas(500, 500);
				background(64);
			}

			function draw(){
				fill(255);
				ellipse(mouseX, mouseY, 20, 20);
			}
		</script>
	</head>
	<body>
	</body>
</html>
This code defines a setup() function, which P5.js when the page is loaded. Inside the setup() function, the code calls the createCanvas() function, which is provided by P5.js and creates a <canvas> element for drawing. It then calls the background() function to draw a dark background. Then the code defines a draw() function, which P5.js calls 60 times per second. Inside the draw() function, the code calls the P5.js fill() function, which sets the drawing color to white, and then the P5.js ellipse() function, which draws a circle. The code uses the mouseX and mouseY variables, which are also provided by P5.js, and give us the location of the cursor.
In other words, this program shows a white circle wherever the mouse is.
See the Pen by Happy Coding (@KevinWorkman) on CodePen.
From here, creating more complicated P5.js programs is “just” a matter of knowing which functions and variables to use. The P5.js reference is your best friend.
Coordinates
In P5.js, the coordinate 0,0 is in the upper-left corner. The X value increases as you go to the right, and the Y value increases as you go down.
The width and height variables hold the width and height of the drawing canvas, so the coordinate width,height is in the lower-right corner. The coordinate width/2, height/2 is the center of the drawing canvas.
The best way to understand the coordinate system is to get a sheet of graph paper and draw out a bunch of examples!
If Statements
If statements check a condition, and only execute a code block if that condition is true.
if(condition){
  // this code only fires if condition is true
}
else{
  // this code only fires if condition is false
}
The above example uses an if statement to check whether the circle has gone off the edge of the window, and if so it reverses the direction of the circle.
Animation
Creating an animation is generally a 3-step process:
- Step one: Create a set of variables to represent the state of your scene.
- Step two: Use those variables to draw your scene each frame.
- Step three: Change those variables a little bit over time, so the drawing changes each frame.
Here’s an example:
var circleX;
var circleY;
var xSpeed;
var ySpeed;

function setup() {
  createCanvas(200, 200);
  circleX = width/2;
  circleY = height/2;
  xSpeed = random(-5, 5);
  ySpeed = random(-5, 5);
}

function draw() {
  background(64);
  fill(255);
  ellipse(circleX, circleY, 20, 20);

  // move the circle
  circleX += xSpeed;
  circleY += ySpeed;

  // bounce off left and right
  if(circleX < 0 || circleX > width){
    xSpeed *= -1;
  }

  // bounce off top and bottom
  if(circleY < 0 || circleY > height){
    ySpeed *= -1;
  }
}
See the Pen by Happy Coding (@KevinWorkman) on CodePen.
This example uses a circleX and a circleY variable to keep track of the position of the circle, and a xSpeed and ySpeed variable to keep track of how much the circle should move each frame. By changing the circleX and circleY variables over time, the code shows the circle moving. And by changing the xSpeed and ySpeed variables, the code changes which direction the circle is moving.
For Loops
For loops allow you to repeat a block of code a certain number of times. Here’s an example:
function setup() {
  createCanvas(200, 100);

  for(var x = 0; x < width; x++){
    stroke(random(256));
    line(x, 0, x, height);
  }
}
This code uses a for loop to create a looping variable named x, which starts at 0. The loop checks whether x is less than width, and if so it executes the code inside the body of the for loop. The body sets the color to a random shade of gray, and then draws a line at the x position of the current iteration of the loop. At the end of each loop iteration, the code increments x, then checks whether x is less than width again.
See the Pen by Happy Coding (@KevinWorkman) on CodePen.
In other words, this code draws a randomly shaded vertical line at each x position.
Here’s another example that uses a for loop to draw random colored cirlces:
function setup() {
  createCanvas(200, 200);
  background(64);
  noStroke();
}

function draw() {
  var size = random (25, 100);
  var x = random(width);
  var y = random(height);

  for (var ring = size; ring >= 0; ring -= random(2, 10)) {
    fill(random(256), random(256), random(256));
    ellipse(x, y, ring, ring);
  }
}
This code uses a for loop to draw smaller and smaller randomly colored circles. Notice that this for loop doesn’t just count 1 by 1. Your for loops can use whatever pattern you want!
See the Pen by Happy Coding (@KevinWorkman) on CodePen.
You can also use while loops to repeat code as long as a condition is true.
Arrays
Arrays can hold multiple values at different indexes. Here’s an example:
var animals = ['Lions', 'Tigers', 'Bears']

function setup() {
  createCanvas(100, 125);
  textSize(18);
  animals.push('Lizards');
  animals.push('Giraffes');
}

function draw() {
  background(64);
  fill(255);
  text(animals[0], 20, 20);
  text(animals[1], 20, 40);
  text(animals[2], 20, 60);
  text(animals[3], 20, 80);
  text(animals[4], 20, 100);
}
This code creates an array named animals containing three values, and then adds two more values. Then it accesses the values at each index to draw them to the screen.
See the Pen by Happy Coding (@KevinWorkman) on CodePen.
When you’re using arrays, for loops often come in handy. We can use a for loop to iterate over the values in an array:
var animals = ['Lions', 'Tigers', 'Bears']

function setup() {
  createCanvas(100, 125);
  textSize(18);
  animals.push('Lizards');
  animals.push('Giraffes');
}

function draw() {
  background(64);
  fill(255);
  for(var index = 0; index < animals.length; index++){
    text(animals[index], 20, 30 + index * 20);
  }
}
See the Pen by Happy Coding (@KevinWorkman) on CodePen.
Now the code uses a for loop to iterate over the values in the array. This is especially useful when our arrays are very large or change over time.
Input
P5.js provides several variables and functions that allow you to react to user input, like clicking the mouse or typing a key.
Here’s an example that uses input variables:
function setup() {
  createCanvas(200, 200);
}

function draw() {

  background(64);
  fill(255);
  textSize(36);

  if(keyIsPressed){
    text('Key: ' + key, 20, 100);
  }

  if(mouseIsPressed){
    fill(255, 0, 0);
  }
  else{
    fill(0, 0, 255);
  }

  ellipse(mouseX, mouseY, 20, 20);
}
See the Pen by Happy Coding (@KevinWorkman) on CodePen.
This example uses the keyIsPressed variable to check whether a key is being pressed, and the key variable to display which key it is. It then uses the mouseIsPressed to check whether the mouse is being pressed, and the mouseX and mouseY variables to track the cursor position.
Here’s another example that uses input functions:
function setup() {
  createCanvas(200, 200);
  background(64);
  stroke(255);
}

function mousePressed(){
  fill(0, 255, 0);
  ellipse(mouseX, mouseY, 20, 20);
}

function mouseDragged(){
  line(pmouseX, pmouseY, mouseX, mouseY);
}

function mouseReleased(){
  fill(0, 0, 255);
  ellipse(mouseX, mouseY, 20, 20);
}

function keyPressed(){
  if(key == 'R'){
    background(64);
  }
}
See the Pen by Happy Coding (@KevinWorkman) on CodePen.
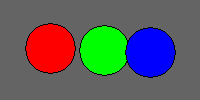
This example uses the mousePressed() function to draw a green circle when the user first clicks the mouse, then the mouseDragged() function to draw a line from the previous cursor position to the current cursor position, and finally the mouseReleased() function to draw a blue circle when the user lets go of the mouse. It also uses the keyPressed() function to clear out old drawings when the user presses the R key.
More Info
This is just a high-level overview of some of the topics that we’ve already covered in other tutorials. This wasn’t really meant to teach anything from scratch, so if you’d like to learn more, check out the Processing, HTML, and JavaScript tutorials for more info.