HTML Tags


HTML Tags
- HTML Content
- Markup
- Example
- Document type:
<!DOCTYPE html> - HTML content:
<html> - Page info:
<head> - Tab title:
<title> - Content:
<body> - Headings:
<h1> - Paragraphs:
<p> - Lists:
<ul>and<li> - Images:
<img> - Links:
<a> - Finding Other Tags
- Homework
HTML Content
Before you start writing HTML, think about webpages for a minute.
Generally, webpages contain different types of content. That content is often different types of text, but it can also be things like links, images, videos, and sound files.
Take a look at a few websites you use. (Or just start with this page!) What types of content do you see? Here are a few things to look for:
- Normal text
- Headings
- Lists (like this one!)
- Links
- Images
What other types of content do you notice?
Markup
Let’s say you have two lines of text:
My Website

Welcome to my website!
And now you want to show My Website as a heading, and Welcome to as normal text, and my website! as bold.
My Website
Welcome to my website!
In a word processor like Microsoft Word or Google Docs, you might highlight each line and then select some formatting options. But if you aren’t using a word processor, how do you specify how to display your content?
The answer is that you can include markup in your text to specify rules about the text’s formatting. This is similar to how you might “mark up” a physical copy of text, for example to correct spelling mistakes with a red pen.

(photo by Jo)
There are many different markup languages. Here are a few examples:
# My Website

Welcome to **my website!**
\section(My Website)

Welcome to {\bf my website!}
= My Website =

Welcome to '''my website!'''
[size=40]My Website[/size]

Welcome to [b]my website![/b]
No matter what markup language you’re using, the idea is similar: you add markup to specify options about your content; that markup is used to format the output; but the markup itself is not shown in the output. (That’s what makes it markup and not content!)
Web browsers use a markup language called Hyper Text Markup Language, abbreviated as HTML. Here’s the above example in HTML:
<h1>My Website</h1>

<p>Welcome to <b>my website!</b></p>
The things in <> angle brackets are called HTML tags, which are markup that tell the web browser how to display content.
Example
As a starting point, here’s an example HTML file:
<!DOCTYPE html>
<html>
<head>
<title>My First Webpage</title>
</head>
<body>
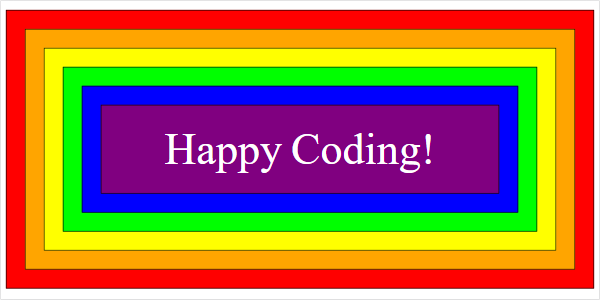
<h1>Happy Coding</h1>
<p>Hello world!</p>
<p>Here are my favorite animals:</p>
<ul>
<li>Lions</li>
<li>Tigers</li>
<li>Bears</li>
</ul>
<img src="https://happycoding.io/images/stanley-1.jpg" />
<p>Learn more at <a href="https://happycoding.io">Happy Coding</a>!</p>
</body>
</html>
See the Pen by Happy Coding (@KevinWorkman) on CodePen.
Let’s go over these tags one by one.
Document type: <!DOCTYPE html>
This line tells your browser that it should treat the rest of the file as HTML. Technically this isn’t an HTML tag, but you should still add it as the very first line in your HTML files. If you don’t, things might not look right.
HTML content: <html>
Similar to the DOCTYPE line, the <html> tag tells the browser that anything inside of it is HTML. Anything between <html> and </html> will be treated as HTML.
Page info: <head>
The <head> tag contains information that you don’t want to show as content, but is still important for the browser to know.
Tab title: <title>
The <title> tag sets the title of the webpage, which the browser shows as the label of the tab.
The title does not show up in the content of the page, because it’s inside the <head> section.
Content: <body>
The <body> tag contains all of the content that will show in your webpage.
The rest of the tags mentioned below should go inside the <body> tag.
Headings: <h1>
The <h1> tag is a heading and is rendered in large bold text on its own line.
There are other heading tags: <h1> is the biggest, <h2> is the second-biggest, down to <h6> which is the smallest.
<h1>Content of h1 tag</h1>
<h2>Content of h2 tag</h2>
<h3>Content of h3 tag</h3>
<h4>Content of h4 tag</h4>
<h5>Content of h5 tag</h5>
<h6>Content of h6 tag</h6>
Content of h1 tag
Content of h2 tag
Content of h3 tag
Content of h4 tag
Content of h5 tag
Content of h6 tag
See the Pen by Happy Coding (@KevinWorkman) on CodePen.
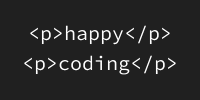
Paragraphs: <p>
The <p> tag tells the browser that the content is a paragraph. Any content between an opening <p> tag and a closing </p> tag will be rendered as a block of text. So this:
<p>Space: the final frontier. These are the voyages of the starship Enterprise. Its continuing mission: to explore strange new worlds. To seek out new life and new civilizations. To boldly go where no one has gone before!</p>

<p>You are traveling through another dimension, a dimension not only of sight and sound but of mind. A journey into a wondrous land whose boundaries are that of imagination. Your next stop, the Twilight Zone!</p>
Is rendered as this:
Space: the final frontier. These are the voyages of the starship Enterprise. Its continuing mission: to explore strange new worlds. To seek out new life and new civilizations. To boldly go where no one has gone before!
You are traveling through another dimension, a dimension not only of sight and sound but of mind. A journey into a wondrous land whose boundaries are that of imagination. Your next stop, the Twilight Zone!
See the Pen by Happy Coding (@KevinWorkman) on CodePen.
The <p> tag might not seem very important, but HTML ignores whitespace between tags. That makes it hard to split your text up into paragraphs. Try modifying this example to not include the <p> tags to see what I mean. You’ll see that the text gets combined into one big block of text, which makes it harder to read. Use the <p> tag to split your text up into smaller chunks!
Lists: <ul> and <li>
The <ul> tag creates an unordered list, which is a list with bullet points in front of each item. The <li> tag is a list item inside that list. For example, this HTML:
<ul>
  <li>Cats</li>
  <li>Dogs</li>
  <li>Lizards</li>
</ul>
Is rendered like this:
- Cats
- Dogs
- Lizards
See the Pen by Happy Coding (@KevinWorkman) on CodePen.
Images: <img>
The <img> tag lets you add images to your webpage. To use the <img> tag, you need to know the URL of an image file. For example, I know I have an image located here: https://happycoding.io/images/stanley-2.jpg
So I can use it in an <img> tag like this:
<img src="https://happycoding.io/images/stanley-2.jpg" />
Note: You can also use a relative path. For example, if your image file is next to your HTML file, you can use a path like <img src="image.jpg" />, without the rest of the URL. This is handy if you’re writing HTML using a file on your computer!
The <img> tag is a little different from the other tags you’ve seen so far.
- The
<img>tag does not have any content. - It also doesn’t have a closing </img> tag. Instead, it has an optional slash
/at the end of the tag. This is called a self-closing tag. - Instead of content, it contains an attribute named
srcthat points to the url using the equals sign=followed by the URL inside" "quotation marks.
See the Pen by Happy Coding (@KevinWorkman) on CodePen.
Links: <a>
The internet is made up of a bunch of webpages that all link to each other, forming a web of pages. You can link to another page using the <a> tag.
The <a> tag has an href attribute that points to a URL, and content that specifies the text. The browser shows that text as a link, and when the user clicks it, the browser navigates to the href URL.
For example, this HTML:
<p>Learn more at <a href="https://happycoding.io/tutorials/html">Happy Coding</a>!</p>
Is rendered like this:
Learn more at Happy Coding!
Note: Similar to images, you can also use a relative path for the href attribute. So if you have an HTML file named other-page.html that’s next to the current file, you can use a link like this:
<a href="other-page.html">My Other Page</a>
This comes in handy if you’re writing HTML using a file on your computer!
Finding Other Tags
This tutorial introduced a few of the tags you’ll see most often, but there are a TON of other tags. Check out W3Schools or Mozilla Developer Network for a complete list.
When you’re coding, a big part of the process is looking information up and learning more as you need it. Don’t try to memorize every single HTML tag! Instead, get into the habit of searching for tags when you need them, and then reading through documentation to learn more. Experiment, see how it works, and then add it to your code!
For example, let’s say I wanted to highlight a section of my webpage, but I wasn’t sure how to do that. I would search the internet for terms like “html highlight tag” and read through the results. I might find the W3Schools page for the <mark> tag, and I’d read through that and try it out to see how it works. Then I’d write something like this:
Some of <mark>this text</mark> is highlighted!
And it would display like this:
Some of this text is highlighted!
Being able to search the internet, read documentation, and experiment are all very important skills when you’re writing code. Rather than trying to memorize a bunch of tags, try to practice that process!
Homework
- Try to use all the tags you’ve learned so far in your webpage. List a few of the things you enjoy, add a picture of your cat, etc.
- Look at W3Schools and Mozilla Developer Network to find some other tags. A lot of programming is using resources like these and trying things out. Try to figure out what the
<hr>tag does. What does the<details>tag do?
