Nesting HTML Tags


Nesting HTML Tags
Now you know how to write HTML, and how to use HTML tags to create a webpage.
This tutorial explores HTML tags a bit more, and talks about how HTML tags fit together and how you can explore any HTML on the internet.
HTML Tags
Remember that you write HTML by adding tags to your content, which tells the browser what to do with the content. For example, the <h1> tag tells the browser that something is a heading, the <p> tag tells the browser that text is a paragraph, and the <img> tag tells the browser to display an image.
A tag has a name which goes between < > angle brackets, and contains content which goes between an opening and closing tag. A closing tag is a / forward slash followed by the tag name, both in angle brackets.
For example, the <h1> tag tells the browser that the content is a heading, and the <p> tag tells the browser that the content is a paragraph:
See the Pen by Happy Coding (@KevinWorkman) on CodePen.
Challenge: Try adding another <p> tag to this HTML.
Nesting HTML Tags
HTML tags generally contain content, which is often text. In the example above, the <h1> tag contains the content Hello World and the <p> tag contains the content Welcome to my webpage!.
However, the content of an HTML tag isn’t always text. Sometimes it’s other HTML tags!
For example, the <ul> tag creates an unordered list, in other words a bullet-point list.
However, if you put your content directly inside the <ul> tag, it won’t work:
See the Pen by Happy Coding (@KevinWorkman) on CodePen.
This doesn’t create an HTML list. In fact, it doesn’t even put each item on its own line!
To fix this, you need to wrap each item in its own <li> (list item) tag:
See the Pen by Happy Coding (@KevinWorkman) on CodePen.
This is called nesting, because the <li> tags are nested inside the <ul> tag.
HTML generally includes many levels of nested tags.
See the Pen by Happy Coding (@KevinWorkman) on CodePen.
How many levels of nesting can you spot?
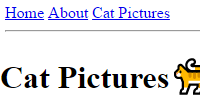
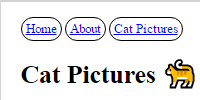
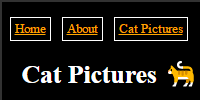
For example, the top-level <html> tag contains two nested tags: <head> and <body>. The <body> tag contains six nested tags: <h1>, <p>, <p>, <ul>, <img>, and <p>. That last <p> tag contains a nested <a> tag. You can probably spot other nested tags.
Here are some other examples of common nested tags:
- The
<ul>tag almost always contains<li>tags. - the
<table>tag contains a<tr>tag for each row, and each<tr>tag contains a<td>tag for each cell. - The
<details>tag contains a<summary>tag that lets you create collapsible sections of content.
There are many other ways to nest HTML tags!
Understanding nested tags is important to understanding HTML. But note that it doesn’t make sense to nest every tag combination. For example, it doesn’t really make sense to put a <p> tag inside the <head> tag, since the <head> tag is only for stuff that isn’t shown to the user.
Formatting Code
If you’re ever having trouble reading or debugging nested HTML tags, one of the best things you can do is make sure your code is formatted. Generally, opening and closing tags usually go on their own lines. And you should use tabs or spaces to indent nested tags, which makes it easier to keep track of the nesting.
HTML itself doesn’t care about formatting. Nothing is stopping you from writing your HTML on a single line:
<!DOCTYPE html>
<html><head><title>My First Webpage</title></head><body><h1>Happy Coding</h1><p>Hello world!</p><p>Here are my favorite animals:</p><ul><li>Lions</li><li>Tigers</li><li>Bears</li></ul><img src="https://happycoding.io/images/stanley-1.jpg" /><p>Learn more at <a href="https://happycoding.io">Happy Coding</a>!</p></body></html>
Or with whatever indentation you want:
<!DOCTYPE html>
<html>
  <head>
<title>My First Webpage</title>
	</head>
         <body>
	<h1>Happy Coding</h1>
		<p>Hello world!</p>
      <p>Here are my favorite animals:</p><ul>
  <li>Lions</li><li>Tigers</li><li>Bears</li>
  </ul>
<img src="https://happycoding.io/images/stanley-1.jpg" />
<p>Learn more at <a href="https://happycoding.io">Happy Coding</a>!</p>
     	 </body></html>
HTML ignores whitespace, so either of the above would work fine. But it’s much harder for humans to read code that’s not formatted nicely!
Here’s the same code again, this time with proper formatting:
<!DOCTYPE html>
<html>
	<head>
		<title>My First Webpage</title>
	</head>
	<body>
		<h1>Happy Coding</h1>
		<p>Hello world!</p>
    <p>Here are my favorite animals:</p>
    <ul>
      <li>Lions</li>
      <li>Tigers</li>
      <li>Bears</li>
    </ul>
    <img src="https://happycoding.io/images/stanley-1.jpg" />
    <p>Learn more at <a href="https://happycoding.io">Happy Coding</a>!</p>
	</body>
</html>
This makes your code easier to read, and much easier to find mistakes in!
Most code editors come with an ability to automatically format your code for you. On Replit, the format button is in the upper-right corner of the editor and looks like 3 lines of code in a little box. Click that, and Replit will automatically format your code for you. This is very handy for spotting missing closing tags!
Self-Closing Tags
Nesting tags is when the content of an HTML tag contains another HTML tag. On the other end of the spectrum, there are some tags that don’t have any content at all! These are called self-closing tags.
Self closing tags don’t have any content, and generally don’t require a separate closing tag.
For example, the <hr> tag draws a horizontal line. The line itself doesn’t contain any content, so the tag doesn’t contain content either.
See the Pen by Happy Coding (@KevinWorkman) on CodePen.
The <img> tag is also self-closing. Instead of content, it contains a src attribute that points to the location of an image file, and an alt attribute that describes the image.
See the Pen by Happy Coding (@KevinWorkman) on CodePen.
Another self-closing tag is the <br> tag. This tag lets you add a line break to content, but it doesn’t itself contain content.
See the Pen by Happy Coding (@KevinWorkman) on CodePen.
You’ll encounter other self-closing tags as you learn more about HTML, but now you know what they are!
Developer Tools
Now that you’re learning more about HTML, let me introduce you to another useful tool: the developer tools that come with your browser!
Almost every browser comes with a set of developer tools that let you poke around at the source code of any webpage. This is handy for debugging your own code, but you can also use it to check out the source code of any page you view!
Each browser has its own way of opening its developer tools:
- Chrome: click the three-dot menu, then click
More tools, and then clickDeveloper tools - Firefox: click the three-line menu, then click
More tools, then clickWeb Developer Tools - Safari: click
Safari, thenSettings,Advanced, and then selectShow Develop menu in menu bar. After that, you can clickDevelopand thenShow Page Source.
Alternatively, you can right-click inside any webpage and then click Inspect to open your developer tools for a specific element.
Try it now!
Homework
- Use your developer tools to inspect the elements used by the webpages you visit most often. Try using your developer tools to modify these webpages. Don’t worry, any changes you make go away as soon as you refresh, so you won’t break anything!
- Read soft corruptor, an HTML poem by Everest Pipkin. Then write your own HTML poem using the
<details>and<summary>tags.