CSS


CSS
- CSS
- CSS Syntax
- Element Selectors
- ID Selectors
- Class Selectors
- External Style Sheets
- Inline Styles
- Cascading
- Learn More
- Practice
Now you know that an HTML file contains tags that tell the browser what to show. You’ve seen a few examples of tags you can use, like the <p> paragraph tag, the <h1> heading tag, and the <img> image tag. You know how to look for new tags by reading through W3Schools and Mozilla Developer Network to find other tags, and you can use all of that knowledge to write an HTML page.
One limitation that you might have noticed with what you’ve seen so far is that the pages aren’t very pretty. HTML tags tell the browser what type of content should be shown (like the <p> tag telling the browser that the content is a paragraph, or the <h1> tag telling the browser that the content is a heading), but they don’t tell the browser what that content should look like, or how that content should be laid out.
That might seem like a contradiction, but think about it this way: the <p> tag tells the browser that the content is a paragraph, but it doesn’t tell the browser what font size that paragraph should be, whether it should be aligned to the left, center, or right, or whether it should have a border or a color. The browser has some default settings, but those settings aren’t very exciting.
If you want to make your content look more interesting, then you have to use CSS.
CSS
CSS stands for Cascading Style Sheets, and it’s another type of language that lets you create style rules for your HTML tags.
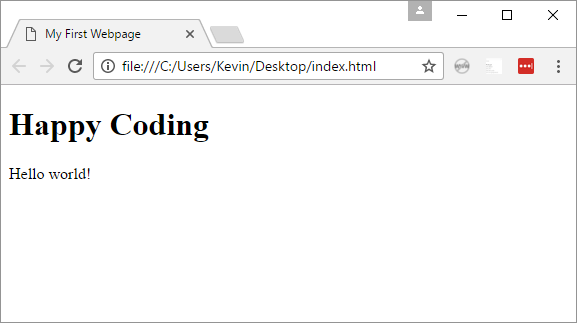
Let’s start with an unstyled HTML page, without any CSS:
<!DOCTYPE html>
<html>
	<head>
		<title>My First Webpage</title>
	</head>
	<body>
		<h1>Happy Coding</h1>
		<p>Hello world!</p>
	</body>
</html>
This renders the content in a pretty boring webpage with a white background and black, left-aligned text.
See the Pen by Happy Coding (@KevinWorkman) on CodePen.
If you want to style this HTML page, you can use CSS by adding a <style> tag into the <head> section of your HTML, and then listing your style rules inside the <style> element.
Here’s an example:
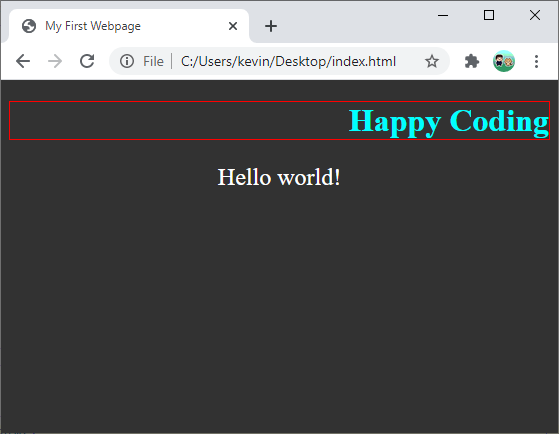
<!DOCTYPE html>
<html>
	<head>
		<title>My First Webpage</title>
		<style>
      body {
        background-color: #323232;
      }

      p {
        color: white;
	      text-align: center;
        font-size: 24px;
      }

      h1 {
        color: #00ffff;
        border: thin solid red;
	      text-align: right;
      }
		</style>
	</head>
	<body>
		<h1>Happy Coding</h1>
		<p>Hello world!</p>
	</body>
</html>
This sets up three style rules:
- The
<body>tag has a background color of#323232, which is a hex color for dark gray. - The
<p>tag has a color of white (you can use hex colors or color names for colors), a center alignment, and a font size of 24 pixels. - The
<h1>tag has a color of#00ffff, a red border, and is aligned to the right.
See the Pen by Happy Coding (@KevinWorkman) on CodePen.
CSS Syntax
To create a style rule, you specify a selector, followed by { } curly brackets, and inside those curly brackets you put a list of css properties and values, each ending with a ; semicolon.
Here’s an example from above:
p {
	color: white;
	text-align: center;
	font-size: 24px;
}
This style rule selects every <p> tag and lists three properties and their values. Those properties give every <p> tag on the page a style with a white color, center-aligned text, and 24px font size.
There are a ton of CSS properties you can use, and each property has its own set of values you can choose from. You can learn more about your options on W3Schools and MDN. You can also find a CSS property and value by googling something like “css text alignment” or similar.
Element Selectors
Here’s another example that styles three <p> tags:
<!DOCTYPE html>
<html>
	<head>
		<title>CSS P Selector</title>
		<style>
			p {
				text-align: center;
				font-size: 24px;
				background-color: lightblue;
			}
		</style>
	</head>
	<body>
		<p>This is the first paragraph.</p>
		<p>This is the second paragraph!</p>
		<p>And here's a third one!</p>
	</body>
</html>
See the Pen by Happy Coding (@KevinWorkman) on CodePen.
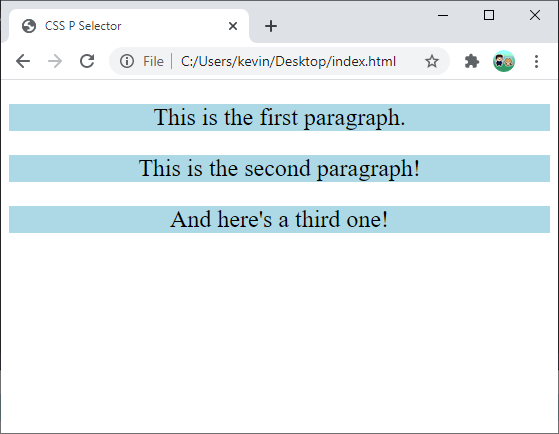
So far, all of the CSS examples select the <p> tag, which styles all of the <p> tags on the page. This is called an element selector, because it selects every element with that tag.
ID Selectors
Now you know how to style all of the tags on your page, but what if you want to give individual <p> tags their own styles? Element selectors are too broad, because they end up styling every <p> tag.
One way to get more specific is to give each of your <p> tags an ID. You can do this by adding an id attribute to the HTML tags:
<p id="first">This is the first paragraph.</p>
<p id="second">This is the second paragraph!</p>
<p id="third">And here's a third one!</p>
Now that your tags have IDs, you can use a id selectors in your CSS to select each <p> tag individually.
To use an ID selector in your CSS, you use a # pound sign, then the id, then style rules inside { } curly brackets, like this:
#first {
	background-color: red;
}
Putting it all together, it looks like this:
<!DOCTYPE html>
<html>
	<head>
		<title>CSS ID Selector</title>
		<style>
			p {
				text-align: center;
				font-size: 24px;
				background-color: lightblue;
			}

			#first {
				background-color: red;
			}

			#second{
				text-align: left;
			}

			#third {
        text-align: right;
				font-size: 36px;
			}
		</style>
	</head>
	<body>
		<p id="first">This is the first paragraph.</p>
		<p id="second">This is the second paragraph!</p>
		<p id="third">And here's a third one!</p>
	</body>
</html>
See the Pen by Happy Coding (@KevinWorkman) on CodePen.
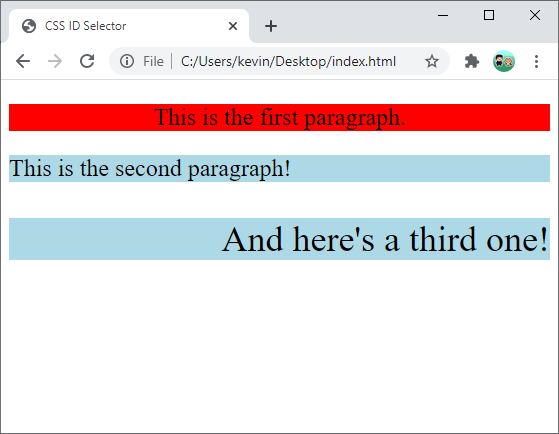
Now you can style each <p> tag individually. Also notice that the <p> tags have both the styles from the element selector and the styles from their respective id selectors. This is what cascading means: the style rules combine so you can go from general rules to more specific rules.
Class Selectors
IDs should be unique, so you shouldn’t have more than one tag with the same ID. Also, each tag can only have one ID. But what if you want to apply the same style to multiple elements, or you want multiple styles to apply to the same element?
This is where class selectors come in handy. CSS classes are similar to IDs, except multiple elements can have the same class, and one element can have multiple classes.
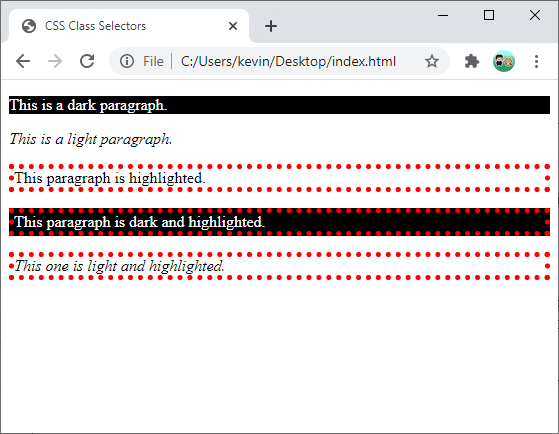
For example, you can have multiple <p> tags with multiple classes, separated by spaces:
<p class="dark">This is a dark paragraph.</p>
<p class="light">This is a light paragraph.</p>
<p class="highlighted">This paragraph is highlighted.</p>
<p class="dark highlighted">This paragraph is dark and highlighted.</p>
<p class="light highlighted">This one is light and highlighted.</p>
Notice that the same classes are used in multiple <p> tags, and a single <p> tag can have multiple classes.
Then you can define your style rules using a class selector, which is a . dot followed by a class name, followed by style rules inside { } curly brackets.
.dark {
	background-color: black;
	color: white;
}
Putting it all together, it looks like this:
<!DOCTYPE html>
<html>
  <head>
    <title>CSS Class Selectors</title>
    <style>
      .dark {
        background-color: black;
        color: white;
      }

      .light {
        background-color: white;
        color: black;
        font-style: italic;
      }

      .highlighted {
        border: thick dotted red;
      }
    </style>
  </head>
  <body>
    <p class="dark">This is a dark paragraph.</p>
    <p class="light">This is a light paragraph.</p>
    <p class="highlighted">This paragraph is highlighted.</p>
    <p class="dark highlighted">This paragraph is dark and highlighted.</p>
    <p class="light highlighted">This one is light and highlighted.</p>
  </body>
</html>
The style rules in the classes for each element are combined. For example, the <p class="dark highlighted"> element follows the rules from the dark class and the rules from the highlighted class. This is another form of cascading, where rules are combined.
See the Pen by Happy Coding (@KevinWorkman) on CodePen.
External Style Sheets
So far, all of the examples have used internal style sheets, which means that they defined the CSS rules inside a <style> tag inside the <head> section of the HTML file.
That’s handy for testing small examples. However, most of the time you’ll use external style sheets, which means your CSS style rules will go in their own file.
For example, you could create a file named styles.css and save these style rules into it:
.dark {
  background-color: black;
  color: white;
}

.light {
  background-color: white;
  color: black;
  font-style: italic;
}

.highlighted {
  border: thick dotted red;
}
Now that you have you styles.css file, you can point to it from your index.html file. To use an external style sheet, use the <link> tag, and set its href attribute to the URL or name of the CSS file.
<link rel="stylesheet" type="text/css" href="styles.css">
This goes into the <head> section of your HTML file, like this:
<!DOCTYPE html>
<html>
	<head>
		<title>External CSS</title>
		<link rel="stylesheet" type="text/css" href="styles.css">
	</head>
	<body>
		<p class="dark">This is a dark paragraph.</p>
		<p class="light">This is a light paragraph.</p>
		<p class="highlighted">This paragraph is highlighted.</p>
		<p class="dark highlighted">This paragraph is dark and highlighted.</p>
		<p class="light highlighted">This one is light and highlighted.</p>
	</body>
</html>
This lets you separate your HTML content from its style rules. This is especially handy if you want to apply the same styles across multiple pages!
Inline Styles
In addition to internal and external style rules, you can also use inline styles by setting the style attribute of a tag, and then putting your style rules in that attribute.
For example, this line would style a <p> tag with a red background, black text, and center alignment:
<p style="background-color:red; color:black; text-align:center">
  This paragraph has inline styles.
</p>
This approach might be okay for elements that you want to give a very specific style, but in general, inline styles are avoided because they make it harder to see your styles in one place.
Cascading
The cool (and confusing) thing about CSS is that it cascades, so multiple rules combine to style an element. In other words, you can mix and match all of the above.
For example, you can use an external style sheet for the styles that are on every page, then an internal <style> tag for styles specific to a particular page, and then inline styles on special case elements. All of those rules “trickle down” to style the content.
The selector logic also cascades. You can use element selectors to create style rules that apply to every element with a particular tag, then have some of those elements have classes, and then have some of those have an ID. The rules from all of the selectors will combine to style your content.
Here’s an example:
<!DOCTYPE html>
<html>
	<head>
		<title>Cascading CSS</title>
		<style>
      p {
        background-color: pink;
        color: black;
        text-align: center;
        font-size: 24px;
      }

      .highlighted {
        border: thick dotted blue;
      }

      #bottom {
        background-color: red;
      }
		</style>
	</head>
	<body>
		<p>This is a regular paragraph.</p>
    <p class="highlighted">This is a highlighted paragraph.</p>
    <p id="bottom" class="highlighted">This is the bottom paragraph.</p>
	</body>
</html>
This CSS styles every <p> tag by giving it a pink background, black text, and center alignment. Then it gives elements with the highlighted class a border. Finally, it gives the element with an id of bottom a red background.
See the Pen by Happy Coding (@KevinWorkman) on CodePen.
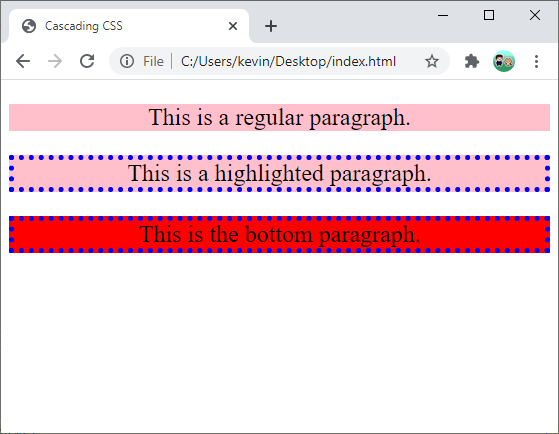
Notice that the background-color rule in the #bottom id selector overrides the background-color rule in the p element selector, because the id selector is more specific. This is an important rule to keep in mind: as style rules cascade, rules from more specific selectors take precedence. IDs are the most specific, then classes, and element selectors are the least specific. Similarly, inline styles are the most specific, then internal style sheets, and external style sheets are the least specific.
Understanding the specificity of CSS selectors and styles can be difficult, but if you’re ever confused, try creating a smaller example like above to test things out!
Learn More
Now that you’re more familiar with the fundamentals of CSS, check out these other resources to learn more:
- CSS Tutorial - W3Schools
- CSS: Cascading Style Sheets - MDN
- CSS - Wikipedia
- Old CSS, new CSS is a great description of the history of CSS, which helps put everything into context. (Warning: contains some swears.)
- Better Website shows an example of how just a few lines of CSS can improve the styling of a website. You don’t need a whole framework to make your page look nice! (Warning: contains lots of swears.)
Practice
- Use CSS to style the personal webpage you’ve been creating.
- Experiment with cascading by creating CSS with conflicting rules. For example, what happens if one class has
background-color:redand another class hasbackground-color:green, but an element is set to both classes? What about IDs? What about conflicts between external, internal, and inline styles?
