Simple Reference


Simple Reference
Now that you’ve learned about calling functions, the best thing you can do is practice by writing your own sketch that uses Processing’s functions to draw a few different scenes.
The Processing reference contains all of the functions you can call in Processing, but it also contains a bunch of more advanced stuff that can be confusing if you’re just starting out. This page is a simplified reference that contains all of the functions you need to practice calling functions to draw a scene.
This process of coming up with a goal (drawing a scene), breaking that goal down into smaller pieces (draw one small part of the scene at a time), and looking stuff up in the reference (this page) is honestly 95% of a “real” programmer’s job. So if you’re here, you’re a real programmer!
Window
size(width, height)
Sets the size of the window. If you call this function, it must be the first function you call.
size(200, 100);
size(200, 400);

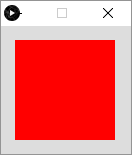
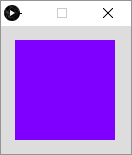
background(red, green, blue)
Sets the background color of the window.
The red, green, and blue values can be between 0 and 255. They can mix together to form other colors, such as red and blue mixing together to form violet. This doesn’t work exactly the same as it does with paint in real life. Play with this function to see how colors mix together.
background(255, 0, 0);
background(128, 0, 255);
Shapes
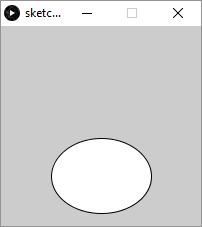
ellipse(x, y, width, height)
Draws an ellipse (oval). The x and y arguments are the center of the ellipse. If width and height are the same number, this function will draw a circle.
size(200, 200);
ellipse(100, 150, 100, 75);
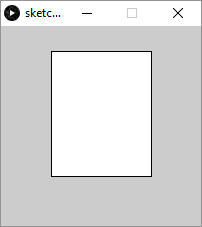
rect(x, y, width, height)
Draws a rectangle. The x and y arguments are the upper-left corner of the rectangle. If width and height are the same number, this function will draw a square.
size(200, 200);
rect(50, 25, 100, 125);
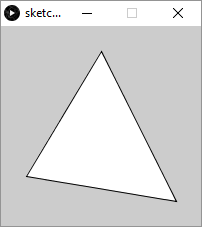
triangle(xOne, yOne, xTwo, yTwo, xThree, yThree)
Draws a triangle using the three x,y points.
size(200, 200);
triangle(100, 25, 175, 175, 25, 150);
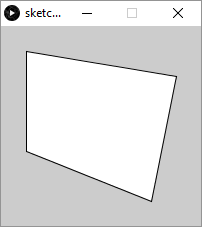
quad(xOne, yOne, xTwo, yTwo, xThree, yThree, xFour, yFour)
Draws a quadrilateral from the four x,y points. This function gives you more freedom than the rect() function.
size(200, 200);
quad(25, 25, 175, 50, 150, 175, 25, 125);
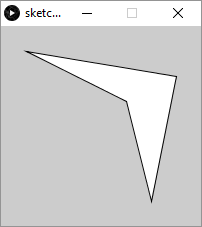
size(200, 200);
quad(25, 25, 175, 50, 150, 175, 125, 75);
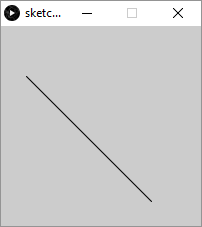
line(startX, startY, endX, endY)
Draws a line between the two x,y points.
size(200, 200);
line(25, 50, 150, 175);
Colors
stroke(red, green, blue)
Sets the color of the line drawn around the shapes.
size(200, 200);
stroke(255, 0, 0);
ellipse(100, 125, 150, 125);
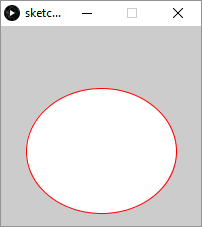
You can also call noStroke() to not draw a line around the shapes.
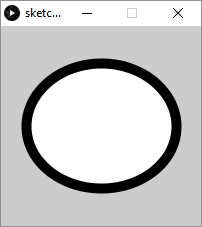
strokeWeight(weight)
Sets the width of the line drawn around the shapes.
size(200, 200);
strokeWeight(10);
ellipse(100, 100, 150, 125);
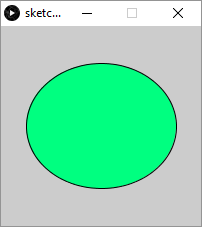
fill(red, green, blue)
Sets the inner color of the shapes.
size(200, 200);
fill(0, 255, 128);
ellipse(100, 100, 150, 125);
Calling Multiple Functions
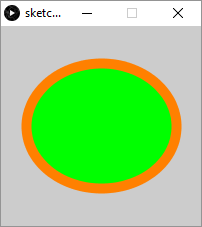
Note that most sketches will contain many function calls. You can call multiple functions to achieve different effects. For example:
size(200, 200);
strokeWeight(10);
stroke(255, 128, 0);
fill(0, 255, 0);
ellipse(100, 100, 150, 125);
To understand what this code does, read through it line by line. This sketch creates a 200x200 window, then sets the stroke weight to 10, and the stroke color to orange. It then sets the fill color to green, and finally it draws an ellipse. Because of the functions we called, the ellipse has a thick orange outline and a green inside.
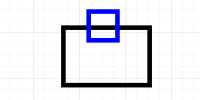
Similarly, we can draw multiple shapes on top of each other:
size(200, 200);
ellipse(75, 75, 125, 100);
rect(75, 75, 100, 100);
This code sets the window size, then draws an ellipse, then draws a rectangle.
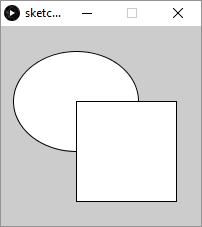
Notice that the rectangle is drawn on top of the ellipse. Think of this as painting an ellipse to a canvas and then painting a rectangle over top of it.
Math
In the examples above, we’ve passed numbers directly into the functions. But remember that a computer is basically just a big calculator, so you can also use math (more specifically, arithmetic operators) on those numbers to come up with a result number before passing it into a function. That sounds complicated, but it just means that this line:
ellipse(100, 200, 75, 25);
Could be rewritten like this:
ellipse(99 + 1, 500 - 300, 150 * 0.5, 50 / 2);
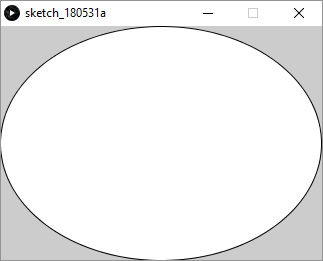
This can be especially useful for things like calculating the center of the window:
size(321, 234);
ellipse(321 / 2, 234 / 2, 321, 234);
This code sets the width of the window to 321 and the height of the window to 234. It then calculates 321 / 2 to find the x value that’s halfway between 0 and 321 - in other words, the x value that’s in the center of the window. Similarly, it calcultes 234 / 2 to find the y value that’s halfway between 0 and 234 - in other words, the y value that’s in the center of the window. By passing the result of these calculations into the ellipse() function, the code is drawing an ellipse in the center of the window:
Comments
Your code can also contain comments, which are statements the computer will ignore but can help you remember what your code is doing. Here’s an example:
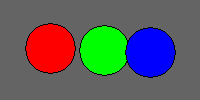
size(200, 100);

// draw a green circle on the left
fill(0, 255, 0);
ellipse(75, 50, 75, 75);

// draw a blue circle on the right
fill(0, 0, 255);
ellipse(125, 50, 75, 75);
The comments (and the spacing) make this code easier to read and understand.
