Blobstore (Java 8)


Blobstore (Java 8)
So far, we’ve learned how to use POST requests to allow users to submit data, and we’ve learned how to use Datastore to store that data.
Datastore is great for storing basic data like strings or numbers, but it does not support storing binary data, aka files. To store files, we can use another Google Cloud API called Blobstore.
Blobstore lets us store blobs (Binary Large OBjects), which is just a nerdy way to say “file”. For example, we can use Blobstore to allow users to upload images or videos.
File Uploads
To understand what Blobstore is doing for us, let’s think about how we’d implement file uploads without using Blobstore.
On the client side, we can use <input type="file"> to show a file selector. (You can play with an example here.) We can put this inside a <form> element, just like any other <input> element.
When the user submits the form, the request would trigger a servlet. The file would be sent to the servlet as a stream of data, which we would have to parse. This Stack Overflow answer summarizes what we’d have to do just to parse the data.
After we parsed the data, we’d have to store the file somewhere. We can’t store the file directly on our server because we’d clutter up our hosting server (and App Engine disallows it anyway), so we’d have to store the file data in something like a database. So we’d have to write code that store our parsed file data in some storage format.
After we stored the data, we’d need a way to access it from the client. For example, if the file was an image, we’d need a way to access it via a URL that we could use in an <img> tag. This would involve creating a new servlet, mapping URLs to it, understanding which image the URL was requesting, and responding to the request with the file data we fetched from the database.
If this sounds like a lot of work, that’s because it is. Luckily, Blobstore handles almost all of this for us. We submit the form to Blobstore, and Blobstore takes care of parsing, storing, and hosting the file. It then forwards the request to our servlet, and it gives us a handy URL that we can use to access the uploaded file. We can then store that URL in Datastore without worrying about the underlying file hosting.
Requests
The Blobstore API works by adding an extra step in a request. Think about what happens when a user submits a normal form, without using Blobstore:
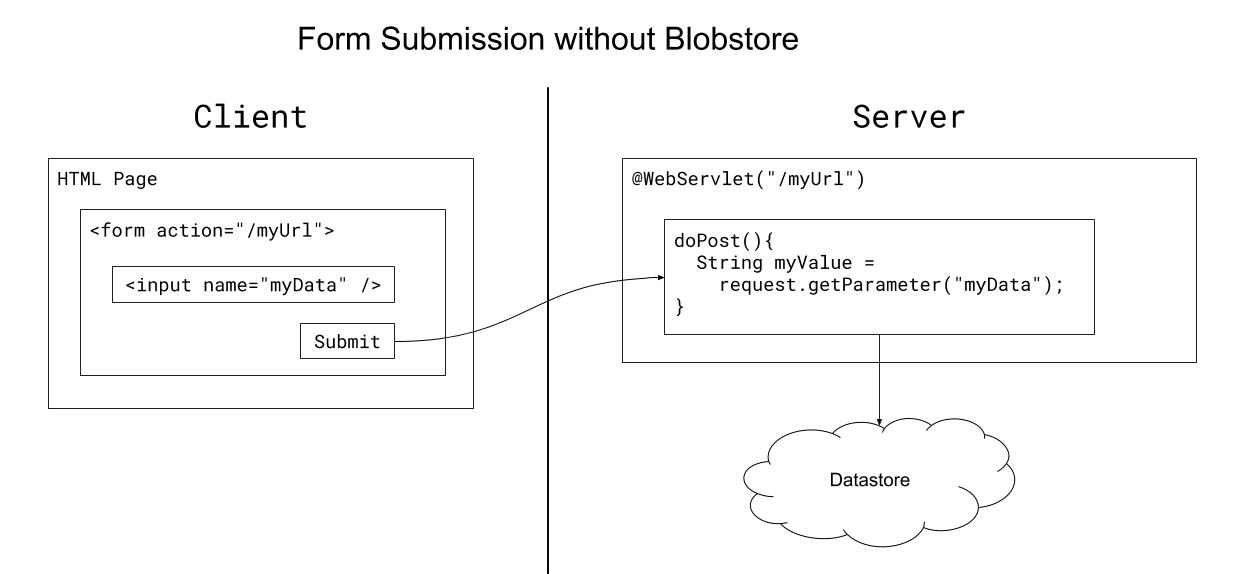
Normally, the action of the form is a URL that maps to a servlet on the server. When the user submits the form, the servlet can get the values entered by the user through the request.getParameter() function, and can then store those values in Datastore.
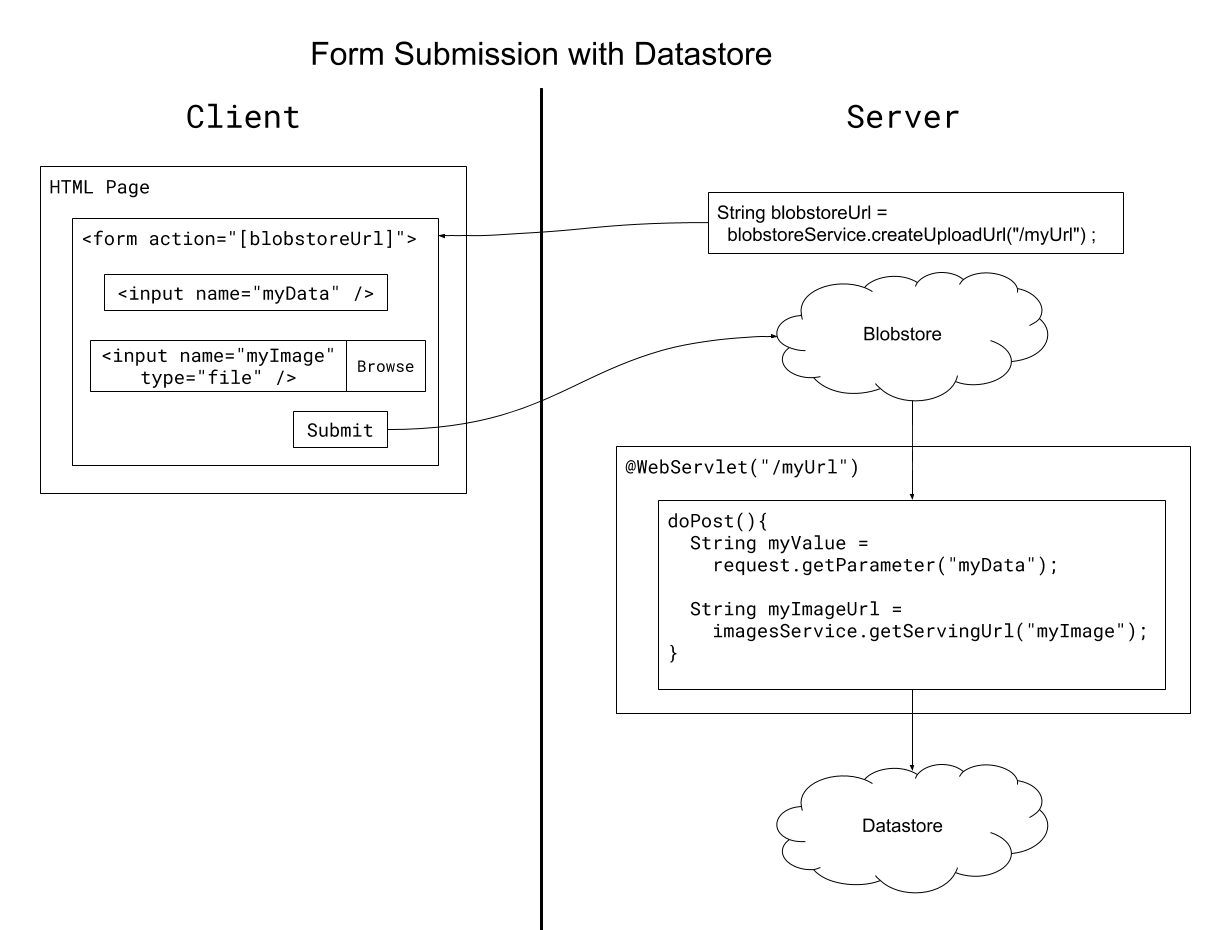
But when you use Blobstore, the action of the form is a URL that points to Blobstore. When the user submits the form, the request first goes to Blobstore. Blobstore takes care of handling the file uploaded by the user, and then forwards the request to your servlet. Your servlet can then get the data entered by the user, including the URL of the file that Blobstore handled.
This extra step is pretty confusing, but saves us all the work of parsing, storing, and hosting the file.
Example
You can download the full code for this example here.
HomeServlet
@WebServlet("/home")
public class HomeServlet extends HttpServlet {

  /**
   * Returns HTML that contains a form. The form submits to Blobstore,
   * which redirects to our /my-form-handler, which is handled by FormHandlerServlet.
   */
  @Override
  public void doGet(HttpServletRequest request, HttpServletResponse response) throws IOException {

    // Get the Blobstore URL
    BlobstoreService blobstoreService = BlobstoreServiceFactory.getBlobstoreService();
    String uploadUrl = blobstoreService.createUploadUrl("/my-form-handler") ;

    response.setContentType("text/html");

    // This demonstrates creating a form that uses the Blobstore URL.
    // This is not how you'd do this in a real codebase!
    // See the hello-world-jsp or hello-world-fetch examples for more info.
    ServletOutputStream out = response.getOutputStream();
    out.println("<form method=\"POST\" enctype=\"multipart/form-data\" action=\"" + uploadUrl + "\">");

    out.println("<p>Type some text:</p>");
    out.println("<textarea name=\"message\"></textarea>");
    out.println("<br/>");

    out.println("<p>Upload an image:</p>");
    out.println("<input type=\"file\" name=\"image\">");
    out.println("<br/><br/>");

    out.println("<button>Submit</button>");
    out.println("</form>");
  }
}
The HomeServlet class defines a doGet() function, which is triggered when users navigate to the /home URL. Generally you probably don’t want to build HTML this way because it’s annoying to work with, but we’re doing this to demonstrate the overall approach. We’ll see more realistic examples in a second.
The doGet() function uses BlobstoreService to get a URL that points to Blobstore. Its value is something like this: http://localhost:8080/_ah/upload/ag9ZT1VSCgCAw (try printing it out yourself to see).
Then it uses that URL to create a form, which contains a text area, file selector, and submit button.
If you send a POST request to that URL (for example by using it as a form’s action attribute), your data is first sent to Blobstore. Blobstore will process any files included in the request, and then it will add information about the uploaded files to the request, and forward the request on to whatever URL you passed into the createUploadUrl() function (in our example above, that’s /my-form-handler).
In other words, the request is forwarded to our FormHandlerServlet class.
FormHandlerServlet
@WebServlet("/my-form-handler")
public class FormHandlerServlet extends HttpServlet {

  @Override
  public void doPost(HttpServletRequest request, HttpServletResponse response) throws IOException {

    // Get the message entered by the user.
    String message = request.getParameter("message");

    // Get the URL of the image that the user uploaded to Blobstore.
    String imageUrl = getUploadedFileUrl(request, "image");

    // Output some HTML that shows the data the user entered.
    // A real codebase would probably store these in Datastore.
    ServletOutputStream out = response.getOutputStream();
    out.println("<p>Here's the image you uploaded:</p>");
    out.println("<a href=\"" + imageUrl + "\">");
    out.println("<img src=\"" + imageUrl + "\" />");
    out.println("</a>");
    out.println("<p>Here's the text you entered:</p>");
    out.println(message);
  }

  /**
   * Returns a URL that points to the uploaded file, or null if the user didn't upload a file.
   */
  private String getUploadedFileUrl(HttpServletRequest request, String formInputElementName){
    BlobstoreService blobstoreService = BlobstoreServiceFactory.getBlobstoreService();
    Map<String, List<BlobKey>> blobs = blobstoreService.getUploads(request);
    List<BlobKey> blobKeys = blobs.get("image");

    // User submitted form without selecting a file, so we can't get a URL. (devserver)
    if(blobKeys == null || blobKeys.isEmpty()) {
      return null;
    }

    // Our form only contains a single file input, so get the first index.
    BlobKey blobKey = blobKeys.get(0);

    // User submitted form without selecting a file, so we can't get a URL. (live server)
    BlobInfo blobInfo = new BlobInfoFactory().loadBlobInfo(blobKey);
    if (blobInfo.getSize() == 0) {
      blobstoreService.delete(blobKey);
      return null;
    }

    // We could check the validity of the file here, e.g. to make sure it's an image file
    // https://stackoverflow.com/q/10779564/873165

    // Use ImagesService to get a URL that points to the uploaded file.
    ImagesService imagesService = ImagesServiceFactory.getImagesService();
    ServingUrlOptions options = ServingUrlOptions.Builder.withBlobKey(blobKey);
    return imagesService.getServingUrl(options);
  }
}
The FormHandlerServlet class has a doPost() function that’s triggered when Blobstore forwards the request to the /my-form-handler URL. The doPost() function gets the value entered in the text area, and it then gets the URL for the uploaded image. The getUploadedFileUrl() function might seem intimidating, but most of that is checking for corner cases. The core of the logic for getting the image URL is in the last 3 lines of code.
We can then use that URL to create an <img> element. In a real project, we’d probably do something like store the image URL in Datastore so we could later retrieve it.
Try running this example and printing out the values for uploadUrl and imageUrl to get an idea of how Blobstore works. Try visiting imageUrl directly in your browser to see how the image hosting works.
Getting the Blobstore Upload URL
Now we know how to use Blobstore to allow users to upload an image:
- Call
blobstoreService.createUploadUrl()to get the Blobstore upload URL. - Use that URL as the
actionattribute of a<form>element that contains a file selector input. - Create a servlet that handles the
POSTrequest after Blobstore processes the upload. - Call
imagesService.getServingUrl()to get the URL of the uploaded image. - Store the image URL in Datastore, or use it to output an
<img>element.
Let’s think a little harder about step 2. We have HTML and JavaScript that runs on the client, but we need to get a URL from blobstoreService.createUploadUrl() which can only run on the server. How do we get that value from the server into the <form> element in our client-side HTML?
In our above example, we handled step 2 by using a servlet to output the HTML of a page. This is a hack that allowed us to output the upload URL directly in the HTML, but this is not how you’d do it in a real codebase! Having all of your HTML inside String values in Java code is really annoying to work with and prone to bugs.
Here are two approaches you might take instead.
Fetch
(View the full code for this example here.)
If we have client-side HTML, we can use the JavaScript fetch() function to make a GET request to our server. At a high level, our approach would work like this:
- Create a servlet that maps to
/blobstore-upload-url. - Inside the
doGet()function for that servlet, call theblobstoreService.createUploadUrl()function, and return that result as the response to the request. - On the client side, use the
fetch()function to make aGETrequest to/blobstore-upload-url. - The response to our request will be the Blobstore upload URL, which we can then use to set the
actionof our form.
Here’s what the servlet part of that would look like:
BlobstoreUploadUrlServlet
@WebServlet("/blobstore-upload-url")
public class BlobstoreUploadUrlServlet extends HttpServlet {

  @Override
  public void doGet(HttpServletRequest request, HttpServletResponse response) throws IOException {
    BlobstoreService blobstoreService = BlobstoreServiceFactory.getBlobstoreService();
    String uploadUrl = blobstoreService.createUploadUrl("/my-form-handler") ;

    response.setContentType("text/html");
    response.getOutputStream().println(uploadUrl);
  }
}
When a client makes a request to /blobstore-upload-url, this servlet’s doGet() function is triggered. The doGet() function calls the blobstoreService.createUploadUrl() function to get Blobstore’s upload URL, and it outputs this URL as the response.
We’re going to use this with the fetch() function in a second, but just to get an idea of what’s going on, try running a devserver and navigating to localhost:8080/blobstore-upload-url in your browser. You should see something like this:
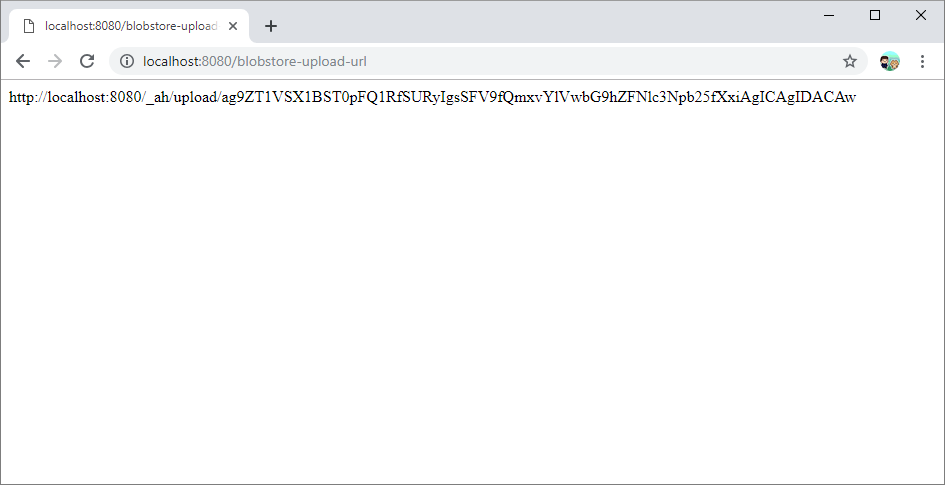
In this screenshow, we’ve visited localhost:8080/blobstore-upload-url, and the entire page is just another URL. This URL is the Blobstore upload URL. (You can try to go to the Blobstore URL, but you’ll get an error because that URL is only meant for POST requests).
This might not seem very useful, but now we can use the fetch() function in JavaScript to get the Blobstore upload URL on the client side.
index.html
<!DOCTYPE html>
<html>
  <head>
    <meta charset="UTF-8">
    <title>Blobstore Fetch Example</title>
    <script>
      function fetchBlobstoreUrlAndShowForm() {
        fetch('/blobstore-upload-url')
          .then((response) => {
            return response.text();
          })
          .then((imageUploadUrl) => {
            const messageForm = document.getElementById('my-form');
            messageForm.action = imageUploadUrl;
            messageForm.classList.remove('hidden');
          });
      }
    </script>
    <style>
      /* Form is hidden by default. */
      .hidden {
        display: none;
      }
    </style>
  </head>
  <body onload="fetchBlobstoreUrlAndShowForm()">
    <h1>Blobstore Fetch Example</h1>
    <p>Type a message and click submit:</p>

    <form id="my-form" class="hidden" method="POST" enctype="multipart/form-data">
      <p>Type some text:</p>
      <textarea name="message"></textarea>
      <br/>
      <p>Upload an image:</p>
      <input type="file" name="image">
      <br/><br/>
      <button>Submit</button>
    </form>
  </body>
</html>
Let’s start by looking at the HTML, specifically the <form> element:
<form id="my-form" class="hidden" method="POST" enctype="multipart/form-data">
  <p>Type some text:</p>
  <textarea name="message"></textarea>
  <br/>
  <p>Upload an image:</p>
  <input type="file" name="image">
  <br/><br/>
  <button>Submit</button>
</form>
The <form> element has an ID that lets us access it from JavaScript, and a class that lets us hide it using CSS. We set its method and enctype like you might expect, but we do not set its action! The action needs to be the Blobstore upload URL, which we need to fetch from the server.
We do that in this JavaScript function:
function fetchBlobstoreUrlAndShowForm() {
  fetch('/blobstore-upload-url')
    .then((response) => {
      return response.text();
    })
    .then((imageUploadUrl) => {
      const messageForm = document.getElementById('my-form');
      messageForm.action = imageUploadUrl;
      messageForm.classList.remove('hidden');
    });
}
This function uses the fetch() function to make a request to the /blobstore-upload-url. This request is routed to our BlobstoreUploadUrlServlet, which responds with the Blobstore upload URL. Back in our JavaScript, we process that response, set the action of the form, and then show the form.
We hide the form by default because it takes a couple seconds to fetch the Blobstore URL, and we don’t want users to submit the form until after we set its action attribute. There are other approaches you might take, such as showing a “Loading…” message, or making the submit button unclickable until we get the Blobstore URL, etc.
JSP
(View the full code for this example here.)
Another approach we could take is to server-side render the form using JSP, that way we could directly embed the URL in the form.
index.jsp
<%@ page import="com.google.appengine.api.blobstore.BlobstoreService" %>
<%@ page import="com.google.appengine.api.blobstore.BlobstoreServiceFactory" %>
<% BlobstoreService blobstoreService = BlobstoreServiceFactory.getBlobstoreService();
   String uploadUrl = blobstoreService.createUploadUrl("/my-form-handler"); %>

<!DOCTYPE html>
<html>
  <head>
    <meta charset="UTF-8">
    <title>Blobstore JSP Example</title>
  </head>
  <body>
    <h1>Blobstore JSP Example</h1>
    <p>Type a message and click submit:</p>

    <form method="POST" enctype="multipart/form-data" action="<%= uploadUrl %>">
      <p>Type some text:</p>
      <textarea name="message"></textarea>
      <br/>
      <p>Upload an image:</p>
      <input type="file" name="image">
      <br/><br/>
      <button>Submit</button>
    </form>
  </body>
</html>
This JSP file runs on the server. The Java code at the top calls the blobstoreService.createUploadUrl() function, which it then embeds directly in the action attribute of the <form> element.
Then the HTML content, including the action attribute of the <form> element, is sent to the client as the response. The client treats this just like it would any other HTML content (because that’s what it is), but we don’t have to fetch the Blobstore upload URL, because it’s already included.
You can learn more about JSP here.
Summary
Now we can use Blobstore to allow users to upload files. This is handy for image uploads, but can also be used for other types of files. To summarize the process, here’s what we have to do:
- Call the
blobstore.getUploadUrl()to get the Blobstore upload URL. Pass in the URL of a servlet that should handle the upload after Blobstore processes it. - Create a
<form>element and set itsactionattribute to the Blobstore upload URL, either by fetching it or by server-side rendering it. Also, don’t forget to setenctype="multipart/form-data"on your form. - Create a servlet that handles the upload after Blobstore processes it.
- In that servlet’s
doPost()function, call theimagesService.getServingUrl()function to get the URL of the uploaded image, and then store that image URL in Datastore.
