App Engine


App Engine
- Hello World
- Server Entry Point
- Servlets
- Static Content
- app.yaml
- pom.xml
- Multiple Instances
- Automatic Shutdown
- Logs
- Other Approaches
- Summary
- Learn More
- Homework
App Engine is a Google Cloud framework for launching and running your code on Google servers so anyone can access it using a public URL.
At this point you’ve deployed the “hello world” project from the Google Cloud Setup tutorial, using the mvn package exec:java and mvn package appengine:deploy commands.
Those commands deploy to App Engine, either locally or to your live server. This tutorial talks about App Engine in more detail.
Hello World
If you haven’t already, you can download a barebones example webapp.
This project is an app-engine-hello-world directory with subdirectories that contain 5 files::
app-engine-hello-world/pom.xmlis a Maven POM file that defines the project.src/main/is a directory that contains the code.appengine/app.yamlis a config file that sets up App Engine. The hello world project only uses a single property that sets the runtime to Java 11.java/is a directory that contains server-side code.io.happycoding.ServerMain.javais the main class that sets up the server.io.happycoding.servlets.HelloWorldServlet.javais a Java servlet that returns some HTML content.
webapp/is a directory that contains web files.index.htmlis an HTML file that shows static content.
Navigate to the app-enging-hello-world directory in a command line, and then execute this command:
mvn package exec:java
When the command completes and you’ll see this in your command line:
Server started!
Next, visit this URL in a web browser:
(If you’re using Google Cloud Shell, use the web preview button. Anywhere you see localhost in these tutorials, use the web preview button instead.)
This URL points to the local server that you just ran. When you navigate to that URL, you should see this:
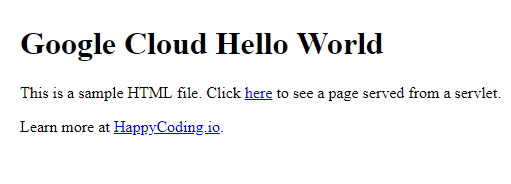
This is the HTML content of the index.html file in our project.
Navigate to localhost:8080/hello to view the content that’s served by the HelloWorldServlet class.
The rest of this tutorial explains this example in more detail.
Server Entry Point
App Engine can run any Java program, starting from a main method. This program doesn’t have to be a server; for example you could use App Engine to run a program that processes a lot of data, without needing to slow down your own computer. The example runs a server, and most likely that’s what you’re here to do, but it’s not the only thing you can do.
Anyway, in the example, the main method is in the ServerMain class.
package io.happycoding;

import java.net.URL;
import org.eclipse.jetty.annotations.AnnotationConfiguration;
import org.eclipse.jetty.server.Handler;
import org.eclipse.jetty.server.handler.DefaultHandler;
import org.eclipse.jetty.server.Server;
import org.eclipse.jetty.servlet.DefaultServlet;
import org.eclipse.jetty.webapp.Configuration;
import org.eclipse.jetty.webapp.WebAppContext;
import org.eclipse.jetty.webapp.WebInfConfiguration;

/**
 * Starts up the server, including a DefaultServlet that handles static files,
 * and any servlet classes annotated with the @WebServlet annotation.
 */
public class ServerMain {

  public static void main(String[] args) throws Exception {

    // Create a server that listens on port 8080.
    Server server = new Server(8080);
    WebAppContext webAppContext = new WebAppContext();
    server.setHandler(webAppContext);

    // Load static content from inside the jar file.
    URL webAppDir =
        ServerMain.class.getClassLoader().getResource("META-INF/resources");
    webAppContext.setResourceBase(webAppDir.toURI().toString());

    // Enable annotations so the server sees classes annotated with @WebServlet.
    webAppContext.setConfigurations(new Configuration[]{
      new AnnotationConfiguration(),
      new WebInfConfiguration(),
    });

    // Look for annotations in the classes directory (dev server) and in the
    // jar file (live server)
    webAppContext.setAttribute(
        "org.eclipse.jetty.server.webapp.ContainerIncludeJarPattern",
        ".*/target/classes/|.*\\.jar");

    // Handle static resources, e.g. html files.
    webAppContext.addServlet(DefaultServlet.class, "/");

    // Start the server! 🚀
    server.start();
    System.out.println("Server started!");

    // Keep the main thread alive while the server is running.
    server.join();
  }
}
This code uses Jetty to create a server. It loads static resources from inside the jar file, and looks for servlet classes with the @WebServlet annotation.
This main method runs a server, which is a program that serves content when users request a particular URL. When you run locally, your computer acts as the server. When you deploy to App Engine, a computer inside Google’s infrastructure acts as the server.
(If you’re using Google Cloud shell, then running a “local” server really runs a live server that only you can access.)
Servlets
Servers support many programming languages and types of code. The examples in these tutorials use the Java servlet API which is a framework based on Java classes that handle server requests.
If you’re new to servlets, you should read through the Java servlets tutorial before continuing. At the very least, make sure you understand that when a user makes a request to the /hello URL, that request is routed to the HelloWorldServlet class, which returns a response.
Static Content
You can also serve static content from your App Engine server. The hello world project contains one index.html file. Other static content might include JavaScript, CSS, or image files.
app.yaml
The app.yaml file contains configuration data required by App Engine.
This example only contains a single property that sets the runtime to Java 11. See Google Cloud docs for more properties you can use.
pom.xml
The pom.xml is a Maven POM file that defines the project and ties everything together.
The example project uses four Maven plugins to package and run the server.
- The Resources Plugin (
maven-resources-plugin) makes sure that static content like HTML files are included in the output jar file. This lets theServerMainclass load this content.
// Load static content from inside the jar file.
URL webAppDir =
    ServerMain.class.getClassLoader().getResource("META-INF/resources");
webAppContext.setResourceBase(webAppDir.toURI().toString());
- The Shade Plugin (
maven-shade-plugin) packages everything into a single executable jar file, which makes it easier to run the server. - The Exec Plugin (
exec-maven-plugin) runs a local server by executing themainmethod in theServerMainclass. - The App Engine Plugin (
appengine-maven-plugin) handles deploying to the live server by uploading the executable jar file to App Engine.
Multiple Instances
By default, App Engine will automatically scale based on how many requests it’s receiving.
In other words, if only a few people are using your webapp, all of your requests are probably served from a single instance of your project. But if you suddenly get a spike of traffic, App Engine will create more instances to deal with the extra traffic automatically.
This means you don’t have to worry about your code crashing if you get a surge of new users, but it also means you have to be careful about how you handle data.
Consider this example servlet:
@WebServlet("/increment")
public class CountingServlet extends HttpServlet {

  int count = 0;

  @Override
  public void doGet(HttpServletRequest request, HttpServletResponse response) throws IOException {
    count++;

    response.setContentType("text/html;");
    response.getOutputStream().println("<h1>Count: " + count + "</h1>");
  }
}
This servlet maintains a count variable. Whenever a user visits the /increment URL, it increments the count variable and then responds with some HTML that displays the current count.
If you run this locally, it’ll work fine.
But if you deploy this to your live server, and many users flock to your site, then App Engine will spawn a new instance of your project to handle the incoming requests. This new instance will have its own count variable, which will start over at 0. Depending on which instance your users are routed to, they’ll see different data. I’ve personally been caught by this myself, so watch out for it!
The solution to this problem is to not rely on in-memory data like this, and to use a service like Datastore instead.
You can read more about App Engine scaling on Google Cloud docs.
Automatic Shutdown
Similar to how App Engine creates new instances if your project receives a lot of traffic, it will also shutdown instances if your project receives no traffic.
By default, App Engine will shutdown your project after 15 minutes of inactivity. Don’t worry, when it receives a new request, it’ll automatically run a new instance!
You generally don’t have to worry about this, but if you notice that your live site takes a few seconds to refresh when you come back to it, that’s probably because it’s spinning back up after being shutdown due to inactivity.
You can read more about this on Google CLoud docs.
Logs
When you’re running locally, your logs and print statements will output to your command line.
For you live server, your logs and print statements are available in the Logging tab at console.cloud.google.com (direct link to logs). You should see something like this:
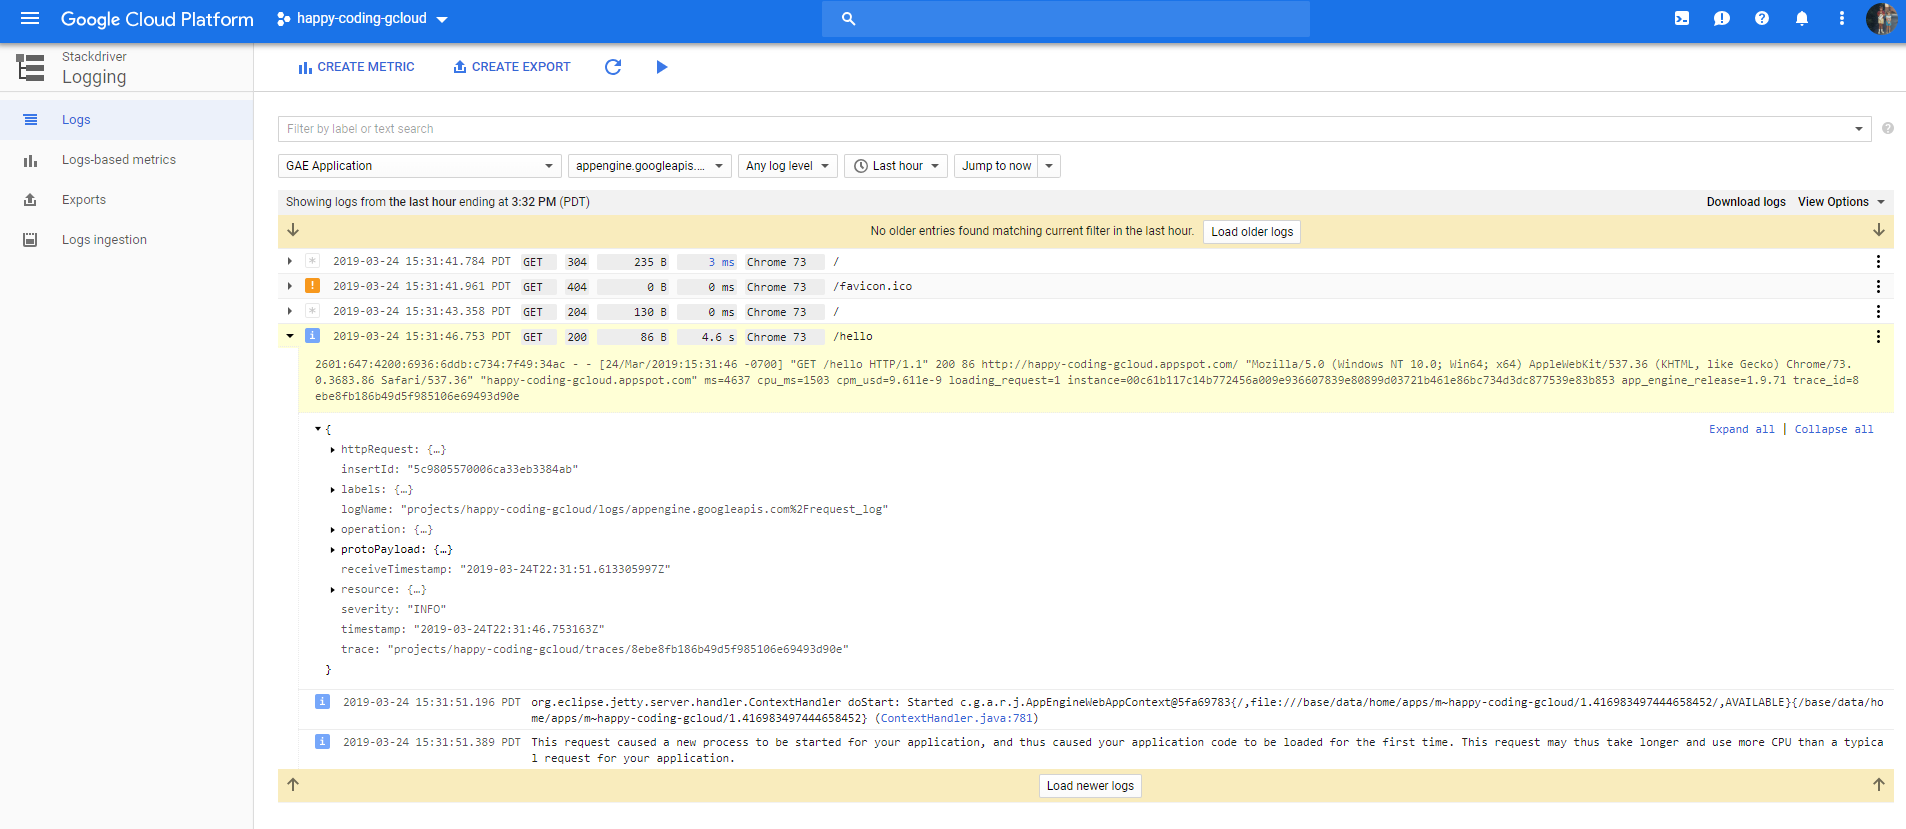
The logs in this screenshot list each request made to my server: one to /, one to /favicon.ico, another to /, and one to /hello.
You can click on any of the requests to view the logs for it. In the screenshot, I’ve expanded the /hello request, which shows more information about that request. This is where stack traces, logs, and print statements show up.
To debug a request that’s behaving differently from what you expected, you’ll generally go to this logging page, find the request you’re trying to debug, and then expand it to see its output.
This can be a little confusing, so I’d recommend playing around with this a bit. Try adding a print statement to your servlet and finding it in the logging page. If you wait until you’re trying to debug a user problem to learn how the logs work, you’re going to have a bad time, so take some time to learn it now!
Other Approaches
I wrote this example with the goal of making it easy to deploy a server without worrying about any complicated frameworks or dealing with static resources or dependencies, but there are many ways to approach this.
For example, you might use a framework like Spring Boot or Vaadin, or you might separate the main class into its own project and package your server code into a war file. See Framework Compatability page and AppEngine examples for more information.
There is no single correct way to deploy a server to App Engine, so you’ll likely encounter other approaches. If you see discrepancies between my examples and other examples you find on the internet (stuff like using a web.xml file instead of annotations or using a framework instead of Jetty and servlets), that’s okay!
I like Jetty and servlets because they allow me to focus on the fundamentals, but I recommend trying to figure out what makes the most sense to you and your project.
Summary
App Engine can run any Java program, and the hello world example uses Jetty to create a server. The pom.xml file packages all of the static content and dependencies into a single executable jar file. That jar file can be run either locally or uploaded to App Engine to run a live server.
Learn More
- Embedding Jetty - official Jetty documentation
- App Engine Java 11 examples - official examples showing various “hello world” approaches
Homework
- Try out a few different hello world examples and see which one makes the most sense to you.
- Add some JavaScript and CSS to the
index.htmlfile. - Add some Java code to the
HelloWorldServletclass. Try printing out the current date, or some server stats like the startup time and memory usage. - Share your live URL on the Happy Coding forum!
