Cloud Storage


Cloud Storage
- Buckets and Objects
- Authentication
- Example
- Maven Dependcy
- HTML Form
- Uploading
- Uploaded URL
- Unique Names
- Cloud Storage Browser
- Local vs Live
- Associating User Data
- Learn More
Now you know how to use POST requests to let users submit data, and you know how to use Datastore to store that data.
Datastore is good for storing primitive data like strings or numbers, but it cannot store large files. If you want to store files, for example if you want to let users upload images or files, then you can use another Google Cloud API called Cloud Storage.
Buckets and Objects
Cloud Storage is organized into buckets, which are similar to directories, and objects, which are similar to files.
Default Bucket
Go to the Cloud Storage browser to see the list of buckets in your Cloud project.
You should see a bucket with a name like YOUR_PROJECT_ID.appspot.com. This is the default bucket that was automatically created when you created your App Engine app. This bucket provides 5 GB of storage for free, so it’s good for development and testing.
You can create new buckets if / when you need them, but for now, use your default bucket.
Permissions
By default, a Cloud Storage bucket can only be accessed by people you’ve given permission to- which right now is nobody.
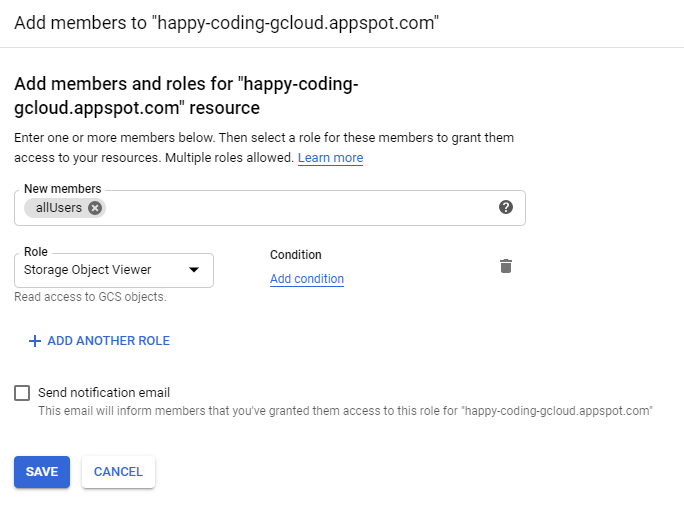
This project uses your bucket to host files that anybody can download. Before that can work, you need to open up permissions on your bucket.
- In the Cloud Storage browser, click your default bucket.
- Click the Permissions tab.
- Click the Add button.
- In the New members text field, type allUsers.
- In the Role dropdown, select Cloud Storage > Storage Object Viewer
- Click Save.
- In the dialog that pops up, click Allow Public Access.
Now, anybody with the URL of an object in your bucket can view it.
Authentication
Anybody can view the objects in your bucket, but only you can upload new files to it. For your code to run, you need to tell the Cloud Storage library who you are.
Follow these steps to created a JSON credentials file and set your GOOGLE_APPLICATION_CREDENTIALS environment variable.
Example
You can download an example project from DownGit.
The rest of this tutorial walks through this project.
Maven Dependcy
The Cloud Storage Java library is included in this Maven dependency:
<dependency>
  <groupId>com.google.cloud</groupId>
  <artifactId>google-cloud-storage</artifactId>
  <version>1.113.0</version>
</dependency>
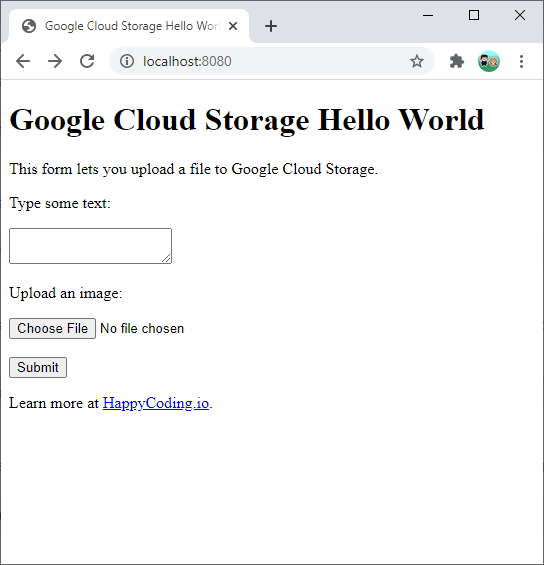
HTML Form
The index.html file uses the <form> tag to let the user enter a message and select a file:
<form method="POST" enctype="multipart/form-data" action="/upload">

  <p>Type some text:</p>
  <textarea name="message"></textarea>
  <br/>

  <p>Upload an image:</p>
  <input type="file" name="image">
  <br/><br/>

  <button>Submit</button>
</form>
Don’t forget the enctype="multipart/form-data" attribute, which is required for file uploads.
Uploading
In the servlet that handles the /upload URL (which the above form submits to), you can get the file chosen by the user:
Part filePart = request.getPart("image");
String fileName = filePart.getSubmittedFileName();
InputStream fileInputStream = filePart.getInputStream();
Then you can upload this file to Cloud Storage using this code:
String projectId = "YOUR_PROJECT_ID");
String bucketName = "YOUR_BUCKET_NAME";
Storage storage =
    StorageOptions.newBuilder().setProjectId(projectId).build().getService();
BlobId blobId = BlobId.of(bucketName, fileName);
BlobInfo blobInfo = BlobInfo.newBuilder(blobId).build();
Blob blob = storage.create(blobInfo, fileInputStream);
Uploaded URL
The Blob class contains information about the uploaded file, and its getMediaLink() function returns its URL. You can use this URL in HTML to display an image or a download link:
String uploadedFileUrl = blob.getMediaLink();

response.getWriter().println("<img src=\"" + uploadedFileUrl + "\"  />");
Putting it all together, it looks like this:
package io.happycoding.servlets;

import com.google.cloud.storage.Blob;
import com.google.cloud.storage.BlobId;
import com.google.cloud.storage.BlobInfo;
import com.google.cloud.storage.Storage;
import com.google.cloud.storage.StorageOptions;
import java.io.IOException;
import java.io.InputStream;
import javax.servlet.ServletException;
import javax.servlet.annotation.MultipartConfig;
import javax.servlet.annotation.WebServlet;
import javax.servlet.http.HttpServlet;
import javax.servlet.http.HttpServletRequest;
import javax.servlet.http.HttpServletResponse;
import javax.servlet.http.Part;

@MultipartConfig
@WebServlet("/upload")
public class UploadServlet extends HttpServlet {

  @Override
  public void doPost(HttpServletRequest request, HttpServletResponse response)
      throws ServletException, IOException {

    // Submissions can contain other types of data
    String message = request.getParameter("message");

    // Get the file chosen by the user
    Part filePart = request.getPart("image");
    String fileName = filePart.getSubmittedFileName();
    InputStream fileInputStream = filePart.getInputStream();

    // Upload the file and get its URL
    String uploadedFileUrl = uploadToCloudStorage(fileName, fileInputStream);

    // Use the URL to output some HTML
    response.setContentType("text/html;");
    response.getWriter().println("<p>Your message: " + message + "</p>");
    response.getWriter().println("<p>Your image:</p>");
    response.getWriter().println("<img src=\"" + uploadedFileUrl + "\"  />");
  }

  /** Uploads a file to Cloud Storage and returns the uploaded file's URL. */
  private static String uploadToCloudStorage(String fileName, InputStream fileInputStream) {
    String projectId = "happy-coding-gcloud");
    String bucketName = "happy-coding-gcloud.appspot.com";
    Storage storage =
        StorageOptions.newBuilder().setProjectId(projectId).build().getService();
    BlobId blobId = BlobId.of(bucketName, fileName);
    BlobInfo blobInfo = BlobInfo.newBuilder(blobId).build();
    Blob blob = storage.create(blobInfo, fileInputStream);
    return blob.getMediaLink();
  }
}
Don’t forget the @MultipartConfig annotation, which is required to handle file uploads.

Unique Names
The above example uses the original file name as the uploaded file name. But you might run into problems if users upload multiple files with the same name. If Ada uploads a file named cat.png, and then Grace uploads a different file named cat.png, Grace’s file will overwrite Ada’s file.
To fix this, you need to give each file a unique name. There are a few ways to do that:
- Add the current time to the name:
String fileName = filePart.getSubmittedFileName() + System.currentTimeMillis(); - Use the UUID class to generate a unique ID:
String fileName = UUID.randomUUID().toString(); - Come up with your own system for generating unique IDs:
String fileName = getNextFileName();(You might do this by storing previous IDs in Datastore.)
Another option is to use object versioning, but that’s likely overkill for most purposes. If your uploaded files have unique names, then you don’t have to worry about it.
Cloud Storage Browser
The Cloud Storage browser lets you view the files in your Cloud Storage buckets, as well as upload new files and delete old ones.
This comes in handy for debugging, and for managing your data.
Local vs Live
You might remember that Datastore has a local version that’s used for development, which lets you test without worrying about changing the data that’s stored on your live server.
Unlike Datastore, Cloud Storage does not have a local version, so any files you upload from your local dev server will be uploaded to the same place that your live server reads from.
This is likely not a big deal, especially if you implement unique file names as mentioned above. But if you are concerned, you can use a different bucket for development.
Associating User Data
Now you know how to upload files to Cloud Storage and get the URL of those uploaded files. You also most likely want to associate each uploaded file with some user data.
For example, you might want to show all of the photos uploaded by a particular user, or you might want to show the photos uploaded as part of a post.
At a high level, you store data in Datastore, and files in Cloud Storage. So you’d store the file in Cloud Storage, and then store the URL of that file in Datastore.
To associate a file with a particular user or other piece of data like a blog post, you’d include the URL of the file in Datastore. So your Datastore database might look something like this:
| User | PostId | PostText | ImageUrl |
|---|---|---|---|
| Stanley | post-1 | Once upon a time… | https://… |
| Ada | post-2 | A long time ago… | https://… |
| Ada | post-3 | In the distant future… | https://… |
Then to show images uploaded by Ada, you’d look up all of the entities with their user ID and then show their images. To show the image uploaded as part of a particular post, you’d look up the entity with that post ID and then show its image.
Learn More
- Using Cloud Storage
- Key terms
- Cloud Storage Client Libraries
- Seeing up authentication
- Listing buckets
- Uploading objects
- What does enctype=’multipart/form-data’ mean?
- Object Versioning
- Cloud Storage Browser
- Cloud Storage Javadoc
