OAuth 2.0


OAuth 2.0
- OAuth 2.0
- OAuth 2.0 Client ID
- Environment Variables
- Example
- Maven Dependencies
- Google OAuth Client Library
- GoogleAuthorizationCodeFlow
AbstractAuthorizationCodeServletAbstractAuthorizationCodeCallbackServlet- Is the user logged in?
- Logging Out
- User Info
- User IDs
- Other Approaches
- Learn More
So far, you’ve used App Engine to deploy servlets that respond to GET and POST requests, and you’ve used Datastore to store data.
That’s enough if you only want to store anonymous data, but if you want to associate data with a specific user then you need to implement authentication. In other words, you need a way for users to login.
There are many ways to implement authentication. This tutorial uses Google’s OAuth 2.0 library to let users login using their Google accounts.
OAuth 2.0
OAuth 2.0 is an open standard used by many login services. If you’ve ever used a site or app that let you login using Twitter, Facebook, or other services, chances are it was using OAuth 2.0.
The idea behind OAuth 2.0 is that the user logs into a service like Google or Twitter and gives your code permission to do something on that service. For example, a user might login to Google and allow your code to create a Google doc, or they might login to Twitter and allow your code to post a tweet. This process of obtaining permission to access parts of a service is called authorization.
You can also use OAuth 2.0 to get information about a user, like their display name, profile picture, and a unique ID that identifies them. This process of identifying a user is called authentication.
Google provides an OAuth 2.0 server that lets users login, as well as a set of libraries that interact with that server. This tutorial uses Google’s OAuth 2.0 Java library to let users login using their Google accounts.
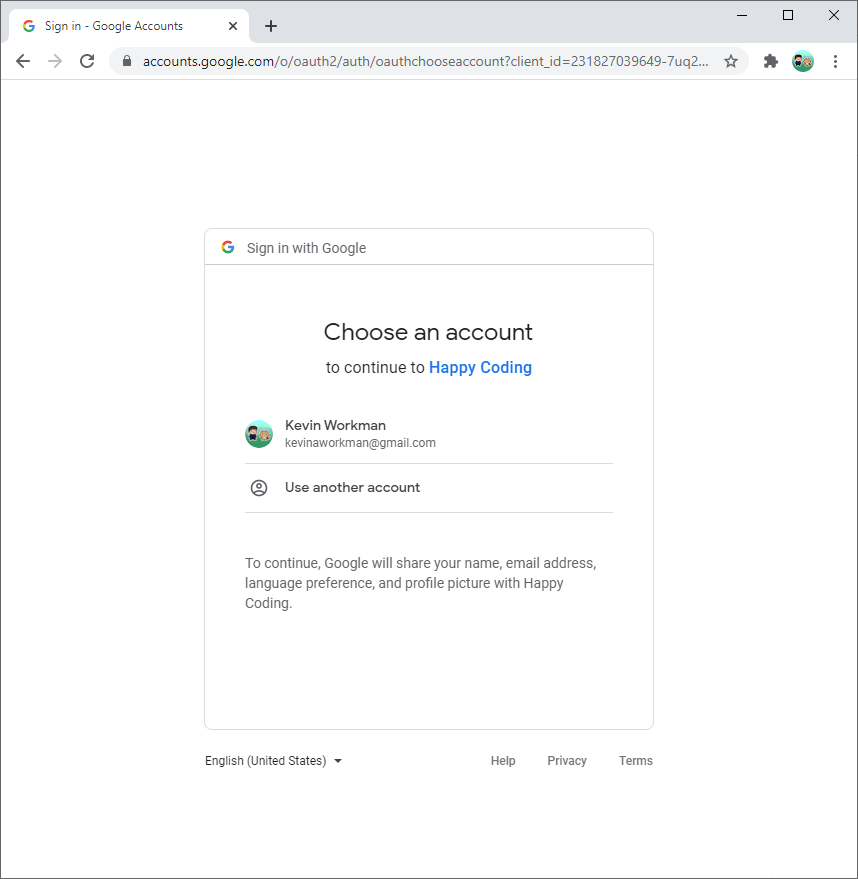
The Google OAuth 2.0 library lets you avoid handling registration and login yourself. Instead, you direct the user to Google’s login page, and then ask Google’s login page to redirect back to your page after the user logs in.
OAuth 2.0 Client ID
Before you can use OAuth 2.0 in your code, you need to create an OAuth 2.0 Client ID, which is how Google’s OAuth 2.0 server identifies your code.
Follow the steps on OAuth documentation:
- Open the Credentials page.
- Click the
Create Credentialsbutton at the top, and then selectOAuth client ID. - Choose
Web applicationfrom the dropdown. - Give your client a name. This can be anything you want, and you can change it later.
- The list of URIs on this page tells Google what URLs your code might want to redirect to after the user logs in. This prevents attackers from pretending to be you. For now, add
http://localhost:8080/oauth2callbackto the list of URIs. - Note the client ID and client secret on this screen.
- Click the
Savebutton!
Environment Variables
The client ID and client secret from the previous step are like your username and password. You need to pass them into Google’s OAuth 2.0 Java library, but you should NOT store them in a public place like GitHub.
Instead, you can create environment variables that store your client ID and client secret, which you can then access in your code without exposing them publicly.
Local
For testing locally, set the environment variables using the command line that you’ll use to run your local server.
Windows:
set OAUTH_CLIENT_ID=YOUR_CLIENT_ID
set OAUTH_CLIENT_SECRET=YOUR_CLIENT_SECRET
Linux / Mac:
export OAUTH_CLIENT_ID=YOUR_CLIENT_ID
export OAUTH_CLIENT_SECRET=YOUR_CLIENT_SECRET
Note that if you close your command line, you’ll need to do this step again. It’s also possible to set these environment variables permanently, using the control panel in Windows or the .bashrc file in Linux / Mac.
Live
For deploying to your live server, you can set environment variables using the app.yaml file. Don’t put your client ID and client secret direction in app.yaml though! Instead, use this approach:
-
Create a new file named
env_variables.yaml. (You can name your file anything, that’s just the name I used.) -
Add this content to that file:
env_variables: OAUTH_CLIENT_ID: 'YOUR_CLIENT_ID' OAUTH_CLIENT_SECRET: 'YOUR_CLIENT_SECRET' -
Add the
env_variables.yamlfile to your.gitignorefile to avoid exposing this file to the public. -
Modify your
app.yamlfile to point to that file:runtime: java11 includes: - /full/path/to/env_variables.yaml
Now when you deploy to your live site, App Engine will include these environment variables.
Example
You can download an example project from DownGit.
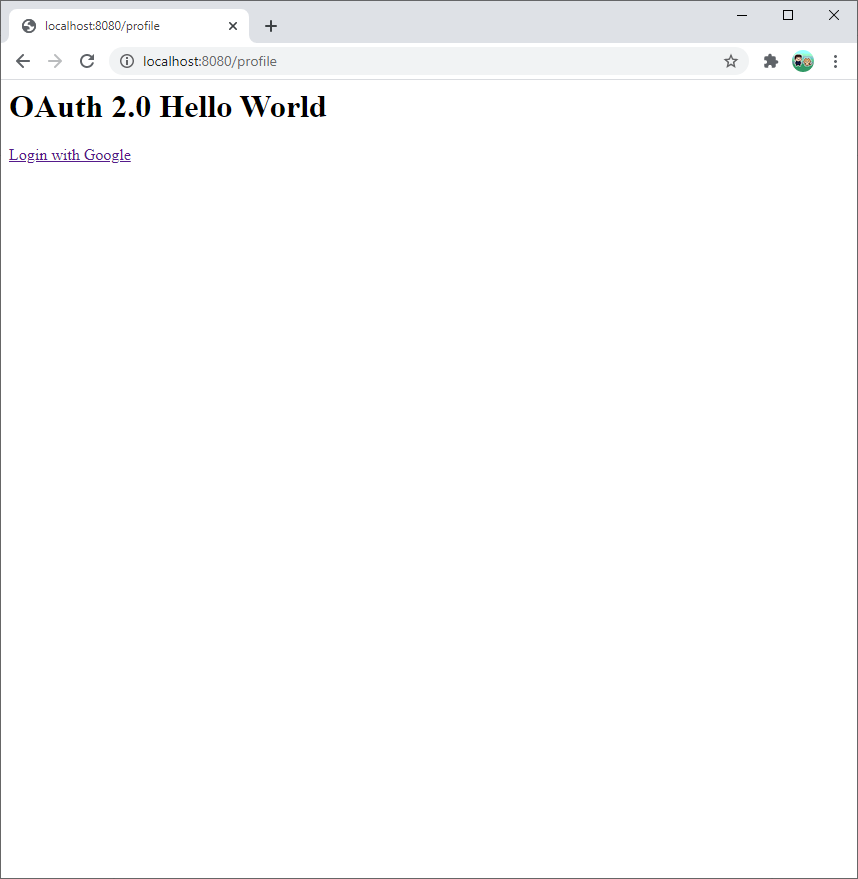
This project lets the user login with their Google account, and shows their profile information.
The rest of this tutorial walks through this example project.
Maven Dependencies
These dependencies in the pom.xml file add Google’s OAuth libraries:
<!-- Google OAuth 2.0 -->
<dependency>
  <groupId>com.google.apis</groupId>
  <artifactId>google-api-services-oauth2</artifactId>
  <version>v2-rev157-1.25.0</version>
</dependency>

<!-- Google OAuth 2.0 servlets -->
<dependency>
  <groupId>com.google.oauth-client</groupId>
  <artifactId>google-oauth-client-servlet</artifactId>
  <version>1.31.0</version>
</dependency>
Google OAuth Client Library
Now that you have your environment variables set and the dependencies included in your pom.xml file, you can use Google’s OAuth client library.
You can think of the library as three different pieces:
- An instance of
GoogleAuthorizationCodeFlowwhich connects to Google’s OAuth server. - A servlet class that extends
AbstractAuthorizationCodeServletand uses theGoogleAuthorizationCodeFlowconnection to let the user login to Google. - A servlet class that extends
AbstractAuthorizationCodeCallbackServletwhich uses theGoogleAuthorizationCodeFlowconnection to redirect the user after they login.
Let’s look at each piece in more detail.
GoogleAuthorizationCodeFlow
The AuthorizationCodeFlow class is the core of Google’s OAuth library. You can use it to connect to any OAuth 2.0 server: GitHub Sign In tutorial is an example that uses it to sign into GitHub.
If you’re connecting to a Google OAuth 2.0 server, then you can use the more specific GoogleAuthorizationCodeFlow class, which takes care of a few things for you that otherwise you’d have to do manually.
To create a GoogleAuthorizationCodeFlow instance, call the GoogleAuthorizationCodeFlow.Builder constructor and pass it the following:
// Tells the user what permissions they're giving you
List<String> scopes = Arrays.asList(
  "https://www.googleapis.com/auth/userinfo.profile",
  "https://www.googleapis.com/auth/userinfo.email");

GoogleAuthorizationCodeFlow flow = new GoogleAuthorizationCodeFlow.Builder(
    // Sends requests to the OAuth server
    new NetHttpTransport(),
    // Converts between JSON and Java
    JacksonFactory.getDefaultInstance(),
    // Your OAuth client ID
    oauthClientId,
    // Your OAuth client secret
    oauthClientSecret,
    // Tells the user what permissions they're giving you
    scopes)
  // Stores the user's credential in memory
  .setDataStoreFactory(MemoryDataStoreFactory.getDefaultInstance())
  .build();
The NetHttpTransport argument tells the library how to send requests, and the JacksonFactory argument tells it how to convert between JSON (which the OAuth server uses) and Java (which your code uses). The defaults I used above should work for most purposes.
Then give the constructor your OAuth client ID and your OAuth client secret, as well as the permissions you need from the user. Since this example uses OAuth to get the user’s profile information, that’s the permission it asks for.
Next, call the setDataStoreFactory() function to tell the library how to store the credential it gets from the OAuth server. For now, storing it in memory is okay, but you might consider storing it in Datastore if you need to support many users.
Finally, call the build() function to create a GoogleAuthorizationCodeFlow from your builder. This code is honestly pretty confusing, but on the bright side it’s everything you need to communicate with Google’s OAuth server!
You need to call this code from a few different places, so the example project puts it in a utility OAuthUtils class.
AbstractAuthorizationCodeServlet
Now you can create GoogleAuthorizationCodeFlow instances, which communicate with Google’s OAuth server. Next, you need to trigger Google’s login page when the user navigates to a particular URL.
You can do this by creating a class that extends AbstractAuthorizationCodeServlet and provides the following:
- A
@WebServletannotation that specifies the URL you want to use for your login page. This is most likely something like@WebServlet("/login"). - A
Stringthat identifies the current user. You could generate the ID yourself and store it in a cookie, or you can use the session’s ID:request.getSession().getId(). (Learn more about sessions from the Java Server tutorial!) - An instance of
GoogleAuthorizationCodeFlow, using the code from above. - The URL to redirect to after the user logs in.
Putting it all together, it looks like this:
package io.happycoding.servlets;

import com.google.api.client.auth.oauth2.AuthorizationCodeFlow;
import com.google.api.client.extensions.servlet.auth.oauth2.AbstractAuthorizationCodeServlet;
import com.google.api.client.http.GenericUrl;
import io.happycoding.OAuthUtils;
import java.io.IOException;
import javax.servlet.ServletException;
import javax.servlet.annotation.WebServlet;
import javax.servlet.http.HttpServletRequest;
import javax.servlet.http.HttpServletResponse;

@WebServlet("/login")
public class LoginServlet extends AbstractAuthorizationCodeServlet {

  @Override
  protected String getUserId(HttpServletRequest request) {
    return request.getSession().getId();
  }

  @Override
  protected AuthorizationCodeFlow initializeFlow() throws IOException {
    return OAuthUtils.newFlow();
  }

  @Override
  protected String getRedirectUri(HttpServletRequest request) {
    GenericUrl url = new GenericUrl(request.getRequestURL().toString());
    url.setRawPath("/login-callback");
    return url.build();
  }
}
In this code, OAuthUtils.newFlow() is a helper function that calls the code from above to create a new instance of GoogleAuthorizationCodeFlow.
When the user navigates to /login, this servlet triggers code inside Google’s OAuth client library which uses the information provided by the functions in this class to redirect the user to Google’s login page.
AbstractAuthorizationCodeCallbackServlet
Now you have a servlet that triggers Google’s login page. After the user logs in, they’ll be redirected to the /login-callback URL. Next, you need to specify where the user should go after that. Most likely you’ll want to redirect the user back to whatever page they were on before they logged in.
You do that by creating a servlet class that extends AbstractAuthorizationCodeCallbackServlet and provides the following:
- A
@WebServletannotation that maps the servlet to the redirect URL, as well as agetRedirectUri()function that returns the URL. The example uses/login-callback. - An instance of
GoogleAuthorizationCodeFlow, using the code from above. - A
Stringthat identifies the current user. This should match what you used before. The example uses the session ID. - An
onSuccess()function that takes some action after the user logs in. The example redirects back to the/profileURL, but you could store the previous URL in a session variable and redirect to that. - Optionally, an
onError()function that takes some action if the user does not login.
Putting it all together, it looks like this:
package io.happycoding.servlets;

import com.google.api.client.auth.oauth2.AuthorizationCodeFlow;
import com.google.api.client.auth.oauth2.AuthorizationCodeResponseUrl;
import com.google.api.client.auth.oauth2.Credential;
import com.google.api.client.extensions.servlet.auth.oauth2.AbstractAuthorizationCodeCallbackServlet;
import com.google.api.client.http.GenericUrl;
import io.happycoding.OAuthUtils;
import java.io.IOException;
import javax.servlet.ServletException;
import javax.servlet.annotation.WebServlet;
import javax.servlet.http.HttpServletRequest;
import javax.servlet.http.HttpServletResponse;

@WebServlet("/login-callback")
public class LoginCallbackServlet extends AbstractAuthorizationCodeCallbackServlet {

  @Override
  protected AuthorizationCodeFlow initializeFlow() throws IOException {
    return OAuthUtils.newFlow();
  }

  @Override
  protected String getRedirectUri(HttpServletRequest request) {
    GenericUrl url = new GenericUrl(request.getRequestURL().toString());
    url.setRawPath("/login-callback");
    return url.build();
  }

  @Override
  protected String getUserId(HttpServletRequest request) {
    return request.getSession().getId();
  }

  @Override
  protected void onSuccess(HttpServletRequest request, HttpServletResponse response, Credential credential)
      throws IOException {
    response.sendRedirect("/profile");
  }

  @Override
  protected void onError(
      HttpServletRequest request, HttpServletResponse response, AuthorizationCodeResponseUrl errorResponse)
      throws IOException {
    response.getWriter().print("Login cancelled.");
  }
}
Is the user logged in?
You probably want to show a login link to users who aren’t logged in, and a logout link to users who are logged in. You might also want to block users from seeing certain pages unless they’re logged in.
You can determine whether a user is logged in using the loadCredential() function of the GoogleAuthorizationCodeFlow class. The loadCredential() function takes a user ID, which in the case of the example is a session ID. The function then returns a Credential instance, which will be null if the user is not logged in.
We can put all of that into a handy utility function:
public static boolean isUserLoggedIn(String sessionId) {
  try{
    Credential credential = newFlow().loadCredential(sessionId);
   return credential != null;
  } catch(IOException e){
    // Error getting login status
    return false;
  }
}
You can call this from a servlet class to show different content based on whether the user is logged in:
String sessionId = request.getSession().getId();
boolean isUserLoggedIn = OAuthUtils.isUserLoggedIn(sessionId);

if (isUserLoggedIn) {
  // show logout link
  // ...
} else{
  // show login link
  // ...
}
Logging Out
How you log a user out depends on how you’re identifying them in the first place. For example, if you’ve stored their ID in a cookie, you’d log them out by deleting the cookie.
The example uses the session ID, so it logs users out by invalidating the session:
package io.happycoding.servlets;

import java.io.IOException;
import javax.servlet.annotation.WebServlet;
import javax.servlet.http.HttpServlet;
import javax.servlet.http.HttpServletRequest;
import javax.servlet.http.HttpServletResponse;

@WebServlet("/logout")
public class LogoutServlet extends HttpServlet {

  @Override
  public void doGet(HttpServletRequest request, HttpServletResponse response) throws IOException {
    request.getSession().invalidate();
    response.sendRedirect("/profile");
  }
}
When the user visits the /logout URL, this servlet invalidates their current session and then redirects the user back to the /profile URL.
Revoking Access
Users can also revoke your access to their Google account by visiting their Google account page.
If they revoke access, they’ll need to log into Google and give you permission again before you can access their Google data.
User Info
After a user logs in, you can use the Oauth2 class to get information about them. Here’s an example that returns an instance of Userinfo:
public static Userinfo getUserInfo(String sessionId) throws IOException {
  String appName = System.getenv("APP_NAME");
  Credential credential = newFlow().loadCredential(sessionId);
  Oauth2 oauth2Client =
      new Oauth2.Builder(HTTP_TRANSPORT, JacksonFactory.getDefaultInstance(), credential)
          .setApplicationName(appName)
          .build();

  Userinfo userInfo = oauth2Client.userinfo().get().execute();
  return userInfo;
}
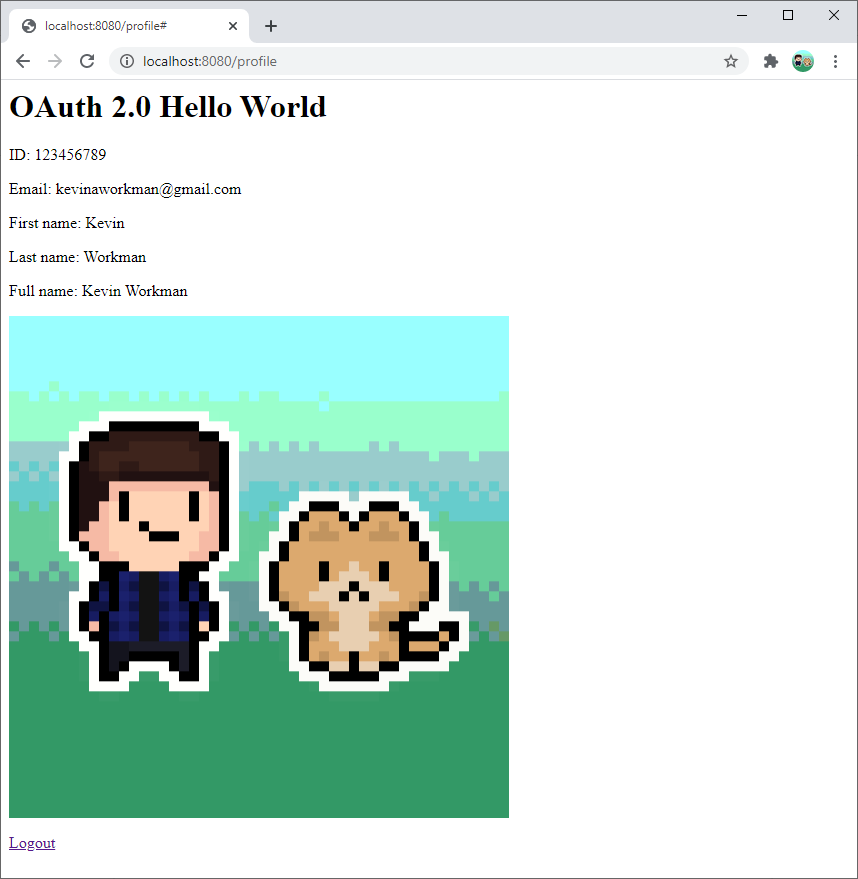
The example project uses this Userinfo class to show the user their profile information:
Userinfo userInfo = OAuthUtils.getUserInfo(sessionId);

response.getWriter().println("<p>ID: " + userInfo.getId() + "</p>");
response.getWriter().println("<p>Email: " + userInfo.getEmail() + "</p>");
response.getWriter().println("<p>First name: " + userInfo.getGivenName() + "</p>");
response.getWriter().println("<p>Last name: " + userInfo.getFamilyName() + "</p>");
response.getWriter().println("<p>Full name: " + userInfo.getName() + "</p>");
response.getWriter().println("<img src=\"" + userInfo.getPicture() + "\" />");
Considerations
With great power comes great responsibility. Make sure you’re treating the user’s data with respect, and only using it in ways they’d expect.
For example, a user might be okay with you showing their first name to other users, but they might be less okay with you showing their email address.
User IDs
The Userinfo class has a getId() function which returns the user’s Google ID. You can use this ID to identify a user across multiple devices, or to associate their data to them individually.
To associate a user with a set of data (for example, the messages they sent, or the files they uploaded), you’d store the user ID alongside that data in Datastore. Then to fetch the data, you’d query for the data that matches the user ID.
You should not include the user’s ID in a public URL (for example /users/[USER_ID_HERE]), because that lets attackers associate users across different websites. Instead, you should create your own ID that you use in your URLs instead.
Other Approaches
This tutorial introduced Google OAuth server and client library, but there are many other ways to handle registration and login.
Google Identity Platform lists several other Google-specific options.
Or you could handle registration and login yourself. This approach generally works like this:
- Your project would contain a registration page consisting of a form that allowed users to create accounts. When the user submits that form, you’d store their username and password. Make sure you store passwords securely!
- Your project would also have a login page consisting of another form that allowed users to enter a username and password. When the user submits that form, you’d check what they submitted against the data that you have stored.
- If the username and password match the data you have stored, then you could use something like sessions to track the fact that the user logged in.
You could also take a hybrid approach and support all of the above.
Learn More
Here are some links with more information.
- Google Identity Platform
- OAuth 2.0 Simplified
- What the Heck is OAuth?
- OAuth - Wikipedia
- Google HTTP Client Library API
- Google OAuth Client Library API
- Google API Client Library API
- Using OAuth 2.0 for Web Server Applications
- Using OAuth 2.0 with the Google API Client Library for Java
- OAuth 2.0 and the Google OAuth Client Library for Java
- Your Google Account
- Google OAuth 2.0 on Google App Engine Standard with Java 11 - official example project