Sessions


Sessions
- Button Example
- Multiple Users
- The Hard Way
- Sessions
- Without Cookies
- Login
- Session Timeout
- Security
- Homework
So far, we’ve learned how to write servlets that can store data that is shared among all users. For example, we’ve created a chat web app that stores a list of messages. This works, because every user looks at the same set of messages.
But what if we want to store user-specific data on the server?
Button Example
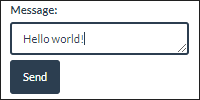
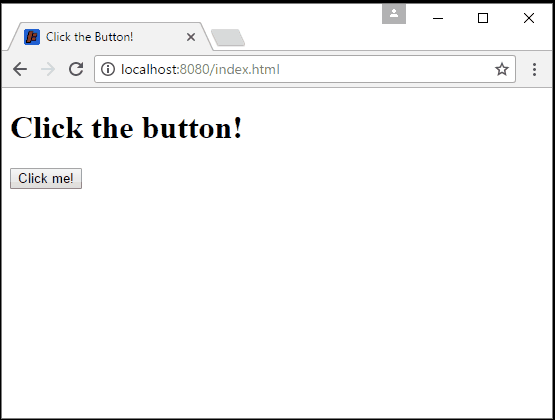
This is probably easier to show with an example. Let’s create a web app that stores how many times the user has clicked a button. We’ll start with an index.html file:
<!DOCTYPE html>
<html>
<head>
	<title>Click the Button!</title>
</head>
<body onload="getChats()">
	<h1>Click the button!</h1>
	<form action="/click" method="POST">
		<input type="submit" value="Click me!">
	</form>
</body>
</html>
This HTML contains a <form> tag that just has a single button. When that button is clicked, it creates a POST request to the /click URL.
Now let’s create a servlet that handles that POST request:
import java.io.IOException;
import javax.servlet.ServletException;
import javax.servlet.http.HttpServlet;
import javax.servlet.http.HttpServletRequest;
import javax.servlet.http.HttpServletResponse;
public class ButtonServlet extends HttpServlet{
private int clickCount = 0;
@Override
public void doPost(HttpServletRequest request, HttpServletResponse response) throws IOException, ServletException {
clickCount++;
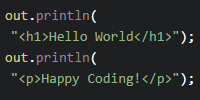
response.getOutputStream().println("<h1>You clicked the button " + clickCount + " times.</h1>");
response.getOutputStream().println("<p>Click <a href=\"/index.html\">here</a> to go back to the button.</p>");
}
}
This servlet class handles the POST request by incrementing a clickCount variable, and then rendering the value of that variable along with a link back to the index.html file.
Finally, we need a web.xml file that maps the /click URL to our servlet class:
<web-app
	xmlns="http://xmlns.jcp.org/xml/ns/javaee"
	xmlns:xsi="http://www.w3.org/2001/XMLSchema-instance"
	xsi:schemaLocation="http://xmlns.jcp.org/xml/ns/javaee
		http://xmlns.jcp.org/xml/ns/javaee/web-app_3_1.xsd"
	version="3.1">

	<servlet>
		<servlet-name>ButtonServlet</servlet-name>
		<servlet-class>ButtonServlet</servlet-class>
	</servlet>

	<servlet-mapping>
		<servlet-name>ButtonServlet</servlet-name>
		<url-pattern>/click</url-pattern>
	</servlet-mapping>

</web-app>
Here’s what our web app looks like in action:
This works okay as long as we only have one user, but we’re going to have a problem if we have multiple users.
Multiple Users
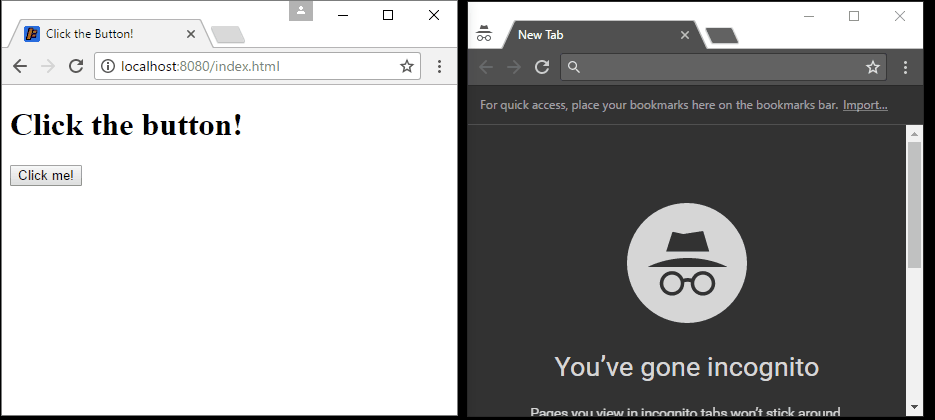
Since we’re deploying locally on our own computer, we have to play the role of multiple users when we’re testing our web apps.
You might think you can do this by opening up multiple tabs, but that’s not quite enough. Multiple tabs in the same browser are still considered the same user! So that’s not enough. Instead, we have to either:
- Open up multiple browsers. For example, you might open both Chrome and Firefox to the same URL. From the server’s perspective, that’s the same thing as people on different computers visiting the site.
- Open an incognitio window. An incognito window is considered a different user than the regular window.
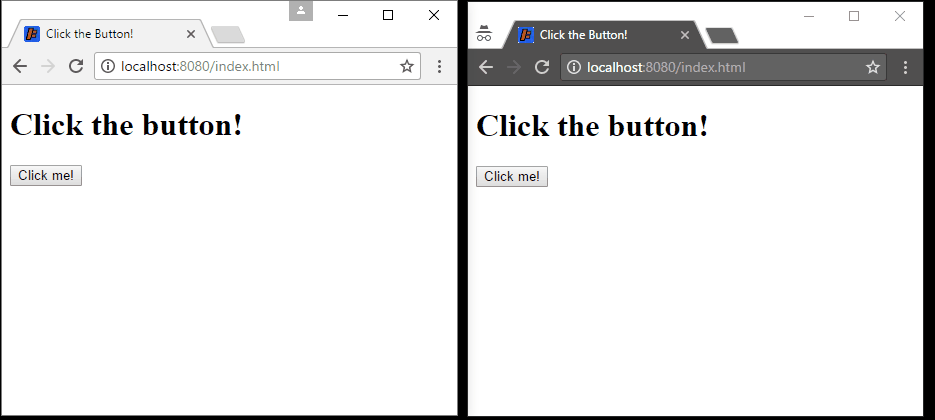
With this in mind, we can now test our button clicking web app using two users:
Notice how our second user only clicks the button once, but the count still says they clicked the button 4 times. That’s because the count is shared among all users, so it’s the total of how many times anybody has clicked it. That won’t work, because we want the count to be specific to each user!
The problem is that a request is standalone- in other words, we have no way of knowing who a request came from. We don’t know whether the first user or second user is clicking the button. And in “real” web apps, we can have many more users!
The Hard Way
We could get around this by storing the user’s count in a cookie. (Side note: each browser and incognitio window has its own set of cookies.) Every time the user clicks the button, we’d read from the cookie, increment it, display it, and then save it back to the cookie.
If we needed to use the user’s count on the server, we could also send the value along with every request. That would get pretty annoying if we started tracking more than just one value for each user: we’d have to store and send every value whenever we sent a request. It’s possible, but it’s annoying.
Another approach would be to store a unique identifier, like a random 128-digit number, in the cookie instead. We’d then send that number with every request, so the server would be able to tell which user each request came from. The server could also keep something like a Map<String, UserData> where the keys are the 128-digit numbers and UserData is an object that contains all of the stuff we want to track for each user.
We could do that last approach ourselves using everything we’ve already learned. But luckily, Java EE provides a feature that does all of that for us!
Sessions
The idea of tracking a user from one request to another is called a session. A session starts when you first visit a webpage (at which point a unique identifier is stored in a cookie on your computer). When you make other requests, that identifier is automatically sent with your requests, so the server can store data specific to you. The session ends when the cookie expires, which depends on a few settings that we’ll talk about in a second.
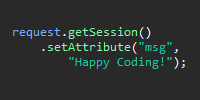
When you’re writing server-side code, you can get to the session data from a servlet class using the request.getSession() function:
HttpSession session = request.getSession();
The HttpSession class contains functions for setting and getting user-specific data. For example we might store a value using the setAttribute() function:
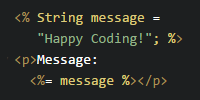
session.setAttribute("message", "Happy Coding!");
And then in subsequent requests, we could fetch that data using the getAttribute() function:
String message = (String) session.getAttribute("message");
Putting it all together, here’s what our servlet looks like using sessions:
import java.io.IOException;

import javax.servlet.ServletException;
import javax.servlet.http.HttpServlet;
import javax.servlet.http.HttpServletRequest;
import javax.servlet.http.HttpServletResponse;
import javax.servlet.http.HttpSession;

public class ButtonServlet extends HttpServlet{

	@Override
	public void doPost(HttpServletRequest request, HttpServletResponse response) throws IOException, ServletException {

		int clickCount;

		//get the session, which contains user-specific data
		HttpSession session = request.getSession();

		if(session.getAttribute("clickCount") != null){
			//we've already stored the clickCount in a previous request, so get it
			clickCount = (int) session.getAttribute("clickCount");
		}
		else{
			//we haven't stored the clickCount for this user yet, start it at zero
			clickCount = 0;
		}

		clickCount++;

		//store the new clickCount in the session
		session.setAttribute("clickCount", clickCount);

		//output the clickCount for this user
		response.getOutputStream().println("<h1>You clicked the button " + clickCount + " times.</h1>");
		response.getOutputStream().println("<p>Click <a href=\"/index.html\">here</a> to go back to the button.</p>");
	}
}
Now instead of using a clickCount variable in our servlet class that’s shared among all users, we use a session attribute that’s specific to each user. We do this by getting the HttpSession and then checking whether we’ve already set the clickCount attribute. If so, we get it, and if not, we just start the count at zero. We then increment the count and then store it back in the session so subsequent requests will see the updated value. Finally, we output the click count as HTML that the user can see.
The big difference is that now the click count is specific to each user:
This is just a basic example, but you can use these ideas to build more advanced web apps that keep track of user-dependent data.
Without Cookies
Remember that by default, session logic is built using a cookie that keeps track of a unique identifier for each user. But keep in mind that users can disable cookies! In this case, the default setup will no longer work.
To get around this, you’ll have to append the unique identifier (called the session ID) to each URL in your web app.
I won’t go into too much detail here because this isn’t really a common case anymore, but if you do encounter this issue just know that there are workarounds available.
Login
We can take this idea of storing data about a user and use it to implement a basic login feature. This lets us restrict certain parts of our web app to specific users, who must login with a username and password. We can also show content specific to a logged-in user.
Here is a very basic servlet class that handles logging in:
import java.io.IOException;
import javax.servlet.ServletException;
import javax.servlet.http.HttpServlet;
import javax.servlet.http.HttpServletRequest;
import javax.servlet.http.HttpServletResponse;

public class LoginServlet extends HttpServlet {

	@Override
	public void doGet(HttpServletRequest request, HttpServletResponse response) throws IOException, ServletException {
		//in real life you would probably use JSP to render the login
		response.getOutputStream().println("<h1>Login</h1>");
		response.getOutputStream().println("<hr/>");
		response.getOutputStream().println("<form action=\"/login\" method=\"POST\">");
		response.getOutputStream().println("<span>Username: </span>");
		response.getOutputStream().println("<input type=\"text\" name=\"username\">");
		response.getOutputStream().println("<span>Password: </span>");
		response.getOutputStream().println("<input type=\"password\" name=\"password\">");
		response.getOutputStream().println("<input type=\"submit\" value=\"Submit\">");
		response.getOutputStream().println("</form>");
	}

	@Override
	public void doPost(HttpServletRequest request, HttpServletResponse response) throws IOException, ServletException {

		String username = request.getParameter("username");
		String password = request.getParameter("password");

		//this is just pseudocode!
		if(username and password are correct){
			request.getSession().setAttribute("user", username);
			response.sendRedirect("/home");
		}
		else{
			//in real life you'd probably just render the login screen again
			response.getOutputStream().println("<h1>Wrong username or password.</h1>");
		}


	}
}
The doGet() function just renders a login form. In real life we’d probably use a JSP file to render it, but I wanted to keep this example as short as possible. The doPost() function gets the username and password submitted by the user, and the if statement (which is just pseudocode for now) checks whether they’re correct. If they are, the code sets a user session attribute to the username. There isn’t anything special about the user attribute, and in fact you can make it anything you want. The point is that now we can use it in subsequent requests. We can use it to check whether the user is logged in, or which user is logged in!
For example, let’s create a web app that contains these:
- A homepage that shows a list of registered users. Anybody can see this page.
- Clicking a username takes you to that user’s profile page. Only logged-in users can see profile pages!
- If a logged-in user is viewing their own profile page, they’ll see a form that lets them edit their profile.
- Each page should either show a link to the login page or the username depending on whether the user is logged in.
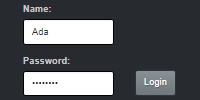
Let’s start with a simple login servlet:
import java.io.IOException;
import java.util.HashMap;
import java.util.Map;

import javax.servlet.ServletException;
import javax.servlet.http.HttpServlet;
import javax.servlet.http.HttpServletRequest;
import javax.servlet.http.HttpServletResponse;

public class LoginServlet extends HttpServlet {

	/**
	 * Map of usernames to their passwords.
	 * Note that storing passwords like this is a bad idea. This is just a simple example!
	 */
	private Map<String, String> usernamePasswordMap = new HashMap<>();

	public LoginServlet(){
		usernamePasswordMap.put("Ada", "bad password one");
		usernamePasswordMap.put("Grace", "bad password two");
		usernamePasswordMap.put("Stanley", "bad password three");
	}

	@Override
	public void doGet(HttpServletRequest request, HttpServletResponse response) throws IOException, ServletException {
		response.getOutputStream().println("<h1>Login</h1>");
		response.getOutputStream().println("<hr/>");
		response.getOutputStream().println("<form action=\"/login\" method=\"POST\">");
		response.getOutputStream().println("<span>Username: </span>");
		response.getOutputStream().println("<input type=\"text\" name=\"username\">");
		response.getOutputStream().println("<span>Password: </span>");
		response.getOutputStream().println("<input type=\"password\" name=\"password\">");
		response.getOutputStream().println("<input type=\"submit\" value=\"Submit\">");
		response.getOutputStream().println("</form>");
	}

	@Override
	public void doPost(HttpServletRequest request, HttpServletResponse response) throws IOException, ServletException {

		String username = request.getParameter("username");
		String password = request.getParameter("password");

		if(usernamePasswordMap.containsKey(username) && usernamePasswordMap.get(username).equals(password)){
			request.getSession().setAttribute("user", username);
		}

		response.sendRedirect("/index.jsp");
	}
}
This is pretty much what we’ve already seen, except now we’re using a Map to store hard-coded usernames and passwords. In real life you’d probably get them from a file or better yet a database.
Next, let’s create an index.jsp file that shows our homepage:
<!DOCTYPE html>
<html>
	<head>
		<title>Login Example Home</title>
	</head>
	<body>

		<% if(request.getSession().getAttribute("user") != null){ %>
			<p>Hello <%= request.getSession().getAttribute("user") %>!</p>
		<% } else{ %>
			<p><a href="/login">Login</a></p>
		<% } %>

		<h1>Users</h1>
		<ul>
			<li><a href="/users/Ada">Ada</a></li>
			<li><a href="/users/Grace">Grace</a></li>
			<li><a href="/users/Stanley">Stanley</a></li>
		</ul>
	</body>
</html>
The only interesting thing here is the if statement at the top of the <body> tag. It checks whether the session contains the user attribute, which is how we know a user is logged in. If so, it renders a greeting to the user, and if not, it renders a link to the login page. Then it just uses hardcoded HTML to list the users. In real life you’d probably pass the users in a List and iterate over them to render the links, but again, I’m trying to keep the example simple.
We also have to map the /login URL to our servlet using a web.xml file:
<web-app
	xmlns="http://xmlns.jcp.org/xml/ns/javaee"
	xmlns:xsi="http://www.w3.org/2001/XMLSchema-instance"
	xsi:schemaLocation="http://xmlns.jcp.org/xml/ns/javaee
		http://xmlns.jcp.org/xml/ns/javaee/web-app_3_1.xsd"
	version="3.1">

	<servlet>
		<servlet-name>LoginServlet</servlet-name>
		<servlet-class>LoginServlet</servlet-class>
	</servlet>

	<servlet-mapping>
		<servlet-name>LoginServlet</servlet-name>
		<url-pattern>/login</url-pattern>
	</servlet-mapping>

</web-app>
At this point, the basic login functionality works. Try running the server and visiting index.jsp.

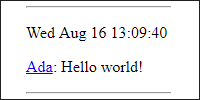
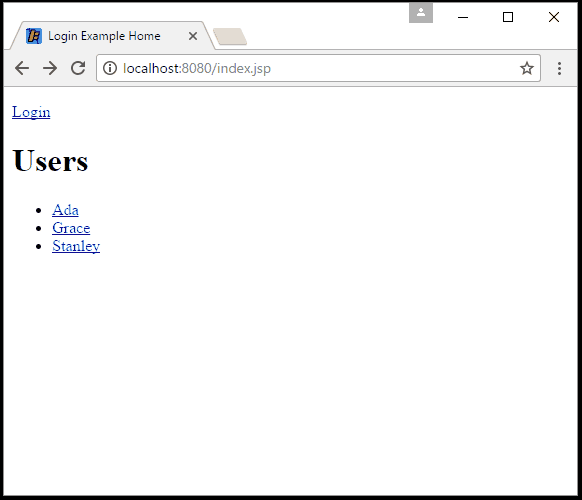
Our homepage detects whether the user is logged in, and shows a login link if not. If the user enters the wrong username or password they see an error. Finally, if the user is logged in, the homepage shows a greeting.
Now that we have that, let’s create the servlet that handles viewing and editing user profiles:
import java.io.IOException;
import java.util.ArrayList;
import java.util.HashMap;
import java.util.List;
import java.util.Map;

import javax.servlet.ServletException;
import javax.servlet.http.HttpServlet;
import javax.servlet.http.HttpServletRequest;
import javax.servlet.http.HttpServletResponse;

public class UserServlet extends HttpServlet {

	/**
	 * Map of usernames to their descriptions.
	 */
	private Map<String, String> usernameDescriptionMap = new HashMap<>();

	public UserServlet(){
		usernameDescriptionMap.put("Ada", "I love poetical science!");
		usernameDescriptionMap.put("Grace", "I love nanoseconds!");
		usernameDescriptionMap.put("Stanley", "I love cat food!");
	}

	@Override
	public void doGet(HttpServletRequest request, HttpServletResponse response) throws IOException, ServletException {

		String loggedInUser = (String) request.getSession().getAttribute("user");

		String requestUrl = request.getRequestURI();
		String requestedUsername = requestUrl.substring(requestUrl.lastIndexOf("/") + 1);

		if(loggedInUser == null){
			//user is not logged in
			response.getOutputStream().println("<h1>You have to be logged in to do that.</h1>");
		}
		else if(!loggedInUser.equals(requestedUsername)){
			//user is viewing somebody else's page
			response.getOutputStream().println("<h1>" + requestedUsername + "'s Page</h1>");
			response.getOutputStream().println("<p>" + usernameDescriptionMap.get(requestedUsername) + "</p>");
		}
		else{
			//user is viewing their own page, show form
			response.getOutputStream().println("<h1>Your Page</h1>");
			response.getOutputStream().println("<hr/>");
			response.getOutputStream().println("<form action=\"\" method=\"POST\">");
			response.getOutputStream().println("<p>Enter some info about yourself:</p>");
			response.getOutputStream().println("<textarea name=\"description\">" + usernameDescriptionMap.get(requestedUsername) + "</textarea>");
			response.getOutputStream().println("<input type=\"submit\" value=\"Submit\">");
			response.getOutputStream().println("</form>");
		}
	}

	@Override
	public void doPost(HttpServletRequest request, HttpServletResponse response) throws IOException, ServletException {

		String loggedInUser = (String) request.getSession().getAttribute("user");

		String requestUrl = request.getRequestURI();
		String requestedUsername = requestUrl.substring(requestUrl.lastIndexOf("/") + 1);

		if(loggedInUser == null){
			//user is not logged in
			response.getOutputStream().println("<h1>You have to be logged in to do that.</h1>");
		}
		else if(!loggedInUser.equals(requestedUsername)){
			//user is submitting somebody else's page
			response.getOutputStream().println("<h1>You can't change somebody else's user page.</h1>");
		}
		else{
			//user is submitting their own page
			String description = request.getParameter("description");
			usernameDescriptionMap.put(loggedInUser, description);

			//just redirect to a GET request
			response.sendRedirect(request.getRequestURI());
		}
	}
}
This might seem complicated, but just take it one line at a time. First, this code creates a Map that contains a description for each user. In real life you’d probably read these from a file or a database, but for now we’re just hardcoding everything.
The doGet() function detects both the logged-in user (from the session attribute) and the requested username (from the URL). If the user is not logged in, an error message is shown. If the user is viewing a user other than themselves, the page just shows the requested user’s description. If the user is viewing their own page, the page shows a form that lets them change their description.
Similarly, the doPost() function also gets both the logged-in user and the requested username. If the user is not logged in or they’re trying to edit another user’s page, they see an error message. But if the user is editing their own page, then the usernameDescriptionMap is updated to store the new description.
We also need to update our web.xml file:
<web-app
	xmlns="http://xmlns.jcp.org/xml/ns/javaee"
	xmlns:xsi="http://www.w3.org/2001/XMLSchema-instance"
	xsi:schemaLocation="http://xmlns.jcp.org/xml/ns/javaee
		http://xmlns.jcp.org/xml/ns/javaee/web-app_3_1.xsd"
	version="3.1">

	<servlet>
		<servlet-name>LoginServlet</servlet-name>
		<servlet-class>LoginServlet</servlet-class>
	</servlet>

	<servlet-mapping>
		<servlet-name>LoginServlet</servlet-name>
		<url-pattern>/login</url-pattern>
	</servlet-mapping>

	<servlet>
		<servlet-name>UserServlet</servlet-name>
		<servlet-class>UserServlet</servlet-class>
	</servlet>

	<servlet-mapping>
		<servlet-name>UserServlet</servlet-name>
		<url-pattern>/users/*</url-pattern>
	</servlet-mapping>

</web-app>
Now our web app looks like this:
Notice that the user pages are restricted until the user logs in, and the user can edit their own page.
While we’re at it, we might as well add a way for users to logout. Since we’re storing the login information in the session, to log a user out we just need to delete the session data using the session.invalidate() function. We can do this from a servlet class:
import java.io.IOException;

import javax.servlet.ServletException;
import javax.servlet.http.HttpServlet;
import javax.servlet.http.HttpServletRequest;
import javax.servlet.http.HttpServletResponse;

public class LogoutServlet extends HttpServlet {

	@Override
	public void doGet(HttpServletRequest request, HttpServletResponse response) throws IOException, ServletException {
		request.getSession().invalidate();
		response.sendRedirect("/index.jsp");
	}
}
This code defines a servlet with a doGet() function that simply invalidates the session and then redirects the user to the homepage.
Let’s add a link to this new logout servlet in the index.jsp file. Let’s put that link next to the greeting that’s displayed when the user is logged in:
<!DOCTYPE html>
<html>
	<head>
		<title>Login Example Home</title>
	</head>
	<body>

		<% if(request.getSession().getAttribute("user") != null){ %>
			<p>Hello <%= request.getSession().getAttribute("user") %>! (<a href="/logout"></a>)</p>
		<% } else{ %>
			<p><a href="/login">Login</a></p>
		<% } %>

		<h1>Users</h1>
		<ul>
			<li><a href="/users/Ada">Ada</a></li>
			<li><a href="/users/Grace">Grace</a></li>
			<li><a href="/users/Stanley">Stanley</a></li>
		</ul>
	</body>
</html>
Finally, let’s map the /logout URL to our LogoutServlet in our web.xml file:
<web-app
	xmlns="http://xmlns.jcp.org/xml/ns/javaee"
	xmlns:xsi="http://www.w3.org/2001/XMLSchema-instance"
	xsi:schemaLocation="http://xmlns.jcp.org/xml/ns/javaee
		http://xmlns.jcp.org/xml/ns/javaee/web-app_3_1.xsd"
	version="3.1">

	<servlet>
		<servlet-name>LoginServlet</servlet-name>
		<servlet-class>LoginServlet</servlet-class>
	</servlet>

	<servlet-mapping>
		<servlet-name>LoginServlet</servlet-name>
		<url-pattern>/login</url-pattern>
	</servlet-mapping>

	<servlet>
		<servlet-name>UserServlet</servlet-name>
		<servlet-class>UserServlet</servlet-class>
	</servlet>

	<servlet-mapping>
		<servlet-name>UserServlet</servlet-name>
		<url-pattern>/users/*</url-pattern>
	</servlet-mapping>

	<servlet>
		<servlet-name>LogoutServlet</servlet-name>
		<servlet-class>LogoutServlet</servlet-class>
	</servlet>

	<servlet-mapping>
		<servlet-name>LogoutServlet</servlet-name>
		<url-pattern>/logout</url-pattern>
	</servlet-mapping>

</web-app>
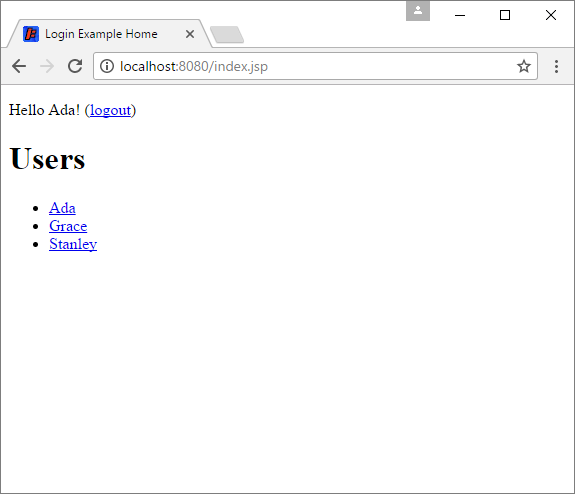
Now when the user is logged in, they’ll see a link that lets them logout:
Session Timeout
Remember that sessions are based on cookies, and cookies expire after a certain amount of time. This means that sessions expire too! In other words, uses will automatically be logged out after a certain amount of activity (the default is fifteen minutes). To see what I mean, try logging in, then walking away from your computer for 20 minutes, and coming back and refreshing the page. You’ll see that you’ve been automatically logged out.
You can change this default by adding this to your web.xml file:
<session-config>
	<session-timeout>120</session-timeout>
</session-config>
This would cause sessions to stay valid for 2 hours (120 minutes). You could also use a value of -1 to make sure they stay valid forever (well, until your server restarts).
You can also set the timeout of a specific session using the session.setMaxInactiveInterval() function. You would do this in a servlet class, for example like this:
@Override
public void doPost(HttpServletRequest request, HttpServletResponse response) throws IOException, ServletException {
	request.getSession().setAttribute("isLoggedIn", true);
	request.getSession().setMaxInactiveInterval(120*60);
	response.sendRedirect("/index.jsp");
}
This example adds an attribute to the session (showing you a simpler way to handle login if you don’t care about usernames), then tells the session to stay active for two hours (note that this paramter is in seconds instead of minutes). Again, you can use a parameter of -1 to tell the session to stay active indefinitely. This is how you would implement a “remember me” feature that kept the user logged in all the time.
Security
It might seem like overkill to check whether the user is logged in or whether they’re editing their own page in both the GET and POST requests: after all, they can’t POST if they can’t reach the form in the first place, right? Wrong! Anybody can create an HTML form that posts to your URL! They could also write a simple program that posts to your URL without even using a web browser. Or they could even edit your HTML in their browsers to get around any client-side security you’ve set up. So it’s always a good idea to program defensively by putting checks in the client side HTML and JavaScript to prevent users from accidentally posting bad data, and in the server side Java to prevent users from purposely posting bad data.
There are also more advanced security considerations that go a little beyond this tutorial, but you should definitely know about them. Check out the Session Management Cheat Sheet on OWASP for a good overview of stuff you should be thinking about. This Wikipedia article on session hijacking is another good place to start.
Homework
- Our example login web app is the very start of a social web app. Add posts, comments, reactions (think likes or favorites), interactions (think retweeting or sharing). Think about making a social web app for a specific group of people.
- Create a simple multiplayer game. Think something like tic-tac-toe or rock paper scissors or Nim.
