Post Requests


Post Requests
- GET Requests
- URLs and Query Parameters
- POST Requests
- Mixing GET and POST Requests
- Redirecting After Post
- JSP
- Fetch
- Other Approaches
- Homework
- Examples
So far, you’ve learned that a client (like a web browser) works by sending a request to a server. The server responds to that request, and the client then renders that response to the user.
GET Requests
You’ve seen examples where the user navigates to a URL, the client requests the content at that URL, and the server responds with content- either from a file, or from a servlet or JSP.
This type of request is called a GET request, because the client is getting content from the server.
This tutorial shows you how to use POST requests so clients can send data to the server.
URLs and Query Parameters
One way to send data to the server is to use query parameters, like this:
http://localhost:8080/names.html?name=Ada
Navigating to this URL requests the names.html file and passes it a name parameter with a value of Ada. You could then use client-side JavaScript or server-side Java to get that parameter and do something with the value.
You’ve also seen how to use URLs themselves to communicate data to the server. For example, you could have a URL like this:
http://localhost:8080/names/Ada
You could then use a servlet mapped to /names/* to let clients request any name. And then you could use server-side Java code to parse the URL and get the name.
These approaches have a few potential drawbacks:
- The URLs are saved to the user’s history. That might be okay with this example, but probably not so great if you’re entering passwords or credit card info. That would let somebody else get your passwords by looking at your history!
- Links to the URLs have to be created ahead of time. For example, how would you let the user enter a name other than
Ada? You’d either have to list every name as a link, or they’d have to enter the URL themselves. - URLs can only contain 2,083 characters. That might seem like a lot, but what if you’re sending something like a blog post or uploading a file?
To work around these limitations, you can use a different kind of request: POST requests!
POST Requests
GET requests are clients asking for content from a server, and POST requests are clients sending data to a server.
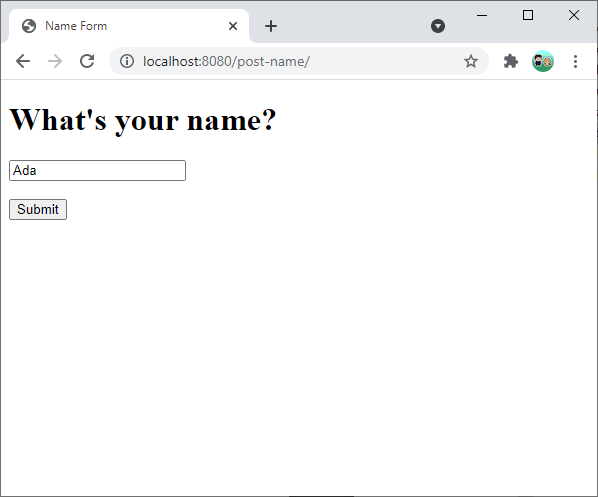
One common way to send a POST request is to use a <form> tag in HTML content. Here’s an example:
<!DOCTYPE html>
<html>
  <head>
    <title>Name Form</title>
  </head>
  <body>
    <h1>What's your name?</h1>

    <form action="/post-name/hello" method="POST">
      <input type="text" name="name" value="Ada">
      <br><br>
      <input type="submit" value="Submit">
    </form>

  </body>
</html>
This HTML uses a <form> tag, which contains a couple attributes:
actionspecifies which URL to send the data to.methodspecifies that the data should use aPOSTrequest. Try changing this tomethod="GET"to see the query parameter approach mentioned above!
Inside the <form> tag, the HTML contains one <input> tag of type text, which shows a text box. The name attribute specifies the name of the parameter to be sent, and the value attribute specifies the default value to display. Then another <input> tag of type submit shows a submit button.
Now that you have a form that submits a POST request, you need to write server code that handles that request. You’ve already seen how to handle GET requests in a servlet class by writing a doGet() function. Handling POST requests is very similar; the only difference is you need to write a doPost() function.
package io.happycoding.servlets;
import java.io.IOException;
import jakarta.servlet.annotation.WebServlet;
import jakarta.servlet.http.HttpServlet;
import jakarta.servlet.http.HttpServletRequest;
import jakarta.servlet.http.HttpServletResponse;
@WebServlet("/hello")
public class GreetingServlet extends HttpServlet {
@Override
public void doPost(HttpServletRequest request, HttpServletResponse response)
throws IOException {
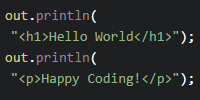
String name = request.getParameter("name");
response.getWriter().println("<h1>Hello " + name + "!</h1>");
}
}
This servlet specifies a doPost() function, which gets the name parameter from the request and outputs a greeting in HTML.
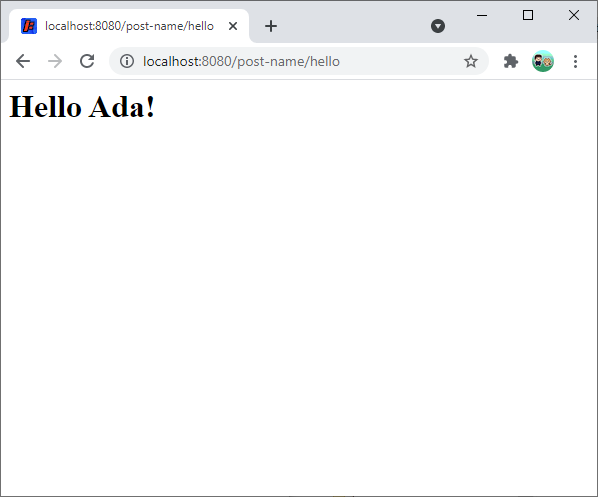
When you run your server, you can visit the index.html page, which renders a form. When you submit that form, your browser sends a POST request containing the name you entered to your servlet class, which outputs the name in HTML.
You can view or download this example here:
Eventually you’ll learn to do more complicated things with the data, like storing it in a database and retrieving it later, but for now focus on how the data gets from the client to the server.
Mixing GET and POST Requests
Remember that servlet classes can also contain a doGet() function to handle GET requests. You can use this to create a servlet that handles both GET and POST requests for the same URL.
For example, let’s build on the previous example so that the servlet contains two functions:
doGet()outputs some HTML based on the values stored in anArrayList.doPost()takes the name from the request and adds it to theArrayList.
package io.happycoding.servlets;
import java.io.IOException;
import java.util.ArrayList;
import java.util.List;
import jakarta.servlet.annotation.WebServlet;
import jakarta.servlet.http.HttpServlet;
import jakarta.servlet.http.HttpServletRequest;
import jakarta.servlet.http.HttpServletResponse;
@WebServlet("/names")
public class NamesServlet extends HttpServlet {
List<String> names = new ArrayList<>();
@Override
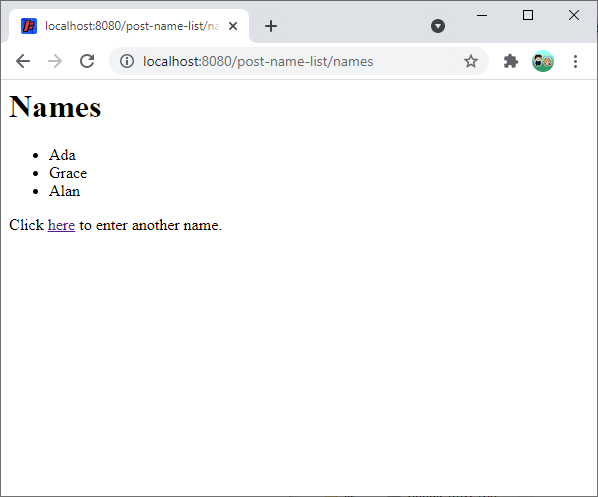
public void doGet(HttpServletRequest request, HttpServletResponse response)
throws IOException {
response.getWriter().println("<h1>Names</h1>");
response.getWriter().println("<ul>");
for (String name : names) {
response.getWriter().println("<li>" + name + "</li>");
}
response.getWriter().println("</ul>");
response.getWriter().println(
"Click <a href=\"/post-name-list/index.html\">here</a> to enter another name.");
}
@Override
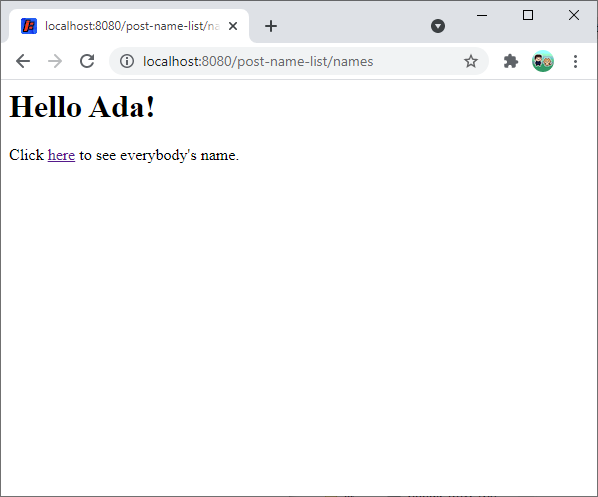
public void doPost(HttpServletRequest request, HttpServletResponse response)
throws IOException {
String name = request.getParameter("name");
names.add(name);
response.getWriter().println("<h1>Hello " + name + "!</h1>");
response.getWriter().println(
"Click <a href=\"/post-name-list/names\">here</a> to see everybody's name.");
}
}
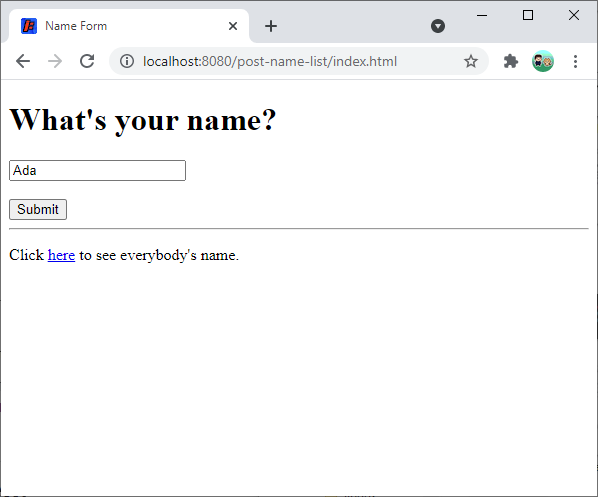
To use this servlet, the HTML file stays pretty much the same as before, except the form’s action attribute uses the new servlet’s URL, and the page provides a link to send a GET request to the servlet:
<!DOCTYPE html>
<html>
  <head>
    <title>Name Form</title>
  </head>
  <body>
    <h1>What's your name?</h1>

    <form action="/post-name-list/names" method="POST">
      <input type="text" name="name" value="Ada">
      <br><br>
      <input type="submit" value="Submit">
    </form>

    <hr>

    <p>Click <a href="/post-name/names">here</a> to see everybody's name.</p>
  </body>
</html>
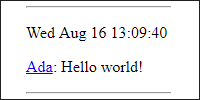
When the user submits the form, the browser sends a POST request to the server, which adds the name to the ArrayList and then outputs some HTML:
When the user navigates to the /post-name-list/names URL, the servlet’s doGet() post iterates over the ArrayList and outputs all of the names that have been entered:
You can view or download this example here:
This example is a little contrived, but it contains a few important concepts: maintaining data on a server, accessing that data through GET requests, and modifying that data through POST requests. These concepts will continue to be important in the rest of the server tutorials.
Redirecting After Post
The above example works, but it’s a little annoying because the POST request is rendered as a separate page, and the user has to click a link to get to the list page.
To fix this, you could copy the code from the doGet() function into the doPost() function, that way the POST request would render the same thing as the GET request. Better yet, you could move the logic to a separate function that both the doGet() and doPost() functions call.
However, that approach has a downside: if the user refreshes, they’ll see a message like this:
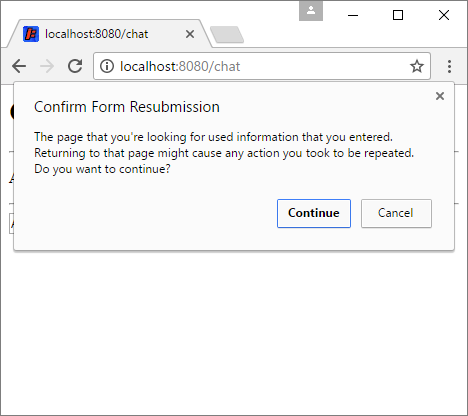
Because the page is a result of a POST request, the client has to send the data again. This results in the same name being posted multiple times, which probably isn’t what you want.
Instead, you can redirect the user to send a GET request after the POST request completes.
public void doPost(HttpServletRequest request, HttpServletResponse response)
    throws IOException {

  String name = request.getParameter("name");

  names.add(name);

  response.sendRedirect("/post-name-list/names");
}
The "/post-name-list/names" parameter tells the client to send a GET request to that URL. Now the web app works like this:
- The user visits
index.htmlin their browser, which sends aGETrequest to the server. - The server responds with the content of that file.
- When a user submits the form, the client sends a
POSTrequest to the server. - The
POSTrequest triggers thedoPost()function in the servlet, which saves the name and tells the client to redirect back to the/post-name-list/namesURL. - The client then sends another
GETrequest to the that URL. - The
GETrequest triggers thedoGet()function in the servlet, which renders all of the names. - The user can go back to
index.htmlto enter another name.
Note that this code redirects to the servlet’s URL because we want to trigger the same servlet, but you can redirect to any URL.
JSP
The above examples use the response.getWriter().println() function to output HTML content directly from a servlet. I did this to keep the code short, but in real life this approach is a pain in the neck. Remember from the JSP tutorial that you can use JSP files to render your content instead. That’s still true!
For example, this JSP file renders the list of names:
<%@ page import="java.util.List" %>
<!DOCTYPE html>
<html>
<head>
<title>Name List</title>
</head>
<body>
<h1>Name List</h1>
<ul>
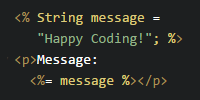
<% List<String> names = (List<String>) request.getAttribute("names"); %>
<% for (String name : names) { %>
<li><%= name %></li>
<% } %>
</ul>
<p>Click <a href="/post-name-list-jsp/index.html">here</a> to enter another name.</p>
</body>
</html>
This JSP file iterates over the names to show each one in a <li> tag.
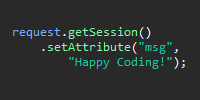
Now the servlet’s doGet() function looks like this:
public void doGet(HttpServletRequest request, HttpServletResponse response)
    throws IOException, ServletException {

  request.setAttribute("names", names);
  request.getRequestDispatcher("/WEB-INF/name-list.jsp").forward(request,response);
}
The doPost() function still adds a name to the ArrayList and then redirects to a GET request. And now the doGet() function adds that list to the request and forwards to the JSP file, which renders the names.
You can view or download this project here:
Fetch
You can also use JavaScript’s fetch() function to send and receive data between your client and your server.
Getting with Fetch
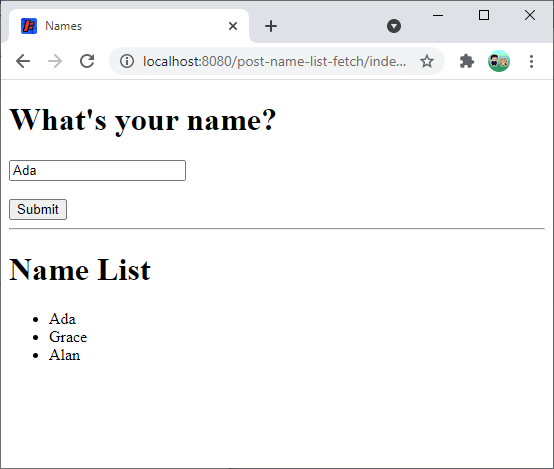
Right now, the list of names is its own page. That might be fine, but what if you wanted to show the names on your homepage, or on the same page as the form?
You could use servlets and JSP to show the list of names on other pages, but I want to introduce another common pattern: using JavaScript’s fetch() function to get the content from your server and insert it into the page.
Remember from the fetch tutorial that fetch() lets you write JavaScript code that requests content from a URL without navigating to a new page. You can use this to request content from a servlet without needing to refresh the page.
First, modify the servlet’s doGet() function to respond with HTML. Note that this HTML is a subset of the whole page, and only contains the list of names. Then modify the servlet’s doPost() function to redirect to the index.html page, which contains the form.
package io.happycoding.servlets;

import java.io.IOException;
import java.util.ArrayList;
import java.util.List;
import jakarta.servlet.annotation.WebServlet;
import jakarta.servlet.http.HttpServlet;
import jakarta.servlet.http.HttpServletRequest;
import jakarta.servlet.http.HttpServletResponse;

@WebServlet("/names")
public class NamesServlet extends HttpServlet {

  List<String> names = new ArrayList<>();

  @Override
  public void doGet(HttpServletRequest request, HttpServletResponse response)
      throws IOException {

    response.getWriter().println("<ul>");
    for (String name : names) {
      response.getWriter().println("<li>" + name + "</li>");
    }
    response.getWriter().println("</ul>");
  }

  @Override
  public void doPost(HttpServletRequest request, HttpServletResponse response)
      throws IOException {

    String name = request.getParameter("name");

    names.add(name);

    response.sendRedirect("/post-name-list-fetch/index.html");
  }
}
Next, modify the index.html file so it uses the fetch() function to get this content from the servlet and adds it to the page:
<!DOCTYPE html>
<html>
  <head>
    <title>Names</title>
    <script>
      async function fetchNames() {
        const response = await fetch('/post-name-list-fetch/names');
        const nameListHtml = await response.text();
        document.getElementById('name-list').innerHTML = nameListHtml;
      }
    </script>
  </head>
  <body onload="fetchNames();">
    <h1>What's your name?</h1>

    <form action="/post-name-list-fetch/names" method="POST">
      <input type="text" name="name" value="Ada">
      <br><br>
      <input type="submit" value="Submit">
    </form>

    <hr>

    <h1>Name List</h1>
    <div id="name-list">Loading...</div>
  </body>
</html>
When the user loads the index.html page, the JavaScript calls the fetch() function to get the HTML content from the servlet’s doGet() function, which it adds to the name-list <div> element. The user can also submit the form, which triggers the servlet’s doPost() function. The doPost() function adds the name to the ArrayList on the server and then redirects back to the index.html page, which starts the process over by calling the fetch() function.
Posting with Fetch
You can also use the fetch() function to send a POST request. This approach has the benefit of not needing to refresh the page whenever the user submits the form.
Note: Don’t feel like you have to take this approach. I’m including it because it’s useful, but if HTML forms serve your purpose, you can keep using that approach!
<!DOCTYPE html>
<html>
  <head>
    <title>Names</title>
    <script>
      async function fetchNames() {
        const response = await fetch('/post-name-list-fetch/names');
        const nameListHtml = await response.text();
        document.getElementById('name-list').innerHTML = nameListHtml;
      }

      async function postName() {
        const params = new URLSearchParams();
        params.append('name', document.getElementById('name').value);

        const fetchSettings = {method: 'POST', body: params};
        const response =
            await fetch('/post-name-list-fetch/names', fetchSettings);

        fetchNames();
      }
    </script>
  </head>
  <body onload="fetchNames();">
    <h1>What's your name?</h1>

    <input type="text" id="name" value="Ada">
    <br><br>
    <button onclick="postName();">Submit</button>

    <hr>

    <h1>Name List</h1>
    <div id="name-list">Loading...</div>
  </body>
</html>
This HTML contains a <button> element with an onclick attribute that calls the postName() function. The postName() function sends a POST request using the fetch() function. After the POST request completes, the code calls the fetchNames() function to refresh the list of names at the bottom of the page.
Notice that the page no longer refreshes when the user submits their name, because the code uses the fetch() function instead of an HTML form.
You can view or download this project here:
Other Approaches
Like everything else in programming, there are multiple ways to solve some of the problems introduced above. The fetch() function is one solution. HTML forms is another. Neither one is better or worse - it all depends on your context and what you think makes more sense.
You could also do something more advanced like using long polling (pretty much the same as above, except the server waits until a new name is sent to return the content) or WebSockets (instead of asking the server for the list of names, the server would send the names to the client whenever there’s an update).
The point of this tutorial was to introduce the idea of POST requests, so I intentionally left some of these other approaches out. But don’t be afraid to do more research and improve upon the ideas that were introduced here!
Homework
- Expand the web app above. Make it prettier using CSS, or count how many people have each name.
- Create a to-do list web app. Let users add and remove tasks from their list.
- Create a text editor web app. Let users submit a block of text and then see that text at a URL that you assign.
