Struts
Struts
- What’s a Framework?
- Download Struts
- Create a Web App Directory
- Create a
web.xmlFile - Create an Action Class
- Create a JSP View
- Create a
struts.xmlFile - Run the Web App
- Thinking in Struts
- Homework
So far, we know how to make a web app using servlet classes and JSP files, and we know how to use libaries in our code. We’ve built our web apps using the following approach:
- The
web.xmlfile maps URLs to servlet classes. - Servlet classes contain
doGet()anddoPost()functions to handle requests. - JSP files contain HTML and Java code to create a view.
This approach will work, and if you’re happy with this setup, that’s completely okay! You don’t need to learn about Struts or other frameworks to get stuff working. But if you’re annoyed by things like parsing multiple URLs to handle them in the same servlet class or sharing data between servlets, or if you’re planning on working on a bigger professional project, then you might want to learn about frameworks like Struts.
What’s a Framework?
A software framework is code that was written by other people, that you can use to help organize your own code. If you think that sounds similar to a software library, you aren’t wrong! There is a blurry line between what counts as a framework versus what counts as a library, but the way I look at it is:
- A library is code that you use inside your code.
- A framework is code that you put your code inside.
If you’re using a library, you’re still using the overall setup and flow of whatever language you’re programming in: you’re using a main() method, or a servlet class with a doGet() function, for example. Compare that to a framework, which sits in between the underlying flow of the language and your code. So instead of writing your code inside a doGet() function, you’ll write your code inside whatever function the framework provides. That’s probably a little confusing right now, but hopefully it will make more sense by the end of this tutorial, which introduces a framework called Struts.
A Struts web app looks like this:
- A
stuts.xmlfile maps URLs to action classes. - Action classes contain functions that map to particular URLs.
- JSP files contain HTML and Java code to create a view, and Struts tags provide access to data in our action classes.
The idea is that Struts allows us to simplify our code, because we don’t have to deal with the “low level” URL mapping and servlet classes.
Download Struts
Go to the Struts download page and download the latest version of Struts. You only need the “Essential Dependencies” version. That gives you a .zip file, which you can unzip anywhere. (I put mine on my desktop for now.)
Create a Web App Directory
By now you’re probably pretty familiar with this step. Either create a directory for your web app (if you’re using the command line to compile and run stuff), or create a project in Eclipse. Copy the .jar files from the folder you just unzipped into the WEB-INF/libs folder of your web app directory, like we covered in the libraries tutorial.
Create a web.xml File
Next, we need to write a web.xml file that tells our server to let the Struts framework handle all of the requests:
<web-app
	xmlns="http://xmlns.jcp.org/xml/ns/javaee"
	xmlns:xsi="http://www.w3.org/2001/XMLSchema-instance"
	xsi:schemaLocation="http://xmlns.jcp.org/xml/ns/javaee
		http://xmlns.jcp.org/xml/ns/javaee/web-app_3_1.xsd"
	version="3.1">

	<filter>
	    <filter-name>struts2</filter-name>
	    <filter-class>org.apache.struts2.dispatcher.filter.StrutsPrepareAndExecuteFilter</filter-class>
	</filter>

	<filter-mapping>
	    <filter-name>struts2</filter-name>
	    <url-pattern>/*</url-pattern>
	</filter-mapping>

</web-app>
This sets up a filter that sends every URL to the Struts framework. This is how Struts “sits between” the server and your code. Now when the server receives a request, it will send that request to Struts, and Struts will then send it to our action classes, which we’ll talk about… right now.
Create an Action Class
Instead of servlets, Struts uses action classes that allow you to write code that runs when the server receives a request from a user. Here’s an example action class:
import com.opensymphony.xwork2.ActionSupport;

public class HelloWorldAction extends ActionSupport{

	private String messageToDisplay;

	@Override
	public String execute(){
		messageToDisplay = "Happy coding!";
		return ActionSupport.SUCCESS;
	}

	public String getMessage(){
		return messageToDisplay;
	}
}
This class extends the ActionSupport class, similar to how a servlet extends the HttpServlet class. It overrides the execute() function, which Struts automatically calls when it receives a request. This function contains any “business logic” required to fulfill a request, and it returns a String value. In this case, it returns the predefined ActionSupport.SUCCESS value, which behind the scenes is a value of "success" but could be anything you want. This helps Struts know which view to show, which we’ll see in a second.
This also defines a getMessage() function, which you can use from a JSP view. More on that in a second.
It’s also worth noting that with a servlet class, you only ever have one instance of a class, which is called from multiple threads. But in Struts, a new instance of your action class is created for every request. (Hint: try to add a visitCount variable to your action class that you increment every time the page is loaded.)
Create a JSP View
Notice that our action class doesn’t render any HTML. This is because we should use a JSP file to render HTML. Here’s an example JSP file:
hello.jsp
<%@ taglib prefix="s" uri="/struts-tags"%>
<!DOCTYPE html>
<html>
	<head>
		<title>Hello World Struts</title>
	</head>
	<body>
		<h1>Hello World</h1>
		<p><s:property value="message" /></p>
	</body>
</html>
Hopefully you’re already familiar with JSP (if not check out the JSP tutorial), but this code contains a couple new things:
First, the <%@ taglib prefix="s" uri="/struts-tags"%> line imports the Struts taglib, which gives us extra Struts functionality in JSP. We then use that taglib in the <s:property value="message" /> line. This property tag looks for a function named getXYZ(), where XYZ is whatever you supply in the value attribute. In other words, this tag ends up calling the getMessage() function in our action class. This allows us to separate our logic from our view, while still easily passing data to be rendered.
There are a bunch of other Struts tags you can use in your JSP files. Read more about them here.
Create a struts.xml File
Finally, we need to map the requests that Struts receives to the action classes and JSP views we want to use. We do that using a struts.xml file, which is a little bit like the web.xml file except it tells Struts what to do.
<?xml version="1.0" encoding="UTF-8"?>
<!DOCTYPE struts PUBLIC
	"-//Apache Software Foundation//DTD Struts Configuration 2.5//EN"
	"http://struts.apache.org/dtds/struts-2.5.dtd">
<struts>

	<package name="helloworld" namespace="/" extends="struts-default">
		<action name="hello" class="HelloWorldAction">
			<result name="success">WEB-INF/jsp/hello.jsp</result>
		</action>
	</package>
</struts>
This might seem confusing at first, but let’s take it piece by piece:
- The first couple of lines just define an XML declaration and specify a Struts version, which the underlying XML parser uses to understand the rest of the file.
<struts>is the top-level element that will contain other elements.<package>defines a group of action classes. How you group them is up to you.nameallows you to name your group. This can be anything you want.namespacespecifies the first part of the URL to map. In this case we’re using/, which means our URLs are relative to the top of our domain.extendstells Struts to hook up its default behaviors to our code.<action>maps an action class to a URL.namespecifies the rest of the URL, which it combines with thenamespaceattribute to create a URL to map. In this case the URL will be/hello.classspecifies the action class whoseexecute()function should be called when a user requests the mapped URL.<result>tells Struts which JSP view should be rendered depending on what value is returned from theexecute()function.namemaps to a value returned from theexecute()function. This matches the value in our action class.- The content of the
<result>tag specifies a path to a JSP file that should be used to render the view when the action class returns a value that matches thenameattribute.
Your struts.xml file can contain multiple <package> elements, which can contain multiple <action> elements, which can contain multiple <result> elements. When a request is made, Struts finds the action class that matches the URL, and calls its execute() function. It then finds the result that matches the value returned from that function, and renders the view using that JSP file.
The struts.xml file needs to be in the same directory as your code, not in the top of the WEB-INF folder! So if you’re using the console to compile everything, it should be in the classes directory; and if you’re using Eclipse then it should be in the src directory.
Run the Web App
Now we should be able to run our web app just like we’ve been running all of our other web apps. If you’re using the console, then copy the web app directory into the Jetty folder. If you’re using Eclipse, then just push the run button.
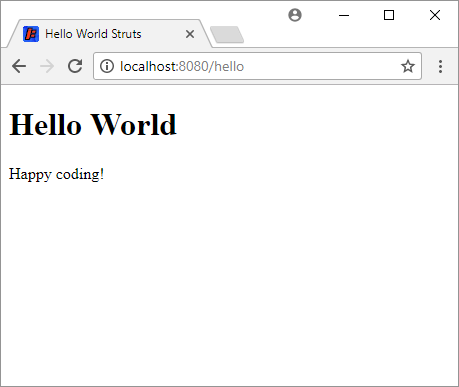
When we visit http://localhost:8080/hello, we should see this:
Thinking in Struts
This tutorial introduced you to the basics of using Struts. My goal was to give you just enough background so you can start doing your own research into using the more advanced features that Struts offers. The Struts website contains a ton of guides that you’re now ready to read through.
Struts acts as a “middle man” between your code and the underlying Java EE code. The idea is that Struts should make it easier to do stuff, but it also requires you to “think in Struts” when writing code. For example, Struts has its own way of doing things: getting form input, handling sessions, etc. This can be a bit of a “re-learning” process, where you have to figure out “the Struts way” of doing something.
In the end it’s up to you whether you want to keep using servlet classes or use a framework like Struts.
Homework
- Turn your web app into a Struts app!
- Learn about Apache Tiles, which is another framework that’s often used alongside Struts.

