Pathfinding


Pathfinding
- Background
- GdxAI
- Path Following
- What if my game doesn’t use nodes?
- More Advanced Pathfinding
- Summary
Let’s say you’ve set up your game environment: you have game objects, items, terrain, a map, a player, and enemies. Now what? How do your enemies know how to get to your player? How do you highlight a path on the map for the player to follow?
For simple games, you can get away with hard-coded behaviors. Maybe your enemies always follow the same path, like pacing back and forth or moving in a circle. But if you want your enemies to do anything smarter, they’ll need to be able to figure out what to do.
Pathfinding is the process of finding a path from one point to another. This is an entire field of study, but this tutorial focuses on pathfinding in libGDX.
Background
To use the pathfinding features that come with libGDX, it’s a good idea to understand what’s going on under the hood. I’m going to skip over a lot of the theory, so if you want more info on that stuff, there are a ton of books and resources out there.
The Problem
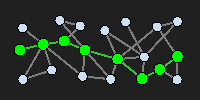
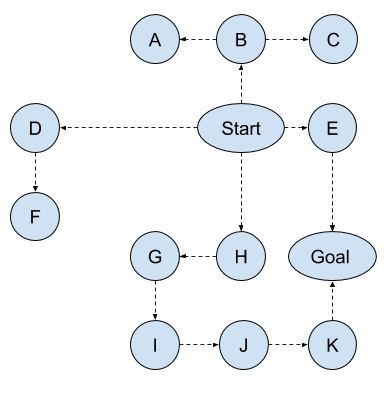
Let’s say we have a map like this:

Each circle is a node and each line is a path that allows you to transition from one node to another. You can think of nodes as cities and lines as highways, or as intersections and roads, or as rooms and doorways.
How would we get from the Start node to the Goal node? In other words, how can we come up with a path that we can follow to get from Start to Goal?
Human Path Finding
https://en.wikipedia.org/wiki/Metacognition
Find path without knowing where the thing is or with a map
Depth-First Search
The simplest approach might be to just go off in a direction and see if we get where we’re going. For example we could choose a random neighbor of Start, go to that neighbor, choose a new random neighbor, and repeat that process until we eventually get to the destination (or reach a dead end, at which point we can turn around and choose a different path).

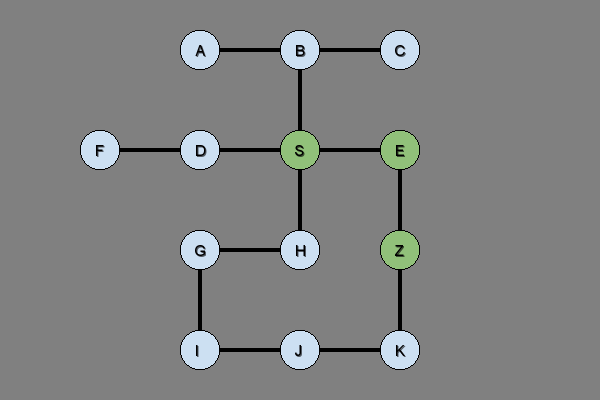
Depth-first search is not particularly intelligent, and it will end up exploring very long paths. Notice how it finds the Start -> H -> G -> I -> J -> K -> Goal path instead of the shorter Start -> E -> Goal path.
In real life, you might think of this as coming up with a path that goes through Antarctica to get to your friend’s house. Unless your friend lives in Antarctica, that’s probably not a very efficient path!
We could use depth-first search to find every possible path and then choose the shortest one from that, but for more situations that will take too much time. Depth-first search is useful for situations like mazes, where there are relatively few possible pathways. But if we have a game with a lot of different pathways, depth-first search spends a lot of time investigating unreasonable paths.
You can read more about depth-first search if you’re curious, but for now it’s enough to know that depth-first search is usually not useful for pathfinding in games.
Breadth-First Search
Instead of just going off in a random direction, we could be a little smarter with our path planning. Keep in mind that a computer isn’t smart enough to understand the overall picture, or to see the obvious Start -> E -> Goal path. So we have to come up with possible paths until we find one that gets us to our goal.
Breadth-first search works by expanding the possible paths one step at a time. In other words, breadth-first search first looks at all paths with a length of 1, then looks at all paths with a length of 2, then all paths with a length of 3, until it finds a path that leads to the goal.
For example, to find a path from your house to your friend’s house, you’d do this:
- What happens if I turn left from my house? Did I find my friend yet?
- If not, what happens if I turn right from my house? Did I find my friend yet?
- If not, what happens if I turn left and then turn left again?
- What happens if I turn left and then turn right?
- What happens if I turn right and then left?
- What happens if I turn right and then right again?
- What happens if I turn left, then left, then left again?
- …
The paths you check will get longer and longer, and eventually you’ll find a path that takes you to your friend’s house.
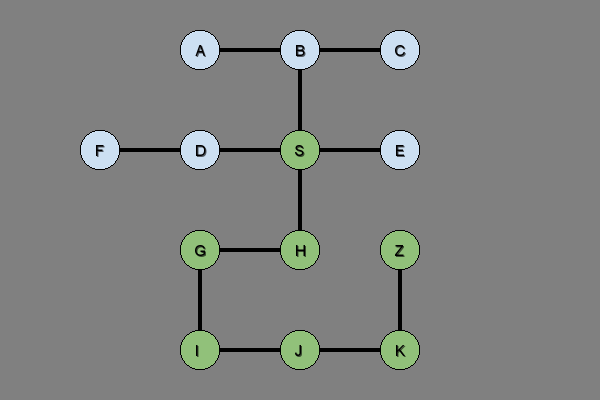
Here’s how breadth-first search would look in our map, finding a path from Start to Goal:
Notice that it first checks paths with a length of 1, then checks paths with a length of 2. If it didn’t find the goal, it would continue to check paths with a length of 3. This allows breadth-first search to avoid going down longer paths when shorter paths are available.
Breadth-first search is the basis for a ton of algorithms, but for games we can use more specific path-finding algorithms.
Dijkstra’s Algorithm
Breadth-first search has one big downside: it’s not particularly smart about how it chooses which neighbor to investigate next. In the above example, notice how breadth-first search explores the D node, even though D is pretty far away.
In our real-life example, let’s say you lived next to an airport. Breadth-first search would check all of the paths that involve getting on a plane and landing thousands of miles away, because the airport is only one “step” away.
Dijkstra’s algorithm improves upon breadth-first search by expanding the shortest path instead of expanding every path. This is a form of best-first search.
When Dijkstra’s algorithm picks which path to expand next, it looks at all of the paths it has seen so far, and picks the path with the shortest total length.
In this animation, Dijkstra’s algorithm does the following:
- Start at the
Startnode. Expand the shortest path, which would take us to theEnode. - The path to
Bis the shortest unexplored path, so expand to theBnode. - Next, the
Start -> B -> AandStart -> B -> Cpaths are shortest, so expand those. - We haven’t found
Goalyet, so expand the next shortest path, which takes us to theHnode. - Now the shortest unexplored path is
Start -> E -> Goal, so expand that. - We found
Goal, so we’re done!
Dijkstra’s algorithm is probably the most popular path-finding algorithm, because it’s relatively simple and always finds the shortest possible path.
A*
Dijkstra’s algorithm has one big downside: it expands the shortest path, regardless of how close that path gets to the destination. In the above animation, notice how Dijkstra’s algorithm explores the B node, even though those paths take us further away from the Goal node.
In our real-life example, let’s say your friend’s house was 10 miles down the highway, but there were a lot of side streets in your neighborhood. Dijkstra’s algorithm would explore all of those side streets before it tried going on the highway, even if those side streets took you further away from your friend’s house.
A* (A star) improves on Dijkstra’s algorithm by deciding which path to expand based on both the length of the path and how far from the goal each path would be.

In this animation, the A* algorithm does the following:
- Start at the
Startnode. Expand the path with the shortest length and that gets us closest toGoal, which would take us to theEnode. - Repeat that process to expand the path to the
Hnode. Note that theStart -> E -> Goalpath is longer than theStart -> Hpath, so it isn’t chosen yet. - Again, repeat the process, this time expanding the
Start -> E -> Goalpath. The algorithm doesn’t expand toBorD, because those paths take us further away from theGoalnode. - We found
Goalso we’re done!
One important note is that we usually don’t know for sure how far away from the destination any particular node is: to figure that out, we’d need to know the path ahead of time, which is what we’re trying to figure out in the first place! So instead of using the true distance, we use a heuristic, which can also be thought of as an educated guess.
What you choose for a heuristic distance from the goal depends on your exact context, but a reasonable general choice for many games is to use the distance between the next node and the goal node, similar to the above example. We can also factor in other facts, for example we can avoid paths that go near enemies by including that in our heuristic value.
Depending on what you choose for a heuristic, A* won’t always find the best possible path, but most games don’t actually need the best possible path- they just need something that looks reasonable and is fast to calculate. That’s what A* is best at.
Example
My favorite example of A* in action is Robin Baumgarten’s entry to the 2009 Mario AI Championship. The contest challenged contestants to create an AI that played Mario, and Robin Baumgarten’s entry used A* to control the player. Check out this video:
This won the contest, which is interesting because the underlying algorithm is relatively simple: it uses A* search to find a path to the right side of the screen. This interview gives a bit more background, but I wanted to point it out just because it’s a real-life example of the A* pathfinding algorithm.
GdxAI
Now that we’ve talked about the theory behind path finding algorithms, let’s talk about how we can use this theory in our code.
GdxAi is a library designed to work with libGDX that contains various artificial intelligence features, including pathfinding. It contains an implementation of the A* pathfinding algorithm that you can use in your game, and the rest of this tutorial will show you how.
Graphs, Connections, and Heuristics
GdxAi uses three interfaces to implement the A* algorithm. We plug into the algorithm by implementing these interfaces to provide information about our game.
Graphrepresents the entire search space. Specifically, we’re going to implement theIndexedGraphinterface to hold our search space.Connectionrepresents a path from one node to another. AConnectionhas a direction (it goes from one node to another node) and a cost (the distance from the first node to the second node).Heuristicdefines a function that returns the estimated distance between a particular node and the goal node. This is how the A* algorithm chooses how to explore the space, as explained above.
Note that there is not a Node class! This can be confusing at first, because when we think about the A* algorithm we usually think in terms of nodes. But with the above interfaces, we can use any class we want as a node. We’ll see an example in a minute.
Any tutorials you see that talk about a Node or IndexedNode class are using an old version of the gdxAI library.
Setup
The easiest way to include the gdxAI library in your project is to use the libGDX setup tool, which we talked about in the libGDX setup tutorial.
Run the setup tool, give your game a name, and make sure you check the Ai box towards the bottom.

The Ai checkbox tells the setup tool to include the gdxAI library in your project. Click the Generate button, and then open the project in your IDE.
Example World
Let’s make a simulation that shows a map of various cities, with roads between them, and shows the best path from one city to another.
Let’s start with a class that represents a city:
package io.happycoding.pathfinding;

import com.badlogic.gdx.graphics.g2d.BitmapFont;
import com.badlogic.gdx.graphics.g2d.SpriteBatch;
import com.badlogic.gdx.graphics.glutils.ShapeRenderer;

public class City {
  float x;
  float y;
  String name;

  /** Index used by the A* algorithm. Keep track of it so we don't have to recalculate it later. */
  int index;

  public City(float x, float y, String name){
    this.x = x;
    this.y = y;
    this.name = name;
  }

  public void setIndex(int index){
    this.index = index;
  }

  public void render(ShapeRenderer shapeRenderer, SpriteBatch batch, BitmapFont font, boolean inPath){
    shapeRenderer.begin(ShapeRenderer.ShapeType.Filled);
    if(inPath) {
      // green
      shapeRenderer.setColor(.57f, .76f, .48f, 1);
    }
    else{
      // blue
      shapeRenderer.setColor(.8f, .88f, .95f, 1);
    }
    shapeRenderer.circle(x, y, 20);
    shapeRenderer.end();

    shapeRenderer.begin(ShapeRenderer.ShapeType.Line);
    shapeRenderer.setColor(0, 0, 0, 1);
    shapeRenderer.circle(x, y, 20);
    shapeRenderer.end();

    batch.begin();
    font.setColor(0, 0, 0, 255);
    font.draw(batch, name, x-5, y+5);
    batch.end();
  }
}
This class contains the X and Y location of a city, as well as its name. It also contains a render() function that draws the city to the screen. Also note that it keeps track of an index variable. We’ll use this in a second.
Next, let’s create a class that represents a street:
package io.happycoding.pathfinding;

import com.badlogic.gdx.ai.pfa.Connection;
import com.badlogic.gdx.graphics.glutils.ShapeRenderer;
import com.badlogic.gdx.math.Vector2;

public class Street implements Connection<City> {
  City fromCity;
  City toCity;
  float cost;

  public Street(City fromCity, City toCity){
    this.fromCity = fromCity;
    this.toCity = toCity;
    cost = Vector2.dst(fromCity.x, fromCity.y, toCity.x, toCity.y);
  }

  public void render(ShapeRenderer shapeRenderer){
    shapeRenderer.begin(ShapeRenderer.ShapeType.Filled);
    shapeRenderer.setColor(0, 0, 0, 1);
    shapeRenderer.rectLine(fromCity.x, fromCity.y, toCity.x, toCity.y, 4);
    shapeRenderer.end();
  }

  @Override
  public float getCost() {
    return cost;
  }

  @Override
  public City getFromNode() {
    return fromCity;
  }

  @Override
  public City getToNode() {
    return toCity;
  }
}
This class contains the start and end cities that define the street, and a render() function that draws the street to the screen. It implements the GdxAI Connection interface, and defines a getCost() function, which returns the length of the street, which equals the distance between the cities connected by the street.
The A* algorithm will use the cost of the connections between nodes (the length of the roads that connect the cities) to figure out which direction to explore. We also need a heuristic class:
package io.happycoding.pathfinding;

import com.badlogic.gdx.ai.pfa.Heuristic;
import com.badlogic.gdx.math.Vector2;

public class CityHeuristic  implements Heuristic<City> {

  @Override
  public float estimate(City currentCity, City goalCity) {
    return Vector2.dst(currentCity.x, currentCity.y, goalCity.x, goalCity.y);
  }
}
The CityHeuristic class implements the GdxAI Heuristic interface and defines a simple estimate() function, which returns the distance between the current node (City) and the goal. This is the other side of the A* algorithm, and allows it to explore the search space more intelligently.
Then we need to create a class that keeps track of our Cities and Streets:
package io.happycoding.pathfinding;


import com.badlogic.gdx.ai.pfa.Connection;
import com.badlogic.gdx.ai.pfa.DefaultGraphPath;
import com.badlogic.gdx.ai.pfa.GraphPath;
import com.badlogic.gdx.ai.pfa.indexed.IndexedAStarPathFinder;
import com.badlogic.gdx.ai.pfa.indexed.IndexedGraph;
import com.badlogic.gdx.utils.Array;
import com.badlogic.gdx.utils.ObjectMap;

public class CityGraph implements IndexedGraph<City> {

  CityHeuristic cityHeuristic = new CityHeuristic();
  Array<City> cities = new Array<>();
  Array<Street> streets = new Array<>();

  /** Map of Cities to Streets starting in that City. */
  ObjectMap<City, Array<Connection<City>>> streetsMap = new ObjectMap<>();

  private int lastNodeIndex = 0;

  public void addCity(City city){
    city.index = lastNodeIndex;
    lastNodeIndex++;

    cities.add(city);
  }

  public void connectCities(City fromCity, City toCity){
    Street street = new Street(fromCity, toCity);
    if(!streetsMap.containsKey(fromCity)){
      streetsMap.put(fromCity, new Array<Connection<City>>());
    }
    streetsMap.get(fromCity).add(street);
    streets.add(street);
  }

  public GraphPath<City> findPath(City startCity, City goalCity){
    GraphPath<City> cityPath = new DefaultGraphPath<>();
    new IndexedAStarPathFinder<>(this).searchNodePath(startCity, goalCity, cityHeuristic, cityPath);
    return cityPath;
  }

  @Override
  public int getIndex(City node) {
    return node.index;
  }

  @Override
  public int getNodeCount() {
    return lastNodeIndex;
  }

  @Override
  public Array<Connection<City>> getConnections(City fromNode) {
    if(streetsMap.containsKey(fromNode)){
      return streetsMap.get(fromNode);
    }

    return new Array<>(0);
  }
}
There’s a lot here, so let’s take it apart a bit:
- We keep track of our Cities and Streets in a couple data structures. There are many different ways to do this, and the example above is just one approach.
- The
addCity()function allows us to add a city to our graph. When a city is added to the graph, we assign it an index that the A* algorithm uses internally. - The
connectCities()function creates aStreetthat goes from one city to another. - The
getIndex()function returns the index of a particularCityinstance. Since we store the index in theCityitself, this is a simple one-line function. - The
getNodeCount()function return the count of how many cities are in our search space. Again, since we’re keeping track of this, this is a simple one-line function. - The
getConnections()function returns list of streets that start at a particular city.
The findPath() function is where the magic happens. This calculates a path from one city to another, and populates the cityPath variable with the path it finds.
Finally, we can create a class that uses all of the above:
package io.happycoding.pathfinding;

import com.badlogic.gdx.ApplicationAdapter;
import com.badlogic.gdx.Gdx;
import com.badlogic.gdx.ai.pfa.DefaultGraphPath;
import com.badlogic.gdx.ai.pfa.GraphPath;
import com.badlogic.gdx.ai.pfa.indexed.IndexedAStarPathFinder;
import com.badlogic.gdx.graphics.GL20;
import com.badlogic.gdx.graphics.Texture;
import com.badlogic.gdx.graphics.g2d.BitmapFont;
import com.badlogic.gdx.graphics.g2d.SpriteBatch;
import com.badlogic.gdx.graphics.glutils.ShapeRenderer;
import com.badlogic.gdx.utils.Array;

public class PathFindingGame extends ApplicationAdapter {
  ShapeRenderer shapeRenderer;
  SpriteBatch batch;
  BitmapFont font;

  CityGraph cityGraph;
  GraphPath<City> cityPath;

  @Override
  public void create() {
    shapeRenderer = new ShapeRenderer();
    batch = new SpriteBatch();
    font = new BitmapFont();

    cityGraph = new CityGraph();

    City startCity = new City(300, 250, "S");
    City bCity = new City(300, 350, "B");
    City aCity = new City(200, 350, "A");
    City cCity = new City(400, 350, "C");
    City dCity = new City(200, 250, "D");
    City fCity = new City(100, 250, "F");
    City eCity = new City(400, 250, "E");
    City hCity = new City(300, 150, "H");
    City gCity = new City(200, 150, "G");
    City iCity = new City(200, 50, "I");
    City jCity = new City(300, 50, "J");
    City kCity = new City(400, 50, "K");
    City goalCity = new City(400, 150, "Z");

    cityGraph.addCity(startCity);
    cityGraph.addCity(bCity);
    cityGraph.addCity(aCity);
    cityGraph.addCity(cCity);
    cityGraph.addCity(dCity);
    cityGraph.addCity(fCity);
    cityGraph.addCity(eCity);
    cityGraph.addCity(hCity);
    cityGraph.addCity(gCity);
    cityGraph.addCity(iCity);
    cityGraph.addCity(jCity);
    cityGraph.addCity(kCity);
    cityGraph.addCity(goalCity);

    cityGraph.connectCities(startCity, bCity);
    cityGraph.connectCities(bCity, aCity);
    cityGraph.connectCities(bCity, cCity);
    cityGraph.connectCities(startCity, dCity);
    cityGraph.connectCities(dCity, fCity);
    cityGraph.connectCities(startCity, hCity);
    cityGraph.connectCities(hCity, gCity);
    cityGraph.connectCities(gCity, iCity);
    cityGraph.connectCities(iCity, jCity);
    cityGraph.connectCities(jCity, kCity);
    cityGraph.connectCities(kCity, goalCity);
    cityGraph.connectCities(startCity, eCity);
    cityGraph.connectCities(eCity, goalCity);

    cityPath = cityGraph.findPath(startCity, goalCity);
  }

  @Override
  public void render() {
    Gdx.gl.glClearColor(.5f, .5f, .5f, 1);
    Gdx.gl.glClear(GL20.GL_COLOR_BUFFER_BIT);

    for (Street street : cityGraph.streets) {
      street.render(shapeRenderer);
    }

    // Draw all cities blue
    for (City city : cityGraph.cities) {
      city.render(shapeRenderer, batch, font, false);
    }

    // Draw cities in path green
    for (City city : cityPath) {
      city.render(shapeRenderer, batch, font, true);
    }
  }

  @Override
  public void dispose() {
    shapeRenderer.dispose();
    batch.dispose();
    font.dispose();
  }
}
This is our main “game” class. It uses the classes we defined above to create a network of cities and streets, and uses GdxAI to calculate a path from city S to city Z, which we draw in green.
Try removing the connection between E and Z to get a different path:
This is just a simple example to show the concepts used by GdxAI, but those same concepts scale up to much more complicated search spaces as well.
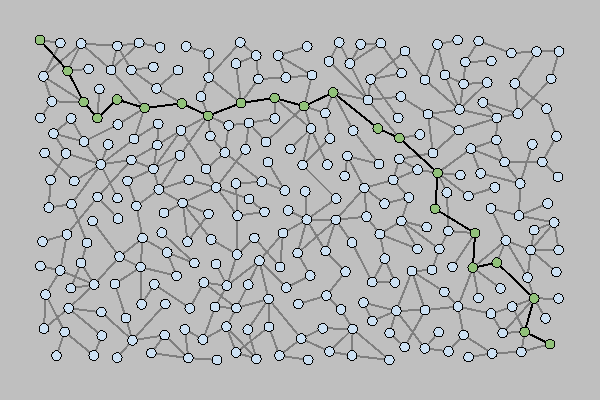
This example graph shows hundreds of cities with a path from the upper-left to the bottom-right.
Path Following
Now that we know how to calculate a path, we need to do something with it. Generally, we want to create an AI character, also called an agent, that follows the path.
There are a ton of different ways to do that. Here are a few options:
- Use interpolation to move the agent between nodes.
- Use the
lerp()function in theVector2class link to move the agent between nodes. - Use the steering behaviors that come with GdxAI.
- Use your own movement logic to move the agent.
Which approach you take depends on how you want your game to work (and honestly, what fits in your brain the best). I’d recommend trying a couple different approaches out to see which one you like best.
Here’s an example of one approach you could take. This class stores the agent’s position and uses a Queue to move that position between nodes in the path. It uses some basic trigonometry to figure out which direction to go, and it updates its internal path (which node is next) whenever it collides with the current target node.
package io.happycoding.pathfinding;

import com.badlogic.gdx.ai.pfa.GraphPath;
import com.badlogic.gdx.graphics.g2d.SpriteBatch;
import com.badlogic.gdx.graphics.glutils.ShapeRenderer;
import com.badlogic.gdx.math.MathUtils;
import com.badlogic.gdx.math.Vector2;
import com.badlogic.gdx.utils.Queue;

/** Example class that moves around in a network of Cities. */
public class Agent {

  CityGraph cityGraph;

  float x;
  float y;

  float speed = 5f;
  float deltaX = 0;
  float deltaY = 0;

  City previousCity;
  Queue<City> pathQueue = new Queue<>();

  public Agent(CityGraph cityGraph, City start) {
    this.cityGraph = cityGraph;
    this.x = start.x;
    this.y = start.y;
    this.previousCity = start;
  }

  public void render(ShapeRenderer shapeRenderer, SpriteBatch batch) {
    shapeRenderer.begin(ShapeRenderer.ShapeType.Filled);
    shapeRenderer.setColor(1f, 0f, 0f, 1);
    shapeRenderer.circle(x, y, 5);
    shapeRenderer.end();

    shapeRenderer.begin(ShapeRenderer.ShapeType.Line);
    shapeRenderer.setColor(0, 0, 0, 1);
    shapeRenderer.circle(x, y, 5);
    shapeRenderer.end();
  }

  public void step() {
    x += deltaX;
    y += deltaY;
    checkCollision();
  }

  /**
   * Set the goal City, calculate a path, and start moving.
   */
  public void setGoal(City goal) {
    GraphPath<City> graphPath = cityGraph.findPath(previousCity, goal);
    for (int i = 1; i < graphPath.getCount(); i++) {
      pathQueue.addLast(graphPath.get(i));
    }
    setSpeedToNextCity();
  }

  /**
   * Check whether Agent has reached the next City in its path.
   */
  private void checkCollision() {
    if (pathQueue.size > 0) {
      City targetCity = pathQueue.first();
      if (Vector2.dst(x, y, targetCity.x, targetCity.y) < 5) {
        reachNextCity();
      }
    }
  }

  /**
   * Agent has collided with the next City in its path.
   */
  private void reachNextCity() {

    City nextCity = pathQueue.first();

    // Set the position to keep the Agent in the middle of the path
    this.x = nextCity.x;
    this.y = nextCity.y;

    this.previousCity = nextCity;
    pathQueue.removeFirst();

    if (pathQueue.size == 0) {
      reachDestination();
    } else {
      setSpeedToNextCity();
    }
  }

  /**
   * Set xSpeed and ySpeed to move towards next City on path.
   */
  private void setSpeedToNextCity() {
    City nextCity = pathQueue.first();
    float angle = MathUtils.atan2(nextCity.y - previousCity.y, nextCity.x - previousCity.x);
    deltaX = MathUtils.cos(angle) * speed;
    deltaY = MathUtils.sin(angle) * speed;
  }

  /**
   * Agent has reached the goal City.
   */
  private void reachDestination() {
    deltaX = 0;
    deltaY = 0;

    // Find a new goal City
    City newGoal;
    do {
      newGoal = cityGraph.cities.random();
    } while (newGoal == previousCity);

    setGoal(newGoal);
  }
}
To use this class, you’d initialize it in your main game class, and then call the step() and render() functions. This example just finds another random goal node whenever it reaches its target node, but you could do anything you want by changing what’s in the reachDestination() function.
What if my game doesn’t use nodes?
The above examples all use environments made up of connected nodes (also called a graph), but not every game uses this approach. Don’t worry, we can still use A* pathfinding with games that aren’t graphs!
The important concept to understand is that the “nodes” used by A* don’t have to be literal: they can be abstract representations of the space in your game. That sounds confusing, but here are a couple examples:
Rooms
Let’s say we have a game that looks like this:
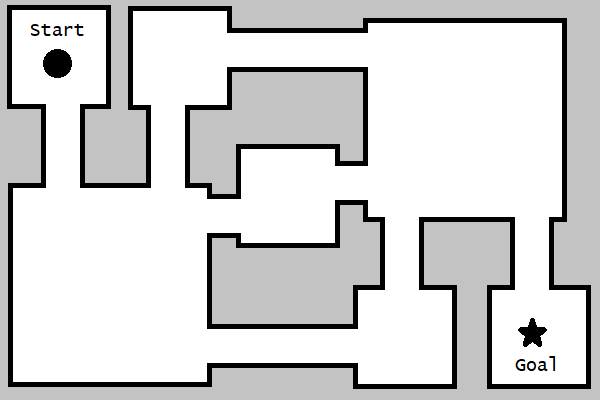
This space is split up into rooms that are connected by hallways, and we want to generate a path from the circle in the upper-left to the star in the bottom-right.
This example is pretty simple, but imagine a game with many more rooms and hallways. How can we use A* pathfinding to figure out the path?
Long story short, we can still split this environment up into nodes useful for the A* algorithm. In this example, we could put nodes in the center of every room, as well as at every entrance or exit. It might look like this:
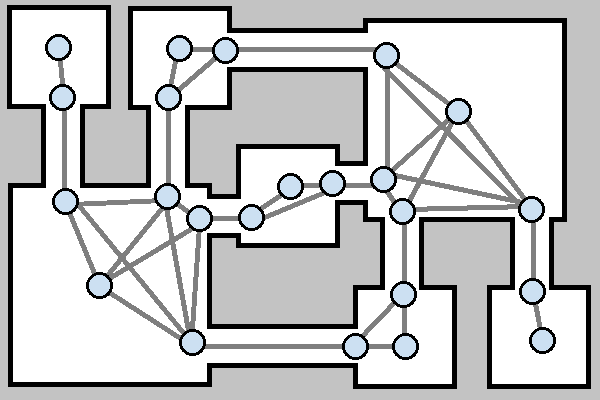
Now we can use A* to get from the upper-left node to the bottom-right node. We don’t have to display these nodes in our game! To the user, it would look like the agent is moving through the rooms. And we could add more nodes for any part of the map that might be worth navigating to.
Grids
Another common approach to organizing the space in a game is to use a grid. Let’s say we have a game that looks like this:
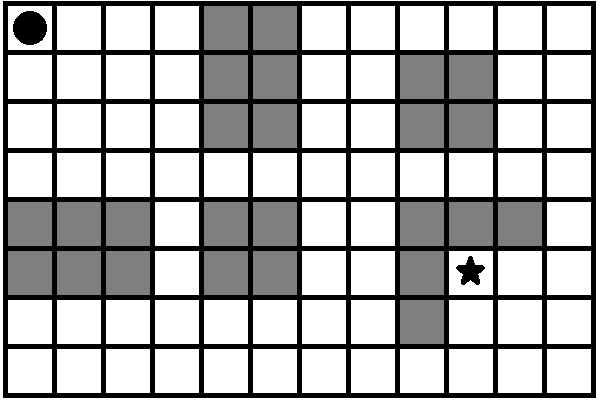
This space is organized into a grid. We have an agent in the upper-left corner, some obstacles in gray that the agent can’t pass through, and a goal near the bottom-right corner.
We can use A* pathfinding by treating each navigable cell as a node, connected to all of its neighbor cells:
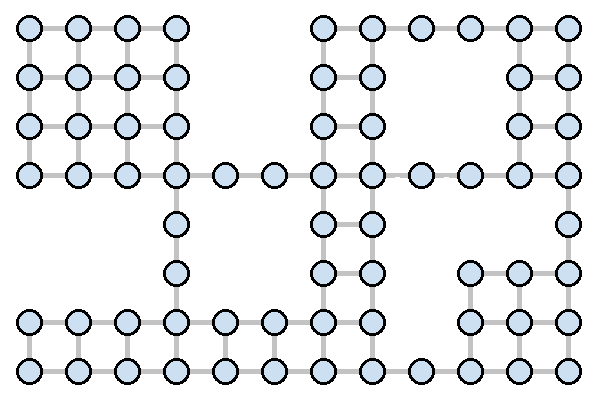
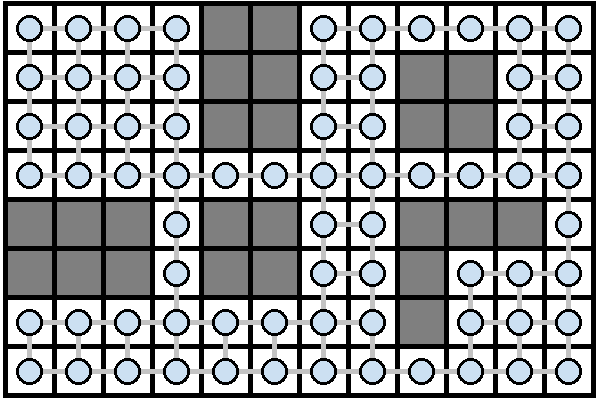
Again, you don’t necessarily have to draw the nodes on the map.
More Advanced Pathfinding
This tutorial focused on the A* pathfinding algorithm that comes with Gdx AI, but there are a ton of other options out there.
GdxAI comes with a few other tools useful for pathfinding. Here are a couple you might check out:
- Steering behaviors are a way to realistically move agents in your game.
- Hierarchical pathfinding breaks down the pathfinding process into multiple steps, similar to how humans plan trips.
Additionally, you might want to check out swarming and flocking behaviors to move groups of agents together, or ant colony optimization algorithms to find paths similar to how ants find food in real life.
Less Advanced Pathfinding
The algorithms we talked about so far are great for situations where you have a complex space with obstacles and multiple possible paths, but there are also many situations where something simpler will suffice.
For example, if you’re trying to figure out how to move something from one point to another, without any obstacles in between, then you can probably get away with taking a simpler approah like linear interpolation or using basic trig to find X and Y speeds. (This is how I moved the agent from one node to another in the above code.)
You might also be surprised by how simple a few if statements can work. Something like this:
if(myX < goalX){
  myX++;
} else if(myX > goalX){
  myX--;
}

if(myY < goalY){
  myY++;
} else if(myY > goalY){
  myY--;
}
This approach combined with some randomness can be very effective for creating pseudo-intelligent behaviors.
One more option to consider is using hard-coded paths for your agents. Plenty of 2D games go with this approach.
Hybrid Approaches
Another thing to keep in mind is that you aren’t limited to using just one type of pathfinding. You can also combine different pathfinding algorithms to create more complex behaviors.
For example, you might use A* to find a path from one room to another, and then use linear interpolation to get from the room entrance to the goal in the room. Or you could default to a hard-coded path, and then use a swarming algorithm when the player gets close enough.
Summary
Pathfinding is a huge topic with a ton of different options and algorithms to consider, but hopefully this tutorial introduced a few approaches that will come in handy.
One last thing I’ll mention: if you’re planning on making a game that will require pathfinding, start with figuring out how you want to handle pathfinding first! It’s much easier to build a game on top of data structures designed for pathfinding than it is to add pathfinding to a codebase that wasn’t built with pathfinding in mind. (I learned this the hard way!)