Multiple Game Screens
Multiple Game Screens
Now we know how to create a game that contains interactive animations. This is okay for testing things out or for simple games, but most real games will contain multiple screens, for example you might contain a title screen, a settings screen, a main game screen, and a game over screen. This tutorial introduces the Game and Screen classes, which provide a framework for showing multiple screens.
The Simple Approach
Before we get into the libGDX approach to this problem, it’s worth mentioning that we can actually already handle this with a simpler approach. This will only work for basic games, but it introduces some ideas that we’ll reuse when we switch to the more advanced approach.
Our goal is to show different screens that display their own content and react differently to user input. One simple way to handle this is to use a set of variables that track which screen we’re showing, and then check those variables in the render() and event functions to decide what to display or which action to take.
For example, we might use an enum to track the current state of the game:
package io.happycoding.helloworld;

import com.badlogic.gdx.ApplicationAdapter;
import com.badlogic.gdx.Gdx;
import com.badlogic.gdx.Input;
import com.badlogic.gdx.InputAdapter;
import com.badlogic.gdx.graphics.GL20;
import com.badlogic.gdx.graphics.g2d.BitmapFont;
import com.badlogic.gdx.graphics.g2d.SpriteBatch;
import com.badlogic.gdx.graphics.glutils.ShapeRenderer;
import com.badlogic.gdx.math.Vector2;

public class HelloWorldGame extends ApplicationAdapter {

    enum Screen{
        TITLE, MAIN_GAME, GAME_OVER;
    }

    Screen currentScreen = Screen.TITLE;

    SpriteBatch batch;
    ShapeRenderer shapeRenderer;
    BitmapFont font;

    float circleX = 300;
    float circleY = 150;
    float circleRadius = 50;

    float xSpeed = 4;
    float ySpeed = 3;

    @Override
    public void create () {
        batch = new SpriteBatch();
        shapeRenderer = new ShapeRenderer();
        font = new BitmapFont();

        Gdx.input.setInputProcessor(new InputAdapter() {

            @Override
            public boolean keyDown (int keyCode) {

                if(currentScreen == Screen.TITLE && keyCode == Input.Keys.SPACE){
                    currentScreen = Screen.MAIN_GAME;
                }
                else if(currentScreen == Screen.GAME_OVER && keyCode == Input.Keys.ENTER){
                    currentScreen = Screen.TITLE;
                }

                return true;
            }

            @Override
            public boolean touchDown (int x, int y, int pointer, int button) {
                if(currentScreen == Screen.MAIN_GAME){
                    int renderY = Gdx.graphics.getHeight() - y;
                    if(Vector2.dst(circleX, circleY, x, renderY) < circleRadius){
                        currentScreen = Screen.GAME_OVER;
                    }
                }
                return true;
            }
        });
    }

    @Override
    public void render () {

        if(currentScreen == Screen.TITLE){

            Gdx.gl.glClearColor(0, .25f, 0, 1);
            Gdx.gl.glClear(GL20.GL_COLOR_BUFFER_BIT);
            batch.begin();
            font.draw(batch, "Title Screen!", Gdx.graphics.getWidth()*.25f, Gdx.graphics.getHeight() * .75f);
            font.draw(batch, "Click the circle to win.", Gdx.graphics.getWidth()*.25f, Gdx.graphics.getHeight() * .5f);
            font.draw(batch, "Press space to play.", Gdx.graphics.getWidth()*.25f, Gdx.graphics.getHeight() * .25f);
            batch.end();
        }
        else if(currentScreen == Screen.MAIN_GAME) {
            circleX += xSpeed;
            circleY += ySpeed;

            if (circleX < 0 || circleX > Gdx.graphics.getWidth()) {
                xSpeed *= -1;
            }

            if (circleY < 0 || circleY > Gdx.graphics.getHeight()) {
                ySpeed *= -1;
            }

            Gdx.gl.glClearColor(0, 0, .25f, 1);
            Gdx.gl.glClear(GL20.GL_COLOR_BUFFER_BIT);

            shapeRenderer.begin(ShapeRenderer.ShapeType.Filled);
            shapeRenderer.setColor(0, 1, 0, 1);
            shapeRenderer.circle(circleX, circleY, 75);
            shapeRenderer.end();
        }
        else if(currentScreen == Screen.GAME_OVER){
            Gdx.gl.glClearColor(.25f, 0, 0, 1);
            Gdx.gl.glClear(GL20.GL_COLOR_BUFFER_BIT);

            batch.begin();
            font.draw(batch, "You win!", Gdx.graphics.getWidth()*.25f, Gdx.graphics.getHeight() * .75f);
            font.draw(batch, "Press enter to restart.", Gdx.graphics.getWidth()*.25f, Gdx.graphics.getHeight() * .25f);
            batch.end();
        }
    }

    @Override
    public void dispose () {
        shapeRenderer.dispose();
    }
}
This code uses an enum to represent the current state of the game. It checks the current mode to decide what to do with user input and what to render, and it switches between modes to change the current screen. This example code creates a game that contains a title screen, a main game screen where the user clicks a bouncing green circle, and a game over screen.
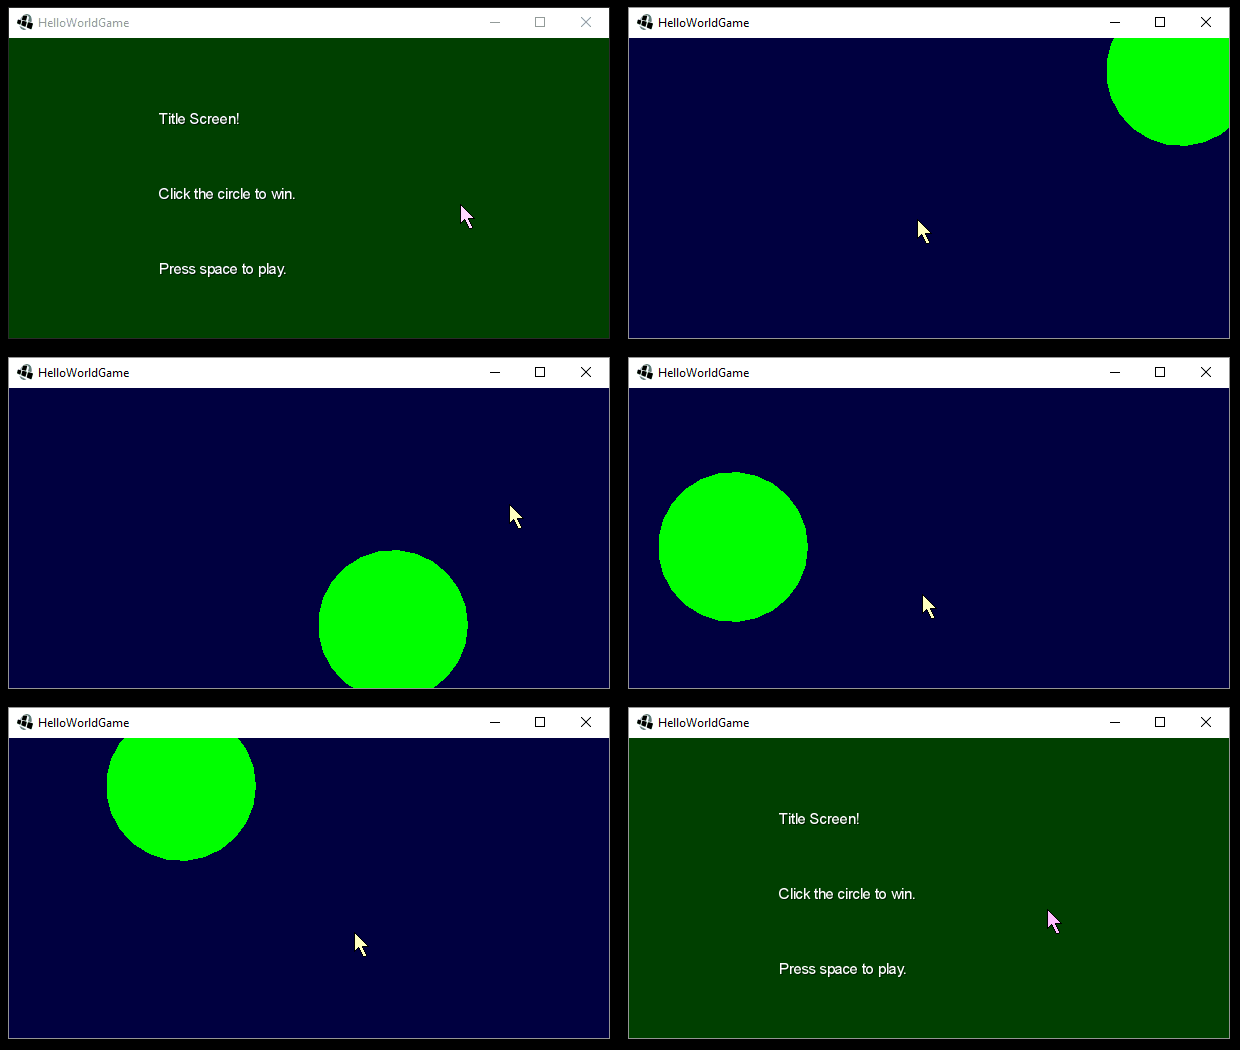
This code could be modified to use separate functions or classes for the levels, or it could use boolean or String values to represent the game screen. But the point is that it’s possible to track the current screen and check it to determine what to render and how to react to user input- but why not let libGDX do that for us?
The libGDX Approach
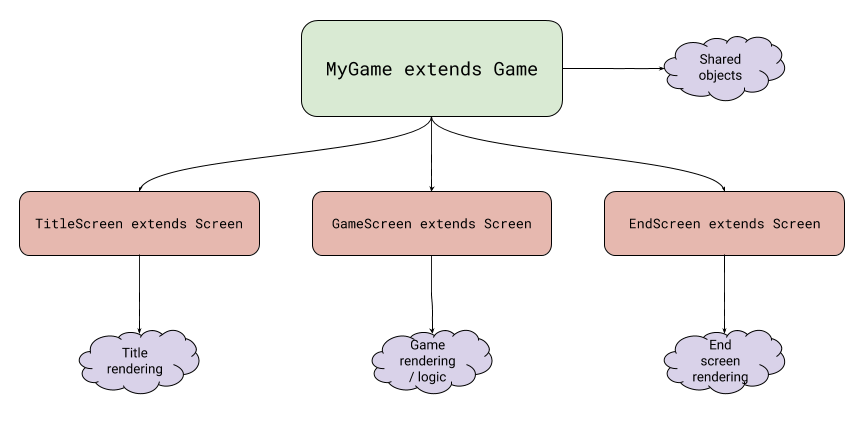
The above approach will work for simple games, but it will get cumbersome if your game contains many screens with their own event logic and rendering code. In this case, you probably want to encapsulate each screen into its own class and pass the shared resources between them. Instead of doing this yourself, libGDX provides a Game class and a Screen interface that make this a bit easier.
Generally a libGDX project will contain one class that extends Game and then a bunch of classes that implement Screen.
Game
The Game class extends ApplicationAdapter so you can use it as the entry point of your core project (which will be used by the entry points of the platform-specific projects). It also provides handy functions for switching between screens.
Your project will usually only contain one class that extends Game. This class will contain shared resources, but it won’t contain any logic or rendering code specific to any one screen.
Screen
The Screen interface contains its own lifecycle functions that are called by libGDX and allow you to isolate screen-specific logic in a separate class.
Your project will usually contain multiple classes that implements Screen: one for each screen in your game.
Example
It’s probably easier to show an example. Here’s a version of our above HelloWorldGame that uses the Game and Screen framework.
HelloWorldGame
package io.happycoding.helloworld;

import com.badlogic.gdx.Game;
import com.badlogic.gdx.graphics.g2d.BitmapFont;
import com.badlogic.gdx.graphics.g2d.SpriteBatch;
import com.badlogic.gdx.graphics.glutils.ShapeRenderer;

public class HelloWorldGame extends Game {

    SpriteBatch batch;
    ShapeRenderer shapeRenderer;
    BitmapFont font;

    @Override
    public void create () {
        batch = new SpriteBatch();
        shapeRenderer = new ShapeRenderer();
        font = new BitmapFont();
        setScreen(new TitleScreen(this));
    }

    @Override
    public void dispose () {
        batch.dispose();
        shapeRenderer.dispose();
        font.dispose();
    }
}
Notice that this class now extends Game and it no longer contains any logic or rendering code. The only interesting line of code is this one:
setScreen(new TitleScreen(this));
The setScreen() is inherited from the Game class, and it allows us to switch between different screens. This line of code creates a TitleScreen and passes a reference of the HelloWorldGame into the constructor using the this keyword- we’ll see why in a second.
In other words, this class now creates some of the shared rendering variables, and then creates a TitleScreen. Here’s what the TitleScreen looks like:
TitleScreen
package io.happycoding.helloworld;

import com.badlogic.gdx.Gdx;
import com.badlogic.gdx.Input;
import com.badlogic.gdx.InputAdapter;
import com.badlogic.gdx.ScreenAdapter;
import com.badlogic.gdx.graphics.GL20;

public class TitleScreen extends ScreenAdapter {

    HelloWorldGame game;

    public TitleScreen(HelloWorldGame game) {
        this.game = game;
    }

    @Override
    public void show(){
        Gdx.input.setInputProcessor(new InputAdapter() {
            @Override
            public boolean keyDown(int keyCode) {
                if (keyCode == Input.Keys.SPACE) {
                    game.setScreen(new GameScreen(game));
                }
                return true;
            }
        });
    }

    @Override
    public void render(float delta) {
        Gdx.gl.glClearColor(0, .25f, 0, 1);
        Gdx.gl.glClear(GL20.GL_COLOR_BUFFER_BIT);
        game.batch.begin();
        game.font.draw(game.batch, "Title Screen!", Gdx.graphics.getWidth() * .25f, Gdx.graphics.getHeight() * .75f);
        game.font.draw(game.batch, "Click the circle to win.", Gdx.graphics.getWidth() * .25f, Gdx.graphics.getHeight() * .5f);
        game.font.draw(game.batch, "Press space to play.", Gdx.graphics.getWidth() * .25f, Gdx.graphics.getHeight() * .25f);
        game.batch.end();
    }

    @Override
    public void hide(){
        Gdx.input.setInputProcessor(null);
    }
}
This class extends ScreenAdapter (which is a way to implement Screen without defining every possible function), and provides a constructor that stores the instance of HelloWorldGame passed into its constructor.
The show() function is automatically called when this Screen becomes the current screen of the game, and it sets up an input processor. Note that we only have to care about the input specific to this screen.
The render() function is called repeatedly (usually 60 frames per second) as long as this screen is the current screen. In this function, we draw the title screen. Not much to see here, but note that we’re using the batch and font created in the main HelloWorldGame class. This allows us to only create objects once instead of recreating a bunch of the same thing in every screen class. This is one reason we passed the HelloWorldGame instance into the constructor.
Finally, the hide() function is called whenever this Screen stops being the current screen of the game. This function removes the input processor we setup in the show() function, so we don’t receive any more events after this screen has been hidden.
This brings us back to the input processor we created in the show() function. This input processor checks whether the user has typed the space key, and if so, it sets the current screen to an instance of the GameScreen class. (This is the other reason we passed the HelloWorldGame instance into the constructor.) The Game framework automatically hides this screen (calling the hide() function in the process) and shows the GameScreen.
Here’s the GameScreen class:
GameScreen
package io.happycoding.helloworld;

import com.badlogic.gdx.Gdx;
import com.badlogic.gdx.InputAdapter;
import com.badlogic.gdx.ScreenAdapter;
import com.badlogic.gdx.graphics.GL20;
import com.badlogic.gdx.graphics.glutils.ShapeRenderer;
import com.badlogic.gdx.math.Vector2;

public class GameScreen extends ScreenAdapter {

    HelloWorldGame game;

    float circleX = 300;
    float circleY = 150;
    float circleRadius = 50;

    float xSpeed = 4;
    float ySpeed = 3;

    public GameScreen(HelloWorldGame game) {
        this.game = game;
    }

    @Override
    public void show() {
        Gdx.input.setInputProcessor(new InputAdapter() {
            @Override
            public boolean touchDown(int x, int y, int pointer, int button) {
                int renderY = Gdx.graphics.getHeight() - y;
                if (Vector2.dst(circleX, circleY, x, renderY) < circleRadius) {
                    game.setScreen(new EndScreen(game));
                }
                return true;
            }
        });
    }

    @Override
    public void render(float delta) {
        circleX += xSpeed;
        circleY += ySpeed;

        if (circleX < 0 || circleX > Gdx.graphics.getWidth()) {
            xSpeed *= -1;
        }

        if (circleY < 0 || circleY > Gdx.graphics.getHeight()) {
            ySpeed *= -1;
        }

        Gdx.gl.glClearColor(0, 0, .25f, 1);
        Gdx.gl.glClear(GL20.GL_COLOR_BUFFER_BIT);

        game.shapeRenderer.begin(ShapeRenderer.ShapeType.Filled);
        game.shapeRenderer.setColor(0, 1, 0, 1);
        game.shapeRenderer.circle(circleX, circleY, 75);
        game.shapeRenderer.end();

    }

    @Override
    public void hide() {
        Gdx.input.setInputProcessor(null);
    }
}
This class contains all of our game logic. Similar to the TitleScreen class, its constructor takes a HelloWorldGame argument so it can access the shared resources. The show() function sets up an input processor that listens for touch events. Again, notice that we only have to check for events specific to the game screen.
The render() function draws our circle bouncing around the screen. Notice that it’s using the shared resources in the main HelloWorldGame instance.
When the user clicks the circle, we make the EndScreen the current screen. Here’s the EndScreen class:
EndScreen
package io.happycoding.helloworld;

import com.badlogic.gdx.Gdx;
import com.badlogic.gdx.Input;
import com.badlogic.gdx.InputAdapter;
import com.badlogic.gdx.ScreenAdapter;
import com.badlogic.gdx.graphics.GL20;

public class EndScreen extends ScreenAdapter {

    HelloWorldGame game;

    public EndScreen(HelloWorldGame game) {
        this.game = game;
    }

    @Override
    public void show() {
        Gdx.input.setInputProcessor(new InputAdapter() {

            @Override
            public boolean keyDown(int keyCode) {

                if (keyCode == Input.Keys.ENTER) {
                    game.setScreen(new TitleScreen(game));
                }

                return true;
            }
        });
    }

    @Override
    public void render(float delta) {
        Gdx.gl.glClearColor(.25f, 0, 0, 1);
        Gdx.gl.glClear(GL20.GL_COLOR_BUFFER_BIT);

        game.batch.begin();
        game.font.draw(game.batch, "You win!", Gdx.graphics.getWidth() * .25f, Gdx.graphics.getHeight() * .75f);
        game.font.draw(game.batch, "Press enter to restart.", Gdx.graphics.getWidth() * .25f, Gdx.graphics.getHeight() * .25f);
        game.batch.end();

    }

    @Override
    public void hide() {
        Gdx.input.setInputProcessor(null);
    }
}
This is pretty similar to the TitleScreen class. Again, we only care about the input and rendering specific to this screen, and we call the setScreen() function on our main HelloWorldGame instance to go back to the title screen when the user presses enter.
Summary
The Game class and Screen interface (and the ScreenAdapter class) provide a simple way to support multiple screens in your game. It provides functionality for switching between screens and for encapsulating logic and rendering code specific to a screen in a single class.
Homework
- Expand on our example to include multiple levels. Maybe the circle gets faster as levels go on, or maybe add red circles that cause the player to lose if they click them.
- Add a title and end screen to a project you created while reading the previous tutorials.

