Processing in Java
Processing in Java
- Processing is Java
- Add Processing to Your Classpath
- Extending the
PAppletClass - Overriding Processing Functions
- Command Line
- Calling Processing Functions From Non-Sketch Classes
- Creating Processing Libraries
- Homework
At this point you’ve probably used Processing through the Processing editor, which lets you write Processing code and automatically run it. You’ve also learned how to use Java libraries, which allow you to use classes and functions written by other people in your Java code. This tutorial combines those ideas and shows you how to use Processing as a Java library.
Processing is Java
So far, we’ve used Processing through the Processing editor, which lets us write Processing code that the editor then runs when you press the play button. But behind the scenes, when you press the play button, the Processing editor is translating your Processing code into Java code, compiling it, and running it.
For example, we might write Processing code that looks like this:
void setup(){
  size(500, 500);
}

void draw(){
  background(64);
  ellipse(mouseX, mouseY, 20, 20);
}
When we run this code, Processing is secretly turning this into Java code that looks like this:
import processing.core.PApplet;

public class MySketch extends PApplet {

	public void settings() {
		size(500, 500);
	}

	public void draw(){
		background(64);
		ellipse(mouseX, mouseY, 20, 20);
	}

	public static void main(String[] passedArgs) {
		String[] appletArgs = new String[] { "MySketch" };
		PApplet.main(appletArgs);
    }
}
You can see this yourself by exporting a Processing sketch as an application and then looking at the .java file it generates.
This works because Processing is written in Java. So the Processing editor can take your Processing code and make a few minor adjustments, such as putting it inside a class inside a .java file, to create valid Java code. Then it compiles and runs that Java code, exactly how we’ve been compiling and running our Java code in these tutorials.
And because Processing is written in Java, we can do the exact same thing from our Java code. This lets us write Java code that accesses Processing’s functionality directly, without going through the Processing editor. This is useful for writing more complicated Processing sketches, or for writing a library that you can then use in Processing.
Add Processing to Your Classpath
This tutorial uses Eclipse, but you can also do this from the command line.
First, create a new project in Eclipse (check out the Projects section of the Eclipse tutorial if you need a reminder).
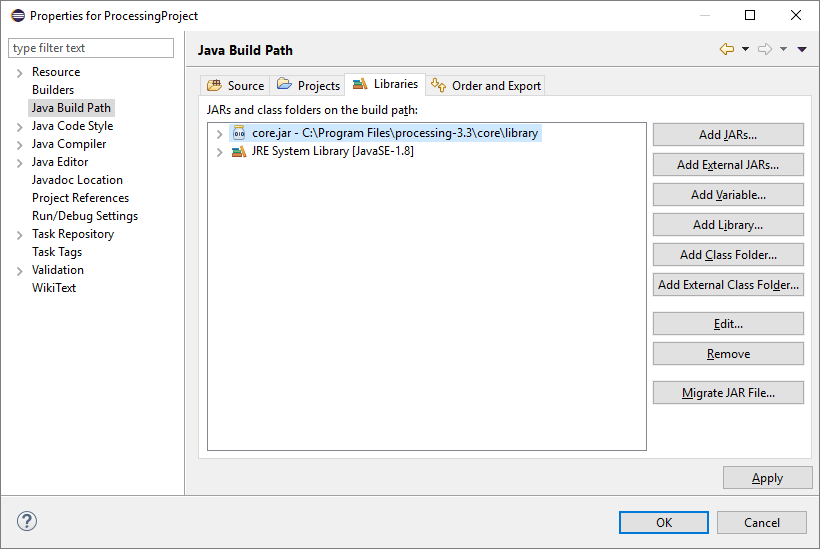
To use Processing in our Java code, we have to include Processing on our classpath. To set your project’s classpath, right-click your project, and then click the Properties option. This brings up a dialog with all the settings you can specify for your project. Click the Java Build Path menu, and then the Libraries tab, which takes you to this screen:
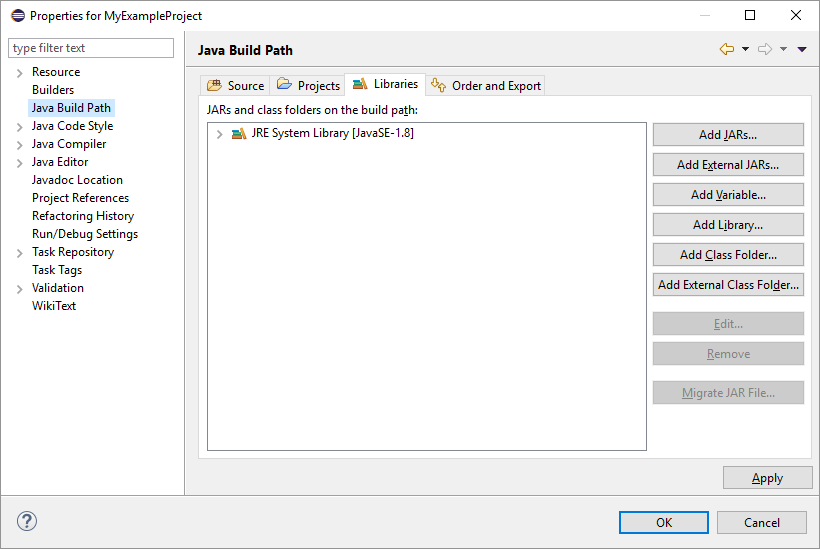
On this screen, click the Add External JARs... button, and then navigate to your Processing directory. I put mine in my Program Files directory, so I navigate to C:/Program Files/processing-3.3. That directory contains a core directory, which then contains a libraries directory, which finally contains a bunch of .jar files. These are the .jar files that make up the Processing library!
For now we only need the core.jar file, so our classpath should look like this:
Click OK in that window. Now you’re ready to use Processing in your Java code!
Extending the PApplet Class
Remember from the inheritance tutorial that we can extend a class to create a child class that is a more specific version of a parent class- like a square is a more specific version of a rectangle, which is a more specific version of a shape. This allows code to deal with a parent class without worrying about specific child classes.
In Procesing, every sketch is a PApplet, so if you want to create a Processing sketch, then the first thing you need to do is create a class that extends the PApplet class.
import processing.core.PApplet;

public class MySketch extends PApplet{

}
Remember that extending a class sets up an is-a relationship, so an instance of our MySketch class is an instance of the PApplet class. That means we can pass an instance of this class to anything that works with an instance of the PApplet class. Specifically, we can pass instances of this into Processing!
import processing.core.PApplet;

public class MySketch extends PApplet{

	public static void main(String[] args){
		String[] processingArgs = {"MySketch"};
		MySketch mySketch = new MySketch();
		PApplet.runSketch(processingArgs, mySketch);
	}
}
This code calls the PApplet.runSketch() function, which expects two parameters: an array of arguments (by default, you only need one argument, the name of the sketch), and an instance of PApplet that contains your sketch code. the runSketch() function then displays a window and runs your sketch inside that window. If you run this code, you should see something like this:

So far that’s not very exciting, because we haven’t told our sketch to do anything yet!
Overriding Processing Functions
Remember that we can override parent class functions in a child class to specify our own behavior. For example, in the Swing tutorial we extended the JPanel class and overrided the paintComponent() function to perform custom painting.
When using Processing as a Java library, we want to do something similar: we’ve extended the PApplet class, and now we want to override various functions to change their behavior- these are the Processing functions you’re used to, like draw() and mousePressed().
import processing.core.PApplet;

public class MySketch extends PApplet{

	public void settings(){
		size(500, 500);
	}

	public void draw(){
		ellipse(mouseX, mouseY, 50, 50);
	}

	public void mousePressed(){
		background(64);
	}

	public static void main(String[] args){
		String[] processingArgs = {"MySketch"};
		MySketch mySketch = new MySketch();
		PApplet.runSketch(processingArgs, mySketch);
	}
}
Most of this should look pretty familiar, but there are a few things to note:
- The functions are
public. - We use
settings()instead ofsetup(). - We don’t have access to the
colortype.
Notice that we have access to the mouseX and mouseY variables, along with all of the other variables we’ve used in Processing. That’s because they’re defined in the PApplet class, and since our class extends PApplet, our class automatically has access to all of those variables.
Also notice that Processing is still handling a lot of stuff for us: creating a window, calling draw() 60 times per second, updating the mouseX and mouseY variables, and calling the mousePressed() function.
This means we get the best of both worlds: we can use Eclipse to create projects that consist of a bunch of files, but we can still use Processing to give us an easy way to create a visualization.
Command Line
Just to show that you can do all of this from the command line, here are the commands for compiling and running the above class:
> javac -cp ".;C:\Program Files\processing-3.3\core\library\core.jar" MySketch.java
> java -cp ".;C:\Program Files\processing-3.3\core\library\core.jar" MySketch
Calling Processing Functions From Non-Sketch Classes
Let’s say we have a Ball.java class that looks like this:
public class Ball {
	private float x;
	private float y;
	private float size;
	private float xSpeed;
	private float ySpeed;

	public Ball(float x, float y){
		this.x = x;
		this.y = y;
		this.size = random(10, 100);
		this.xSpeed = random(-10, 10);
		this.ySpeed = random(-10, 10);
	}

	public void step(){
		x += xSpeed;
		if(x < 0 || x > width){
			xSpeed *= -1;
		}

		y += ySpeed;
		if(y < 0 || y > height){
			ySpeed *= -1;
		}
	}

	public void render(){
		ellipse(x, y, size, size);
	}
}
This class encapsulates variables required to make a ball bounce around on the screen. It uses Processing’s width and height variables, as well as the random() and ellipse() functions. This would work in the Processing editor, but in Eclipse (or in the command line), we’ll get a bunch of compiler errors:
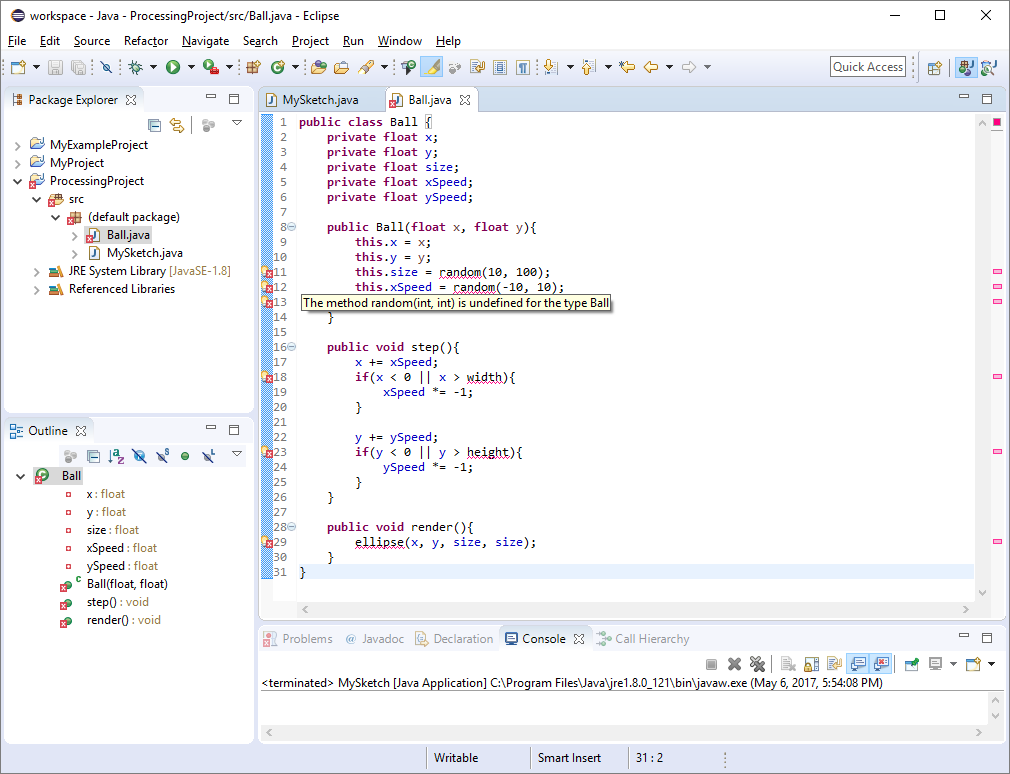
These errors are telling us that Java can’t reach Processing’s variables and functions from our Ball class. And that makes sense, becuase Processing’s variables and functions are defined inside the PApplet class.
In other words, variables like width and height and functions like ellipse() belong to a particular sketch, and a ball is not a sketch. So what we need to do is pass a reference to our sketch into our Ball class, and then use the sketch variable to access Processing’s variables and functions. That might sound complicated, but it looks like this:
import processing.core.PApplet;

public class Ball {

	private PApplet sketch;

	private float x;
	private float y;
	private float size;
	private float xSpeed;
	private float ySpeed;

	public Ball(PApplet sketch, float x, float y){
		this.sketch = sketch;
		this.x = x;
		this.y = y;
		this.size = sketch.random(10, 100);
		this.xSpeed = sketch.random(-10, 10);
		this.ySpeed = sketch.random(-10, 10);
	}

	public void step(){
		x += xSpeed;
		if(x < 0 || x > sketch.width){
			xSpeed *= -1;
		}

		y += ySpeed;
		if(y < 0 || y > sketch.height){
			ySpeed *= -1;
		}
	}

	public void render(){
		sketch.ellipse(x, y, size, size);
	}
}
Now this code accepts a PApplet instance as an argument to its constructor, which it saves in an instance variable. This gives use access to a particular sketch, so whenever we want to use a Processing variable or function, we use the sketch variable.
We can now use this class in our main sketch class:
import java.util.ArrayList;
import processing.core.PApplet;

public class MySketch extends PApplet{

	private ArrayList<Ball> balls = new ArrayList<>();

	public void settings(){
		size(500, 500);
		balls.add(new Ball(this, width/2, height/2));
	}

	public void draw(){
		background(64);
		for(Ball b : balls){
			b.step();
			b.render();
		}
	}

	public void mouseDragged(){
		balls.add(new Ball(this, mouseX, mouseY));
	}

	public static void main(String[] args){
		String[] processingArgs = {"MySketch"};
		MySketch mySketch = new MySketch();
		PApplet.runSketch(processingArgs, mySketch);
	}
}
This code uses the this keyword to pass a reference to the current instance into the Ball constructor. So now when we call sketch.ellipse() from the Ball class, it draws to our sketch.
Creating Processing Libraries
You can use the above approach of accepting a PApplet argument into your code to create a library that you can then use in a Processing sketch in the Processing editor.
Then you would export a .jar file that contains your code. Make sure your classes are in packages: classes inside .jar files must be inside a package to be visible to other classes inside a package. (The alternative is to not use packages at all, which is generally a bad idea.)
Now that you have a .jar file, you can drag it directly onto the Processing editor, or you can package it up as a “real” Processing library for other people to use. See the Processing wiki for more info.
Homework
- Create a Swing GUI that contains buttons that control a sketch window. For example, you could show arrow buttons that move a ball in the Processing window.
- Create a Java application that uses the Twitter4J library along Processing as a Java library to create a Twitter bot!
- Create a Java application that lets the user choose from all of the sketches you’ve created so far.


