Inheritance


Inheritance
- Extending Classes
- References
- Casting
- The
instanceofOperator - Overriding Functions
- The
@OverrideAnnotation - The
superKeyword - Object
- Implementing Interfaces
- Mixing Extending and Implementing
- Abstract Classes
- Generics
- Inner Classes
- Anonymous Inner Classes
- Real Life Example
- Java 8
- Summary
- Homework
By now you should be pretty familiar with creating classes that contain variables and functions. You should understand that different instances of the same class contain the same types of variables and functions, but those instances can have different values for those variables and do different things based on those values. Here’s an example:
public class Animal{

	private String name;

	public void setName(String name){
		this.name = name;
	}

	public void printName(){
		System.out.println("My name is: " + name);
	}

	public static void main(String[] args){
		Animal animalOne = new Animal();
		animalOne.setName("Betty");

		Animal animalTwo = new Animal();
		animalTwo.setName("Veronica");

		animalOne.printName();
		animalTwo.printName();
	}
}
This code defines a class called Animal. This class contains a name variable, a function that sets the value of that variable, and a function that prints it out. The main() function then creates two instances of the Animal class, sets the name of each, and tells each instance to print out its name. Each instance has its own value for the name variable, so both names are printed out.
This tutorial introduces inheritance, which lets you organize your data and code in more advanced hiearchies. Inheritance is a basic building block of pretty much every Java library and framework, so it’s an important concept to understand.
Extending Classes
Let’s say we wanted to add a meow() function to our class.
We might think about modifying the Animal class directly, but that’s not always an option: maybe we don’t have control over this class because it’s coming from a library, or from somebody else’s code. We also don’t want to change existing code that uses this class already. Instead, we can extend the Animal class in another class that we do have control over!
We do that using the extends keyword in our class definition:
public class Cat extends Animal{
Other than that, the rest is just like writing a normal class. We can add variables and functions to the class, and in our case we just want to add a meow() function. Putting it all together, it looks like this:
public class Cat extends Animal{

	public void meow(){
		System.out.println("Meow!");
	}
}
You would save this to a file named Cat.java, and it would act just like any other Java class. So you could do this:
Cat myCat = new Cat();
myCat.meow();
This code creates an instance of Cat and calls that instance’s meow() function. This works exactly like every class we’ve seen so far.
But the cool thing is, because we’re using the extends keyword, any instance of Cat is also an instance of Animal! So you can also do this:
Cat myCat = new Cat();
myCat.meow();

//these functions are inherited, so we can call them!
myCat.setName("Stanley");
myCat.printName();
Notice that we can call the setName() and printName() functions on our Cat instance, even though our Cat class doesn’t contain those functions. They are inherited from the Animal class!
We call the Animal class a parent class or a super type or a super classs. Similarly, we call the Cat class a child class or a subtype or subclass. We call this type of inheritance extending or subtyping or subclassing.
You can only directly extend one class. This is called single inheritance. But you can also extend classes that extend other classes:
public class Animal{}
public class Mammal extends Animal{}
public class Cat extends Mammal{}
In this example, the Cat class extends the Mammal class, which extends the Animal class. So Cat would inherit all of the functions from Animal and Mammal. But note that each class only directly extends one other class.
Extending a class sets up an is-a relationship. Think about it this way: a cat is a mammal, which is an animal. A cat is an animal. So anything that applies to all animals also applies to a specific cat. This will become more useful as we write more complicated code.
References
Remember that subclassing sets up an is-a relationship, so instances of a subtype are also instances of the super type.
This means that you can store subtype instances in super type variables. That sounds complicated, but it just means we can do this:
Animal myAnimal = new Cat();
myAnimal.setName("Stanley");
myAnimal.printName();
Notice that we’re creating an instance of the Cat class, and we’re storing it in an Animal variable. We can do this because Cat is an Animal.
Why is this useful?
This lets us write code that applies to a super type, and that code will work with any subtype!
For example, we could write a function that took an Animal parameter:
public void printAnimalName(Animal animal){
	animal.printName();
}
This function isn’t very exciting, but you can picture more complicated code that calls lots of functions. The point is, since it takes an Animal reference, this function will work with any Animal or any subtype of the Animal class. So we could do this:
Animal myAnimal = new Animal();
myAnimal.setName("Mister Ed");

Cat myCat = new Cat();
myCat.setName("Stanley");

printAnimalName(myAnimal);
printAnimalName(myCat);
And the printAnimalName() function will work with either one! This lets us write generalized code that applies to any subtype. We could even later add a brand new subtype:
public class Dog extends Animal{

	public void bark(){
		System.out.println("Bark bark bark!");
	}
}
This class is another subtype of the Animal class, and it adds a bark() function. The cool thing is, our printAnimalName() function would still work just fine with this class, without changing any of our code!
Dog myDog = new Dog();
myDog.setName("Lassie");

printAnimalName(myDog);
This lets you write code that works with every subtype of a parent class- even types that don’t exist yet!
Casting
Now you’ve seen that we can reference an instance of a child class using its parent class. We’ve seen this with passing parameters into generalized functions.
When we do this, we can only use variables and functions from the parent class. So we can’t do this:
Animal myCat = new Cat();
myCat.meow(); //compiler error!
The first line creates an instance of Cat and stores it in an Animal variable. This works fine, since we’ve already seen that we can reference an instance of a child class using its parent class.
But the second line causes a compiler error!
error: cannot find symbol
                myCat.meow();
                     ^
  symbol:   method meow()
  location: variable myCat of type Animal
This error is telling us that the compiler can’t find the meow() function in the Animal type. And that makes sense, since Animal doesn’t contain a meow() function, only the Cat class does!
Because we’ve defined the myCat variable to be an Animal type, the compiler can only guarantee that the myCat variable has access to the functions in the Animal class. It’s not smart enough to know which subclass the variable is an instance of. However, we can “remind” the compiler which type a variable is by casting it.
To cast a variable to a more specific type, put the type in ( ) parentheses before the value to be casted, which gives you a reference to the casted type. It looks like this:
Animal myCat = new Cat();

//cast to subtype and store it in a subtype variable
Cat myCatAfterCast = (Cat) myCat;
//now we can call functions in the subclass!
myCatAfterCast.meow();

//inline version does both steps in one line
((Cat)myCat).meow();
After we cast the variable to a more specific type, we can access the functions in that type.
But note that this doesn’t change anything. Casting doesn’t create a new object, and it doesn’t change an instance’s type to another type. It only “reminds” the compiler that an instance is already a more specific type. If you try to cast to a type that’s different from a value’s actual type, you’ll get an error.
The instanceof Operator
In the above examples, it’s obvious what subtype a variable holds. But what if we’re taking the supertype as a parameter and don’t know ahead of time what the values will be? Or what if we have code that looks like this:
Animal myAnimal;

if(Math.random() < .5){
	myAnimal = new Cat();
}
else{
	myAnimal = new Dog();
}

//which type is myAnimal?
The Math.random() function returns a random decimal number between 0 and 1 every time it’s called. We have no way of knowing ahead of time what it’s going to return (that’s what makes it random), so the compiler has no way of knowing which branch of the if statement is going to run. Hopefully this makes it more obvious why the compiler can’t give you access to functions in a subtype when a variable is a supertype.
However, if we really need to find out which subtype a variable holds, we can use the instanceof keyword. The instanceof keyword is a comparison between a value and a class name, and it evaluates to true if that value is an instance of that class. It looks like this:
if(myAnimal instanceof Cat){

	//now we know myAnimal is a Cat so we can cast it
	Cat myCat = (Cat) myAnimal;

	//now we can call functions in the Cat class
	myCat.meow();
}
After we use the instanceof operator and it evaluates to true, we can be sure that a variable holds a particular subtype, so it’s safe to cast it.
Note that using casting and instanceof is usually a sign that you should reorganize your code. But I wanted to include this section to make it clear that referencing a subtype through its supertype doesn’t change the instance at all. The instance is still “in there” even if you’re using a supertype to reference it.
Overriding Functions
When you extend a class, any instance of the child class automatically has the functions and variables of the parent class. Let’s add an eat() function to our Animal class:
public class Animal{

	private String name;

	public void setName(String name){
		this.name = name;
	}

	public void printName(){
		System.out.println("My name is: " + name);
	}

	public void eat(){
		System.out.println("munch munch");
	}
}
Now we can do this:
Cat myCat = new Cat();
myCat.eat(); //prints "munch munch"
The Cat class inherits the eat() function from the Animal class, so this code prints out “munch munch” to the console. But what if we want to change what happens when a Cat eats?
We can change the behavior of a function by overriding it in the child class. We do that by defining a function with the same name:
public class Cat extends Animal{

	public void meow(){
		System.out.println("Meow!");
	}

	public void eat(){
		System.out.println("That mouse was delicious!");
	}
}
Now if we run this code:
Cat myCat = new Cat();
myCat.eat(); //prints "That mouse was delicious!"
Calling the eat() function calls the most specific version of the function it can find, so it finds the version in Cat and calls that. In other words, the function in the child class overrides the version in the parent class.
This is true even if you’re referencing the subtype with a super type variable:
Animal myAnimal = new Cat();
myAnimal.eat(); //prints "That mouse was delicious!"
Even though we’re using an Animal variable, the object is still a Cat instance! So calling the eat() function finds the most specific version of the function in the child class and calls that.
The @Override Annotation
When overriding functions, we can add an @Override annotation to the function in the child class. This doesn’t really change anything, except you’ll get a compiler error if the annotation is on a function that isn’t an override of a function from a parent class.
It looks like this:
public class Cat extends Animal{

	public void meow(){
		System.out.println("Meow!");
	}

	@Override
	public void eat(){
		System.out.println("That mouse was delicious!");
	}
}
This might not seem very useful, but what it does is prevent dumb mistakes like spelling a function wrong in a child class. For example, what if we did this:
public class Cat extends Animal{

	public void meow(){
		System.out.println("Meow!");
	}

	public void eatt(){
		System.out.println("That mouse was delicious!");
	}

	public static void main(String[] args){
		Cat myCat = new Cat();
		myCat.eat();
	}
}
Notice that this code spelled the eat() function wrong. This code would compile fine, and it would print out "munch munch" from the parent class when we call myCat.eat(). This would probably confuse us if we thought we were overriding it in our child class!
If we add the @Override annotation to the eat() function, it will catch mistakes like this at compile time, which is always better than having it lead to confusing logic errors.
This is optional, but it’s a good habit to get into.
The super Keyword
Overriding a function can be useful when you want to completely change the behavior of a function. But sometimes you want to maintain the behavior in the parent class and add additional behavior in the child class. You can do this by calling the parent function from the child function, using the super keyword:
public class Cat extends Animal{

	public void meow(){
		System.out.println("Meow!");
	}

	public void eat(){
		super.eat();
		System.out.println("That mouse was delicious!");
	}
}
Now when we run our code:
Cat myCat = new Cat();
myCat.eat(); //prints "munch munch" and then prints "That mouse was delicious!"
Now when we call the eat() function, the code finds the most specific version of it in the Cat class. That version of the function calls the original version of it using the super keyword, so “munch munch” is printed out. After that function finishes, our code prints out “That mouse was delicious!” to the console.
We can override functions to change their behavior in child classes, and we can use the super keyword to call parent functions from child classes.
The super keyword also lets us pass information up to constructors in the parent class. Let’s modify our Animal class so it gets its name from a constructor parameter instead of from a setter function:
public class Animal{

	private String name;

	public Animal(String name){
		this.name = name;
	}

	public void printName(){
		System.out.println("My name is: " + name);
	}

	public void eat(){
		System.out.println("munch munch");
	}

	public static void main(String[] args){
		Animal animalOne = new Animal("Betty");
		Animal animalTwo = new Animal("Veronica");

		animalOne.printName();
		animalTwo.printName();
	}
}
Now our class uses a constructor to take the name as a parameter when it’s instantiated instead of through a setter function. But what happens to our Cat subclass? If we try to compile it in its current form, we get a compiler error:
> javac Cat.java
Cat.java:1: error: constructor Animal in class Animal cannot be applied to given types;
public class Cat extends Animal{
       ^
  required: String
  found: no arguments
  reason: actual and formal argument lists differ in length
1 error
This error is telling us that the Animal constructor takes a String parameter, but we haven’t provided any arguments. In other words, by adding a constructor that takes a name parameter to our Animal class, we’re saying that to create an instance of Animal, you must provide a name for that instance. But since Cat extends Animal, and we can create a Cat without giving it a name, that violates our rule!
To fix this, we can use the super keyword to call the Animal constructor from the Cat constructor, passing the Animal constructor a name:
public class Cat extends Animal{

	public Cat(){
		super("Stanley");
	}

	public void meow(){
		System.out.println("Meow!");
	}

	public void eat(){
		super.eat();
		System.out.println("That mouse was delicious!");
	}
}
Now our Cat constructor calls the Animal constructor and gives it a name. However, right now we’re hard-coding it so every Cat will be named Stanley. We probably want to take the parameter as an argument into the Cat constructor and pass it up:
public class Cat extends Animal{

	public Cat(String name){
		super(name);
	}

	public void meow(){
		System.out.println("Meow!");
	}

	public void eat(){
		super.eat();
		System.out.println("That mouse was delicious!");
	}
}
Now we can create instances of the Cat class, giving each instance its own name, and that name is passed into the Animal constructor and stored in our instance:
Cat myCat = new Cat("Felix");
myCat.printName();
Object
If your class doesn’t extend any classes, it implicitly extends the Object class. You can pretend that extends Object is written in your class:
public class MyClass extends Object{
In fact, you can write this out, but it doesn’t change anything since it’s already implicitly true. So, every class in Java is a subtype of the Object class!
Check out the Java API to see which functions the Object class defines. But basically, extending Object gives every instance some default functions, such as the toString() function. Java uses the toString() function when converting objects to a String value, like when you print them to the console:
Animal myAnimal = new Animal("Godzilla");
System.out.println(myAnimal.toString());
If you run this code, you’ll see that it prints something like this out:
Animal@15db9742
That’s because this is calling the toString() function that our class is inheriting from the Object class, which by default returns a String value containing the class name and the instance’s hash code. The hash code is useful when storing stuff in a HashMap, but it’s not so useful for debugging or displaying info about the object.
To change this, we can override the toString() function to change its behavior. Like we saw above, to override a function, we simply redefine it in the child class. In our example, we’d define a toString() function in our Animal class:
public class Animal{

	private String name;

	public Animal(String name){
		this.name = name;
	}

	public void printName(){
		System.out.println("My name is: " + name);
	}

	public void eat(){
		System.out.println("munch munch");
	}

	@Override
	public String toString(){
		return "I'm an animal! My name is " + name + "!";
	}

	public static void main(String[] args){
		Animal myAnimal = new Animal("Godzilla");
		System.out.println(myAnimal.toString());

	}
}
Now when our code calls the toString() function, it calls the toString() function we’ve defined, not the toString() function we’ve inherited from the Object class. Also note that any subclasses of Animal will also inherit this new version of the toString() function!
Implementing Interfaces
So far we’ve learned how extending a class lets us inherit functions from a super type.
Another form of inheritance lets you specify the functions a class will have in a separate file called an interface. An interface looks a lot like a class, except it uses the interface keyword and it only defines the signature of functions, not the body!
public interface Flyer{
	public void fly();
}
You would save this to a file named Flyer.java. This code defines an interface that lists a single function. Note that you can’t directly create an instance of an interface!
That might not seem very useful, but it lets you write implementations of that interface by writing classes that use the implements keyword and then defining the bodies of those functions inside the class. Here are two examples:
Bird.java
public class Bird implements Flyer{

	public void fly(){
		System.out.println("flap flap flap");
	}

	public void chirp(){
		System.out.println("Tweet tweet!");
	}
}
Helicopter.java
public class Helicopter implements Flyer{

	public void fly(){
		System.out.println("choppa choppa choppa");
	}
}
These classes are implementations of the Flyer interface, and they define their own versions of the fly() function. If a class implements an interface but does not define the functions inside that interface, you get a compiler error.
Also notice that the Bird class contains a function that’s not in the Flyer interface- this is completely fine! Interfaces just specify what functions a class must have, they don’t disallow the class from having other variables and functions.
What if we wanted to write functions that took instances of these classes and called their fly() functions? You might be tempted to write two functions: one that takes a Bird parameter and another one that takes a Helicopter parameter.
But just like extending a class, implementing an interface sets up an is-a relationship. Because the Bird and Helicopter classes implement the Flyer interface, you can reference instances of those classes using the Flyer type. That means we can write a single function that takes a Flyer parameter!
And because we know that any class that implements the Flyer interface will have a fly() function (otherwise you’d get a compiler error), we can do this:
public static void takeoff(Flyer flyer){
	flyer.fly();
}
And we can call this function with instances of both the Bird and Helicopter classes! Putting it all together, it looks like this:
public class FlyerMain{

	public static void takeoff(Flyer flyer){
		flyer.fly();
	}

	public static void main(String[] args){
		Bird bird = new Bird();
		Helicopter helicopter = new Helicopter();

		takeoff(bird);
		takeoff(helicopter);
	}
}
Compiling and running our program looks like this:
> javac FlyerMain.java
> java FlyerMain
flap flap flap
choppa choppa choppa
This lets us write generalized code that applies to every type of Flyer, even before we know exactly what classes will implement the interface. We don’t have to care about the implementation details: we don’t care whether the Flyer is a bird or a plane or Superman, because we know that any Flyer will have a fly() function. We don’t really have to care about what’s inside that function.
This is why we say there is a contract that’s setup by an interface, which tells us exactly which functions we can call. Now if somebody created a new Rocket class that implemented the Flyer interface, our code would work with it, and we wouldn’t have to change any of our code! Interfaces allow us to “program to the contract” instead of worrying about the implementation details of specific classes.
Mixing Extending and Implementing
Unlike extending (where you can only extend one parent class), you can implement multiple interfaces by listing them in a comma-separated format.
You can also create a class that extends a parent class and implements interfaces!
public class Example extends ParentClass implements InterfaceOne, InterfaceTwo{
This class would inherit any variables or functions in the ParentClass class, and it would also have to implement any functions defined in the InterfaceOne and InterfaceTwo interfaces.
For example, our Bird class might extend our Animal class from before, and implement the Flyer interface:
public class Bird extends Animal implements Flyer{

	public Bird(String name){
		super(name);
	}

	@Override
	public void fly(){
		System.out.println("flap flap flap");
	}

	public void chirp(){
		System.out.println("Tweet tweet!");
	}

	public static void main(String[] args){
		Bird myBird = new Bird("Polly");
		myBird.chirp();
	}
}
Now our Bird class extends our Animal class, so it defines a constructor that passes the name up to the Animal constructor. It also implements the Flyer interface, so it must define a fly() function. Also notice that we can use the @Override annotation with implemented interface functions- again, this just helps you avoid logic errors by giving you a compiler error if the annotated function is not also found in a parent class or interface.
And because our Bird class is both an Animal and a Flyer, we can pass instances of it to functions that accept Animal parameters and functions that take Flyer parameters!
Bird myBird = new Bird("Polly");

//this function takes any Animal, so it can take a Bird
printAnimalName(myBird);

//this function takes any Flyer, so it can take a Bird
takeoff(myBird);
Abstract Classes
Now you know that you can extend a class to add functionality to existing code, and you can implement an interface to guarantee that certain functions will be in your class.
Another form of inheritance is creating abstract classes which are a little bit like a mix between an interface and a class. Like interfaces, abstract classes can contain function definitions that must be implemented by subclasses. But abstract classes can also contain regular variables and functions, just like any other class.
Abstract classes can contain a mix of abstract functions (functions that must be implemented by a subclass) and regular functions.
Like interfaces, you can’t instantiate an abstract class. Instead, you have to create a subclass of the abstract class, and the subclass must contain implementations of any abstract functions:
For example, maybe it makes more sense for our Animal class to be an abstract class:
public abstract class Animal{

	private String name;

	public Animal(String name){
		this.name = name;
	}

	public void printName(){
		System.out.println("My name is: " + name);
	}

	public abstract void eat();
}
With this change, our Animal class is now an abstract class. That means we can’t directly create an instance of Animal, so we have to use subclasses instead. And each of those subclasses must define its own version of the eat() function!
From a design perspective, this makes sense: the Animal class is probably too broad. Especially if each subclass is going to override the eat() function anyway!
Now if we want to create a new class that extends our Animal class, we have to make sure we implement the eat() function (and we still have to pass a name into the Animal constructor):
public class Frog extends Animal{

	public Frog(String name){
		super(name);
	}

	public void ribbit(){
		System.out.println("Ribbit ribbit.");
	}

	@Override
	public void eat(){
		System.out.println("I crunch up a cricket.");
	}
}
We would also have to make similar changes in the other classes that extended the Animal class: try adding an eat() function to the Cat, Dog, and Bird classes!
Of course, everything we talked about above still holds true for abstract classes: we can still reference subclasses using their super types, even if that super type is an abstract class. So all of our code that uses Animal references still works exactly the same way.
Generics
By now, you’ve probably seen code that looks like this:
ArrayList<String> nameList = new ArrayList<String>();
Specifically, you probably know that the <String> part tells the computer what types of objects will be inside the ArrayList, which lets the get() function return the correct type of value and the set() function to accept the correct type of parameter.
This < > angle bracket notation is called generics, and you can use it along with inheritance to write more generalized code.
For example, let’s say we wanted to create a bunch of Animal instances and then call the eat() function on each one. Thanks to inheritance and generics, we can store all of our instances in a single ArrayList data structure. Here’s an example:
import java.util.ArrayList;

public class Zoo{

	public static void feedAnimal(Animal animal){
		animal.eat();
	}

	public static void main(String[] args){
		ArrayList<Animal> animals = new ArrayList<Animal>();
		animals.add(new Cat("Stanley"));
		animals.add(new Dog("Clifford"));
		animals.add(new Bird("Polly"));
		animals.add(new Frog("Frank"));

		for(int i = 0; i < animals.size(); i++){
			Animal animal = animals.get(i);
			feedAnimal(animal);
		}
	}
}
Notice that the animals ArrayList can hold instances of any subtype of the Animal class. More specifically, the add() function takes any Animal, and Cat, Dog, Bird and Frog all extend Animal, so they can be passed to the add() function. Also notice that the get() function returns an Animal type. Even though the instances are more specific subtypes, we are only guaranteed the functions from the Animal supertype. (Unless we use instanceof and casting, like we talked about above.)
Compiling and running this class looks like this:
> javac Zoo.java
> java Zoo
I hunt a mouse.
I chew on a bone.
I peck at some seeds.
I crunch up a cricket.
Inner Classes
So far, we’ve used a separate .java file for every class we wanted to create. These are called top-level classes.
You can also put a class inside another class. It looks like this:
public class OuterClass{

	//variables and functions here

	private class InnerClass{
		//variables and functions here
	}
}
You would save this to a file named OuterClass.java, since that’s the top-level class.
Inner classes can access everything in their top-level class, including private variables and functions.
public class OuterClass{

	private String secretMessage = "hello";

	private class InnerClass{
		public void printSecretMessage(){
			System.out.println(secretMessage);
		}
	}
}
Notice that the InnerClass is accessing the secretMessage variable, even though it’s marked private. This is because inner classes have access to everything in their outer classes. This can be useful if you want to encapsulate behaviors that require access to private fields but don’t want to open those fields up to the whole world.
We can create an instance of an inner class from the outer class:
public class OuterClass{

	private String secretMessage = "hello";

	public void useInnerClass(){
		InnerClass myInnerClass = new InnerClass();
		myInnerClass.printSecretMessage();
	}

	private class InnerClass{
		public void printSecretMessage(){
			System.out.println(secretMessage);
		}
	}

	public static void main(String[] args){
		OuterClass outerClass = new OuterClass();
		outerClass.useInnerClass();
	}
}
Starting from the main() function, this code creates an instance of OuterClass. It then calls useInnerClass() on that instance. That function creates an instance of InnerClass and calls its printSecretMessage() function. The printSecretMessage() function prints out the value of secretMessage, which is defined in the outer class.
Anonymous Inner Classes
Let’s say we have an interface that looks like this:
public interface Printer{
	public void print();
}
We can write an inner class that implements this interface:
public class OuterClass{

	private String secretMessage = "hello";

	private class InnerClass implements Printer{
		public void print(){
			System.out.println(secretMessage);
		}
	}
}
And we can add code that creates an instance of the inner class and calls that function:
public class OuterClass{

	private String secretMessage = "hello";

	public void useInnerClass(){
		InnerClass myPrinter = new InnerClass();
		myPrinter.print();
	}

	private class InnerClass implements Printer{
		public void print(){
			System.out.println(secretMessage);
		}
	}

	public static void main(String[] args){
		OuterClass outerClass = new OuterClass();
		outerClass.useInnerClass();
	}
}
Starting from the main() function, this code creates an instance of OuterClass. It then calls useInnerClass() on that instance. That function creates an instance of InnerClass and calls its print() function. The print() function prints out the value of secretMessage, which is defined in the outer class.
In this example, we’re using a named inner class, because our inner class actually has a name (in this example, it’s InnerClass) that we can reuse. We can create multiple instances of InnerClass if we want to. But if we only ever create and use one instance of the class, we can use an anonymous inner class. Here’s code that does the same thing, but uses an anonymous inner class instead of a named inner class:
public class OuterClass{

	private String secretMessage = "hello";

	public void useInnerClass(){
		Printer myPrinter = new Printer(){
			public void print(){
				System.out.println(secretMessage);
			}
		};
		myPrinter.print();
	}

	public static void main(String[] args){
		OuterClass outerClass = new OuterClass();
		outerClass.useInnerClass();
	}
}
This might look confusing at first, but let’s focus on this code:
Printer myPrinter = new Printer(){
	public void print(){
		System.out.println(secretMessage);
	}
};
This code creates an implementation of the Printer interface and defines a print() function. It then creates an instance of that implementation class (even though the class doesn’t have a name) and stores it in the myPrinter variable. From there we can treat the myPrinter variable just like any other instance, because that’s really all it is.
Anonymous inner classes are useful when you only need a subclass to do one thing, and you don’t want to create an entire named class just to do it. It’s a way of implementing an interface and creating an instance in one step. But since it’s done in one step, you can’t reuse the implementation. That’s why it’s called anonymous.
Real Life Example
So far we’ve mostly talked about how inheritance works in theory, but the best way to learn is to see it in action. You’ll see inheritance all over the place as you start writing more advanced code, but you’ve actually already seen one of the best examples of inheritance I can think of: the ArrayList class.
Looking at the Java API, we can see the class hierarchy (what is a subclass of what) of the ArrayList class:
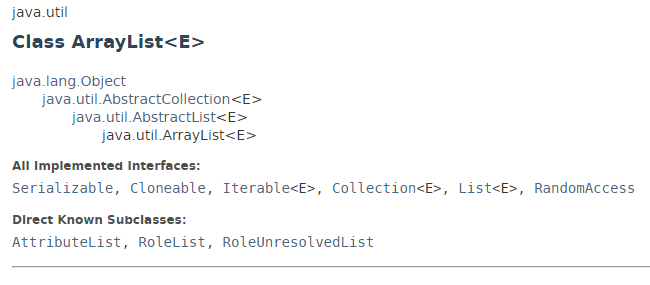
This tells us that the ArrayList class extends AbstractList, which extends AbstractCollection, which extends Object. You can learn more about these classes in the Java API, but basically:
-
AbstractCollectionis an abstract class that defines the basic operations required for creating a collection (an object that holds other objects). The class contains several abstract functions (likesize()) that subclasses must implement. It also contains a few functions (likeadd()andremove()) that by default throw an exception if you call them, so subclasses must override them to change that behavior. It also contains a bunch of normal functions that rely on those unimplemented functions. For example, theclear()function simply calls theremove()function untilsize()equals 0. Theclear()function doesn’t care how those functions are actually implemented, it just assumes that any subclass will have them defined. -
AbstractListis another abstract class that extends theAbstractCollectionclass. It overrides theadd()function, and adds a few functions that subclasses must implement. For example, the abstractget()function means that any subclasses have to implement code that lets you get an object from a specific index. -
ArrayListextendsAbstractListand defines implementations of all of the above abstract functions. Internally, it uses an array to hold the objects that are added to it. So when you call theget()function on anArrayList, you’re actually using an array index behind the scenes. But note that code that calls theget()function doesn’t have to care about exactly how the code works internally.
The Java API also tells us that the ArrayList class implements several interfaces. The functions in those interfaces are implemented by the ArrayList class. For example, the List interface defines functions like add() and get(). The ArrayList class implements these functions using an array. But another implementing class, the LinkedList class, implements them using nodes that point to each other, not an array.
We’ll talk more about that later, but the point is that any code that expects a List doesn’t care how the functions are implemented. So we can write code that does this:
public void addHello(List<String> list){
	list.add("hello");
}
Our code doesn’t need to care whether the parameter is an ArrayList or a LinkedList. It can just trust that the add() function works, because the List interface defines a contract that any subclasses must fulfill.
The Java API also tells us that there are three classes that further extend the ArrayList class: the AttributeList, RoleList, and RoleUnresolvedList. You don’t have to know what all of these classes are (I don’t either!), but the lesson here is that “real” Java classes often have complicated type hierarchies!
Also, the iterator() function in the ArrayList class returns an inner class!
You don’t have to memorize any of that, but I wanted to show you a concrete example of inheritance being used in the real world.
Java 8
Java 8 introduced a few new features that impact inheritance. For example, you can now have default functions in interfaces, and you can now use lambda expressions instead of anonymous inner classes.
A lot of cool things were added in Java 8, and we’ll get to them eventually. But for now just learning the basics of inheritance is probably confusing enough, so don’t feel like you have to learn Java 8 stuff on top!
Summary
All of this is a little overwhelming, but don’t worry, you don’t have to have any of this memorized. I just wanted to introduce this stuff because you’re going to see it as we get into more advanced code.
I’d recommend coming back to this tutorial and re-reading sections as you need them. For example, next time you see an interface and want to remember exactly what that is, just read the interface section above!
Homework
-
Create an application that models a zoo. You might have an abstract
Animalclass, extending byMammalandReptileabstract classes, which are extended byCatandDinosaurclasses. You might haveCarnivoreorHerbivoreinterfaces. Try to use everything we’ve covered in the tutorial! -
Create a
Shapeinterface that defines functions that every shape has:getArea()andgetPerimeter()are two examples. Then create implementations of that interface, likeRectangleandCircle, that implement the functions. How would you model a square, which is a type of rectangle? How would you model compound shapes (like a house shape made up of a rectangle and a triangle)?