Mastodon Bot


Mastodon Bot
February 11, 2023
example java libraries mastodonMastodon
Mastodon is a free, open-source social network, similar to Twitter but without all the evil attached to it. It’s built on top of ActivityPub, which means that instead of being at the mercy of a single company, Mastodon users can interact with any site in the Fediverse. You don’t really have to understand any of that, but it’s pretty neat!
Rather than being a single website or app like Twitter or Facebook, Mastodon is really a bunch of independent sites called instances or servers. Each instance of Mastodon has its own rules and users. But because these instances can talk to each other, a user on one instance of Mastodon can follow somebody from another instance. This page contains a list of many Mastodon instances, but there are a bunch more out there!
I’m @KevinWorkman@mastodon.art which means I joined the Mastodon.art instance. I chose that server mostly because I wanted to hang out with folks participating in Genuary, but that doesn’t mean I can only follow other people on Mastodon.art. For example, I follow @shiffman@mastodon.social. That’s the power of Mastodon- you aren’t locked into a single site, and you can always move to a different instance and bring your followers with you.
Mastodon also offers an API that lets you write code that interacts with Mastodon. This is how folks make Mastodon apps. And it’s also how you can make a Mastodon bot!
The rest of this guide walks you through creating a Mastodon bot in Java using a library called Mastodon4j.
Register Your Bot
Before you can create a bot, you need to register an account for your bot. You can pick pretty much any Mastodon instance (see this page for a directory of Mastodon instances). For my bots, I’ve used botsin.space which is an instance specifically designed for bots.
Register an account for your bot. If you’re using botsin.space, notice that the signup process requires an explanation of what your bot is going to do, and a secret word which can be found in the server rules.
It can take a few hours for your registration to be approved, so register your bot early!
Create an Application
After you’ve registered for an account and been approved by your server, you should be able to login to your Mastodon instance. (If you followed the above steps, that’s botsin.space, or it’s whatever instance you registered with.)
Next, you need to create a Mastodon application. Don’t worry, you don’t need to build a whole Mastodon app! Creating an application lets you write code that interacts with Mastodon, which is how you’ll build your bot.
To create an application, click Edit profile and then click the Development tab. Then click the New application button. Give your application any name you want- this won’t be visible to other people, but I usually use the same name I used for the bot’s account. The default scopes are fine for now, and you can always change them later. Scroll down and click the big Submit button at the bottom of the page.
When you’re finished, you should see a screen like this:
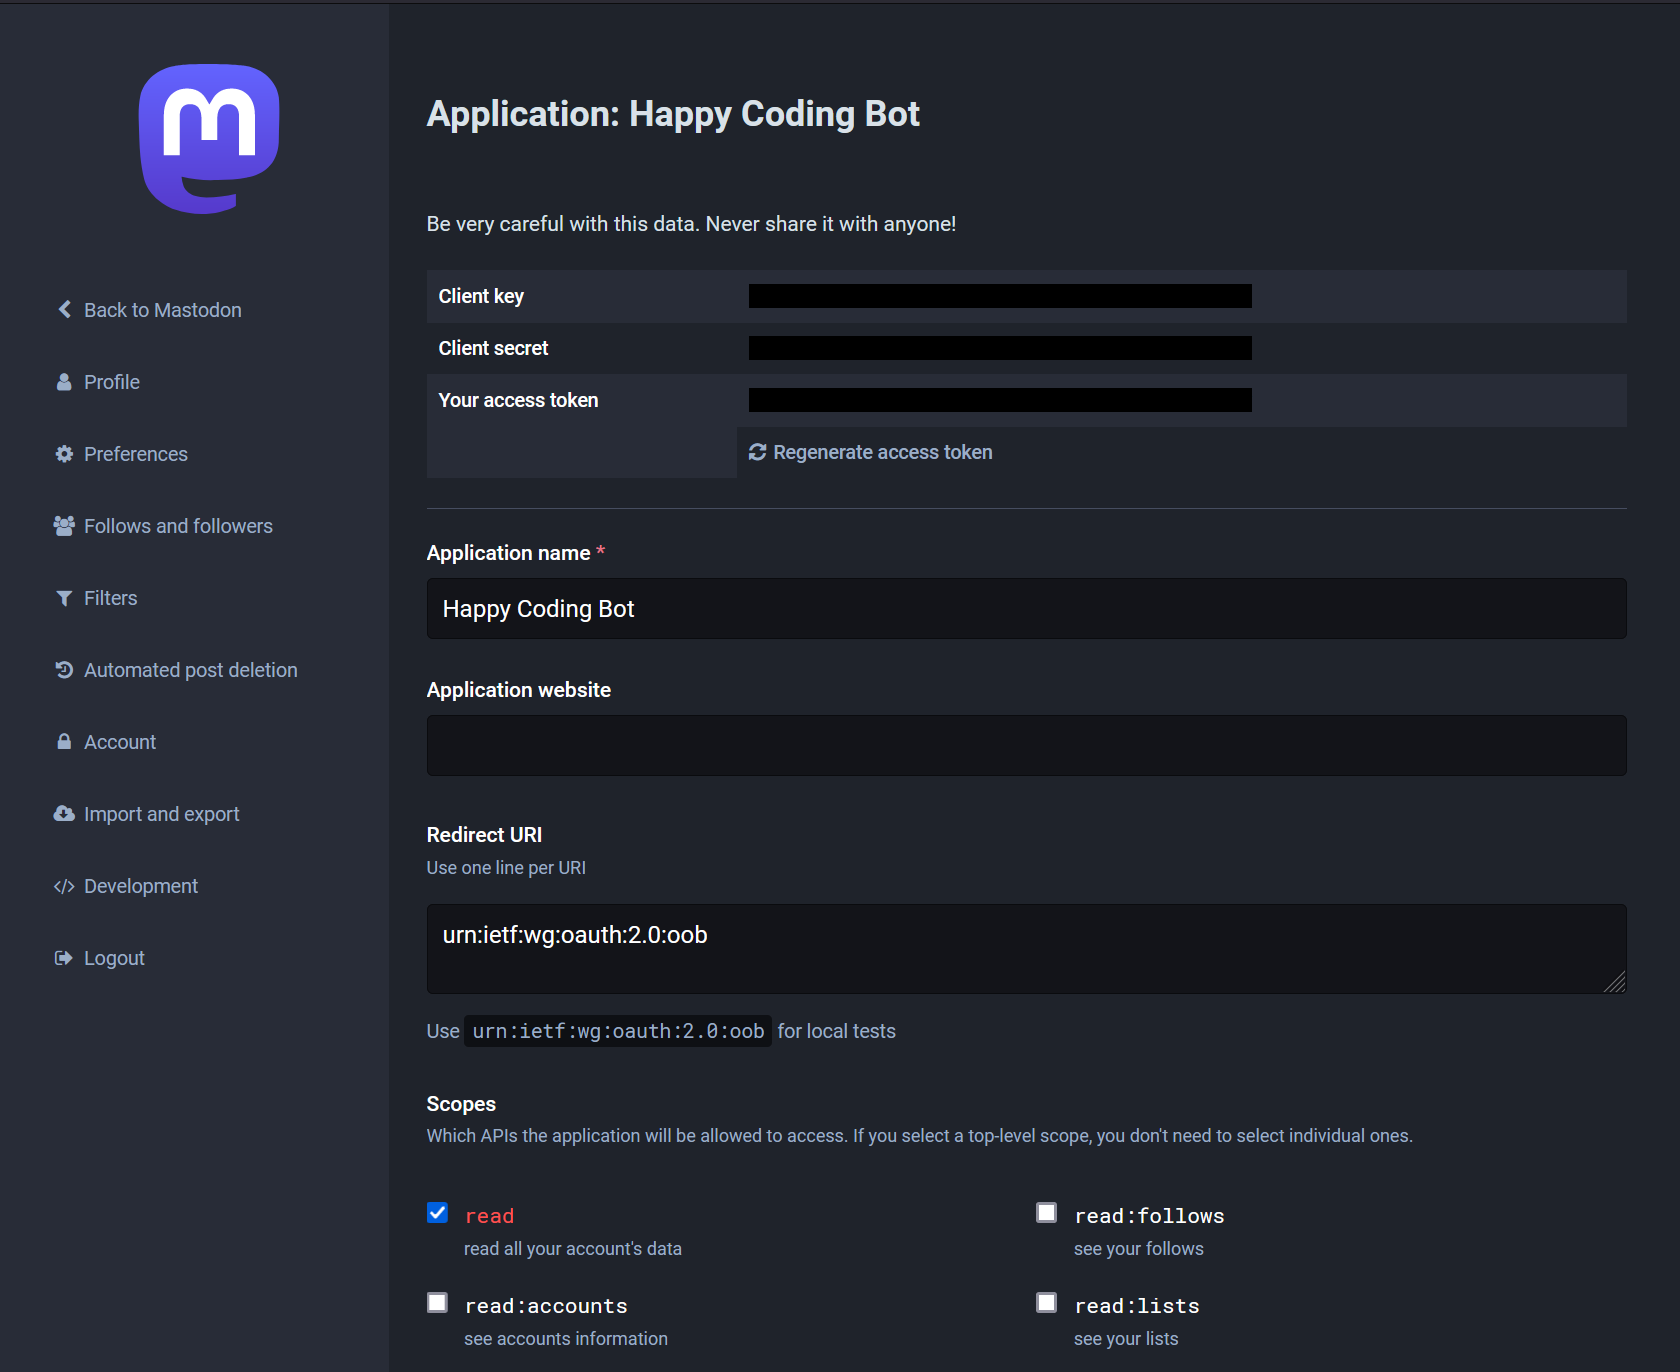
Find Your Access Token
In the above screen, find your application’s access token. You’ll need this in a minute!
IMPORTANT: These are like passwords for your account. Don’t give them to anyone!
Mastodon4J
Mastodon offers a REST API that lets you write code that interacts with a Mastodon instance. See the Mastodon API reference for more info.
You could write code that calls the REST API’s endpoints directly. (And if you’re curious about how to do that, see the REST API tutorial for an example.) But it’s probably easier to use a library that does it for you!
Mastodon4j is a Java library that wraps the Mastodon API.
For example, the Mastodon API provides a statuses endpoint, which responds to GET requests with Status data. Similarly, Mastodon4j provides a Statuses class containing a getStatus() function, which returns instances of the Status class.
I recommend reading through the documentation for both the Mastodon API and Mastodon4j to get a sense of what they both offer. But long story short, Mastodon4j contains a set of classes and functions that call the Mastodon API for you, which means you can write Java code to interact with Mastodon.
Maven
Mastodon4j is published on JitPack and is available as a Maven dependency. Here’s an example pom.xml file that includes the Mastodon4j library as a dependency:
<project xmlns="http://maven.apache.org/POM/4.0.0"
         xmlns:xsi="http://www.w3.org/2001/XMLSchema-instance"
         xsi:schemaLocation="http://maven.apache.org/POM/4.0.0 http://maven.apache.org/xsd/maven-4.0.0.xsd">
  <modelVersion>4.0.0</modelVersion>

  <groupId>io.happycoding</groupId>
  <artifactId>mastodon-bot</artifactId>
  <version>1</version>

  <properties>
    <!-- Java 19 -->
    <maven.compiler.source>19</maven.compiler.source>
    <maven.compiler.target>19</maven.compiler.target>
    <exec.mainClass>io.happycoding.MastodonBot</exec.mainClass>
  </properties>

  <repositories>
    <repository>
      <id>jitpack.io</id>
      <url>https://jitpack.io</url>
    </repository>
  </repositories>

  <dependencies>
    <dependency>
      <groupId>com.github.sys1yagi</groupId>
      <artifactId>mastodon4j</artifactId>
      <version>1.7.0</version>
    </dependency>
  </dependencies>
</project>
Make sure to change the exec.mainClass property to point to your main class.
Also note that Maven expects a specific directory structure. If I have a single Mastodon.java file in the io.happycoding package, my directory structure would look like this:
MastodonBot/-
pom.xmlsrc/main/java/io/happycoding/MastodonBot.java
- (other Java packages here)
-
Running the Project
For now, create a MastodonBot.java file. I’m putting mine in the io.happycoding package, but you can use whatever you want.
package io.happycoding;

public class MastodonBot {
  public static void main (String... args){
    System.out.println("Hello world!");
  }
}
This code doesn’t do anything with Mastodon yet, but it’s a good starting point to test that everything is working.
Now that you have a main class, to run your project, open a command line to the same directory that contains the pom.xml file, and then run this command:
mvn compile exec:java
This tells Maven to compile and run your code. You should see Hello world! printed to the console.
IDEs
You can also run your code from an IDE. I usually use Intellij, but anything that supports Maven projects should be fine.
Creating a Client
Now you have your Maven project, you can start using Mastodon4j to connect to Mastodon.
String accessToken = "YOUR ACCESS TOKEN HERE";
String instanceName = "botsin.space";
MastodonClient client =
    new MastodonClient.Builder(instanceName, new OkHttpClient.Builder(), new Gson())
        .accessToken(accessToken).build();
IMPORTANT: Your access token is like your username and password. Never give it to anyone! This includes uploading it to GitHub! See the section below for approaches for securing your access token.
This code creates an instance of the MastodonClient class, which connects to the Mastodon API. This code doesn’t do anything with that connection yet, but it’s necessary for the next section to work!
Posting a Status
Now that you have an instance of the MastodonClient class, you can use it to post a status- also called a toot! 🐘
// Prepare your status content
String status = "Hello world!";
Long inReplyToId = null;
List<Long> mediaIds = null;
boolean sensitive = false;
String spoilerText = null;

// Connect to the Mastodon API's statuses endpoint
Statuses statusesEndpoint = new Statuses(client);

// Post a status
statusesEndpoint
    .postStatus(status, inReplyToId, mediaIds, sensitive, spoilerText)
    .execute();
Putting it all together, it looks like this:
package io.happycoding;

import com.google.gson.Gson;
import com.sys1yagi.mastodon4j.MastodonClient;
import com.sys1yagi.mastodon4j.api.entity.Status;
import com.sys1yagi.mastodon4j.api.exception.Mastodon4jRequestException;
import com.sys1yagi.mastodon4j.api.method.Statuses;
import okhttp3.OkHttpClient;

public class MastodonBot throws Mastodon4jRequestException {
  public static void main (String... args){
    String accessToken = "YOUR ACCESS TOKEN HERE";
    String instanceName = "botsin.space";
    MastodonClient client =
        new MastodonClient.Builder(instanceName, new OkHttpClient.Builder(), new Gson())
            .accessToken(accessToken).build();

    String status = "Hello world!";
    Long inReplyToId = null;
    List<Long> mediaIds = null;
    boolean sensitive = false;
    String spoilerText = null;

    // Connect to the Mastodon API's statuses endpoint
    Statuses statusesEndpoint = new Statuses(client);

    // Post a status
    statusesEndpoint
        .postStatus(status, inReplyToId, mediaIds, sensitive, spoilerText)
        .execute();

    System.exit(0);
  }
}
Exiting
Notice the exit call at the end of the above code:
System.exit(0);
Normally you don’t need this line, and your program will exit as soon as the main() method finishes. But with Mastodon4j, the program continues running unless you call System.exit() at the end. Try removing the line to see what happens without it.
(I think this is because MastodonClient creates a non-daemon thread to keep the connection alive. If you figure out a better way around this, let me know!)
Posting Images
To post an image, you have to do two things: first, you upload your image and get its ID. Then you post a status that contains that ID. Here’s an example:
package io.happycoding;

import com.google.gson.Gson;
import com.sys1yagi.mastodon4j.MastodonClient;
import com.sys1yagi.mastodon4j.api.entity.Status;
import com.sys1yagi.mastodon4j.api.exception.Mastodon4jRequestException;
import com.sys1yagi.mastodon4j.api.method.Statuses;
import okhttp3.OkHttpClient;

public class MastodonBot {
  public static void main (String... args) throws Mastodon4jRequestException {
    String accessToken = "YOUR ACCESS TOKEN HERE";
    String instanceName = "botsin.space";
    MastodonClient client =
        new MastodonClient.Builder(instanceName, new OkHttpClient.Builder(), new Gson())
            .accessToken(accessToken).build();

    String filename = "your_file_here.png";
    MultipartBody.Part part = MultipartBody.Part.createFormData("file", filename,
        RequestBody.create(MediaType.parse("image/png"), new File(filename)));

    // Connect to the Mastodon API's media endpoint
    Media media = new Media(client);

    // Upload the image
    Attachment uploadedImage = media.postMedia(part).execute();

    String status = "This post contains an image!";
    Long inReplyToId = null;
    List<Long> mediaIds = Arrays.asList(uploadedImage.getId());
    boolean sensitive = false;
    String spoilerText = null;

    // Connect to the Mastodon API's statuses endpoint
    Statuses statusesEndpoint = new Statuses(client);

    // Post the status containing the image.
    statusesEndpoint
        .postStatus(status, inReplyToId, mediaIds, sensitive, spoilerText)
        .execute();

    System.exit(0);
  }
}
Handling Timeouts
In the above examples, the main() method is marked as throwing a Mastodon4jRequestException. This is a quick way to get something working, but it means that if anything goes wrong, the program exits and prints a stack trace to the console. In a more complex project, you probably want to properly handle the exception.
Timeouts are a common error case, so you might want to check for that specifically. Here’s an example:
static void tootImage(String content, String filename, int retryTimes) {
  MultipartBody.Part part = MultipartBody.Part.createFormData("file", filename,
      RequestBody.create(MediaType.parse("image/png"), new File(filename)));

  for (int i = 0; i < retryTimes; i++) {
    try {
    Attachment uploadedImage = new Media(client).postMedia(part).execute();
    new Statuses(client)
        .postStatus(content, null, Arrays.asList(uploadedImage.getId()), false, null)
        .execute();
    // Reaching this line means the post worked, so break out of the loop
    break;
  } catch (Mastodon4jRequestException e) {
    if (e.getCause() instanceof SocketTimeoutException) {
      // This was a timeout error, keep looping to retry
       continue;
    }

    // Unknown error, print a stack trace and exit
    e.printStackTrace();
    System.exit(1);
  }
}
This code defines a function that tries to upload an image and post a status to Mastodon. If the upload or the post return a timeout error, the code retries in a loop.
Handling errors like this is helpful for projects where you need to make sure a post succeeded before doing some other processing. (For an example, see the Replying to Notifications section below.)
Searching Statuses
Mastodon doesn’t have the ability to search based on keywords. This is by design! Instead, you can read posts from specific hashtags:
String hashtag = "CreativeCoding"
List<Status> statuses =
    new Public(client).getFederatedTag(hashtag).execute().getPart();
for (Status status : statuses {
  // Do something with each Status
}
You can also browse posts from the accounts your bot follows:
List<Status> statusResponse = new Timelines(client).getHome().execute().getPart();
for (Status status : statuses {
  // Do something with each Status
}
Respecting Mastodon’s Culture
Mastodon is built on a philosophy that makes it a little different from other social media sites. Mastodon gives a lot of power to its individual human users, rather than giving power to systems and algorithms that drive most other social media sites. It’s generally frowned upon to force users into interactions they didn’t ask for- even if you think that interaction is fun and innocent!
With that in mind, when you’re building a Mastodon bot, make sure that you aren’t spamming users or doing things with their post that they didn’t agree to. For example, you shouldn’t reply directly to a human user, unless that user has somehow opted into receiving a reply.
There’s no exact rule for this, but for example you might only reply to people who follow your bot, or who use a hashtag that’s specific to your bot, or who mention your bot.
This is explicitly stated in the server rules for botsin.space:
No interactions with people who don’t opt in to the interaction. If you mention another user, they must either follow the bot, or they must’ve started the interaction themselves.
If you don’t respect this rule, your bot will be suspended. So make sure your bot plays by the rules!
Replying to Notifications
One way to make sure your bot only interacts with users who opt into it is to wait for a user to mention your bot in a post. This code searches the bot’s notifications for mentions, and then replies to them with a “hello” message.
List<Notification> notifications =
    new Notifications(client).getNotifications().execute().getPart();
for (Notification notification : notifications) {
  if (!"mention".equals(notification.getType())) {
    // Skip notifications for favorites and follows
    continue;
  }

  // Get the status that mentioned you
  Status statusToReply = notification.getStatus();
  String userToMention =  "@" + statusToReply.getAccount().getAcct();
  long statusToReplyId = statusToReply.getId();

  String replyContent = "hello " + userToMention + "!";

  // Reply to the status that mentioned you
  new Statuses(client)
      .postStatus(replyContent, statusToReplyId, null, false, null)
      .execute();
}
Note that if you reply without also mentioning the user in your reply, the user won’t get a notification.
Avoiding Duplicate Replies
The above code looks for notifications and then replies to any statuses that mention the bot. However, if you run this code multiple times, your bot will reply to the same notification multiple times. You probably only want to reply if you haven’t already replied!
The way I’ve approached this is by storing the posts a bot has replied to in a local file. Before the bot replies, it checks whether the post is in the file. After it replies, it adds it to the file.
List<String> repliedIds = Files.readAllLines(Paths.get("replied-ids.txt"));

List<Notification> notifications =
    new Notifications(client).getNotifications().execute().getPart();
for (Notification notification : notifications) {
  if (!"mention".equals(notification.getType())) {
    // Skip notifications for favorites and follows
    continue;
  }

  // Get the status that mentioned you
  Status statusToReply = notification.getStatus();
  long statusToReplyId = statusToReply.getId();

  // Skip statuses already replied to
  if(repliedIds.contains(String.valueOf(statusToReplyId))) {
      System.out.println("Skipping already replied: " + statusToReplyId);
      continue;
  }

  String userToMention =  "@" + statusToReply.getAccount().getAcct();
  String replyContent = "hello " + userToMention + "!";

  // Reply to the status that mentioned you
  new Statuses(client)
      .postStatus(replyContent, statusToReplyId, null, false, null)
      .execute();

  // Save the replied ID
  Files.write(
      Paths.get("replied-ids.txt"),
      String.valueOf(statusToReplyId).getBytes(),
      StandardOpenOption.APPEND);

  }
}
Scheduling Your Bot
The above examples require you to run your code to trigger your bot. That might be good enough depending on how you want your bot to work. But chances are you probably want your bot to run automatically.
There are a few ways to do that, but here’s how I’ve approached it:
Thread.sleep
You can use Java’s Thread.sleep() function to pause your program for a certain amount of time.
public class MastodonBot {
  public static void main (String... args) throws Mastodon4jRequestException {
    while (true) {
      // Run the bot once
      runBot();

      // Wait 60 minutes
      try {
        int minutesToWait = 60;
        int msToWait = minutesToWait * 60 * 1000;
        Thread.sleep(msToWait);
      }
    }
  }
}
In this example, the runBot() function encapsulates a single run of the bot. This can be posting a status, responding to notifications, or anything else your bot does. Then the code sleeps for 60 minutes before looping and running the bot again.
Scheduling a Task
The Thread.sleep approach works, but it requires you to always have your bot running in the background, either in your IDE or in a command line.
Instead of keeping your bot running, you can schedule a task on your computer that runs your bot periodically. How you do this depends on what operating system you’re using. Try searching “[your OS] schedule task” for specific instructions.
I use Windows, so I use Windows Task Scheduler. First, next to my bot’s pom.xml file I create a MastodonBot.bat file, which is really a text file that contains a single line:
mvn compile exec:java
This .bat file is a program that runs the bot. Then, I use Windows Task Scheduler to run that program every so often. How often you run your bot is up to you- I run some of my bots every hour, and others only once a day.
Tip: For me, the scheduled task only works correctly if I also specify the Start in argument as the directory that contains the pom.xml file- without quotes! I don’t know why this is, but it took me a long time to figure out.
Keep in mind that any changes you make to your bot will run whenever your task runs. You can pause your scheduled task while you’re making changes to your code. Or you might want to create two copies of your bot: one for development, and one that contains finished code that you trigger from a scheduled task.
Securing Your Access Token
The above examples create a MastodonClient using a hard-coded access token:
String accessToken = "YOUR ACCESS TOKEN HERE";
String instanceName = "botsin.space";
MastodonClient client =
    new MastodonClient.Builder(instanceName, new OkHttpClient.Builder(), new Gson())
        .accessToken(accessToken).build();
This works for small projects with source code that you’ll never share with anyone else. But your access token is like your username and password, so if you’re going to share your code (for example, if you’re going to upload it to GitHub), you should make sure to remove your access token beforehand!
You can do this manually, by changing that line of code every time you push your changes. But that’s going to get annoying pretty quickly, and you’re likely to accidentally upload your access token.
Instead, here are two approaches you might consider:
Environment Variables
Instead of hard-coding your access token, you could set it as an environment variable. How you do that depends on your operating system- try searching “[your os] set environment variable” for more info.
Once you have your environment variable set, you can change the above code to something like this:
String accessToken = System.getenv("mastodon_bot_access_token");
Only your computer has the environment variable, so this code is safe to commit to GitHub or share with other people.
Token Files
Another approach is to store your access token in a text file which you never share or upload to GitHub. Then your code can load that file and read the access token from it:
BufferedReader br = new BufferedReader(new FileReader("access-token.txt"));
String accessToken = br.readLine();
br.close();
As long as you never upload your access-token.txt file anywhere, this code is safe to commit or share. You can add your access-token.txt file to your .gitignore file to make sure it’s never uploaded to GitHub.
Share Your Bots!
If this guide helped you create a bot, I’d love to hear about them!
Post a link to your bots on the Happy Coding forum, or tag me on Mastodon at @KevinWorkman@mastodon.art.
Here are a couple of my bots:
- Where Was Taylor Swift Bot is inspired by a Taylor Swift lyric and posts once per day.
- Golden Spiral Bot adds a golden spiral overlay to images it’s tagged in.
Happy botting! 🤖
Libraries Examples

Comments
Happy Coding is a community of folks just like you learning about coding.
Do you have a comment or question? Post it here!
Comments are powered by the Happy Coding forum. This page has a corresponding forum post, and replies to that post show up as comments here. Click the button above to go to the forum to post a comment!