Eclipse


Eclipse
- Downloading Eclipse
- Workspaces
- Projects
- Classes
- Writing Code
- Compiler Errors
- Classpath
- Eclipse Views
- Debugger
- Other Eclipse Features
- Summary
- Homework
So far, we’ve been using a basic text editor to edit our code, and we’ve been using the command line to compile and run our classes. It’s a good idea to start programming this way, so you understand the basics of compiling, running, setting the classpath, and looking stuff up in the Java API. But as you start working on more complicated code, you’re probably going to want to use an integrated development environment, aka an IDE.
An IDE is a more advanced code editor that also includes tools for navigating your code more easily, as well as compiling and running your code without going through the command line. If you’re coming from a Processing background, remember that you wrote Processing code in the Processing editor. The Processing editor ran your code when you pressed the play button, and it showed you errors without going through the command line. The Processing editor is an IDE.
This tutorial introduces you to another IDE called Eclipse, which is one of the most common IDEs used for Java development. (And most of the stuff you learn about here will apply to other IDEs as well.)
Downloading Eclipse
Go to the Eclipse homepage and find the download page. Download the Eclipse installer from there, and then run the installer. The first screen of the installer will ask you which version of Eclipse you want:
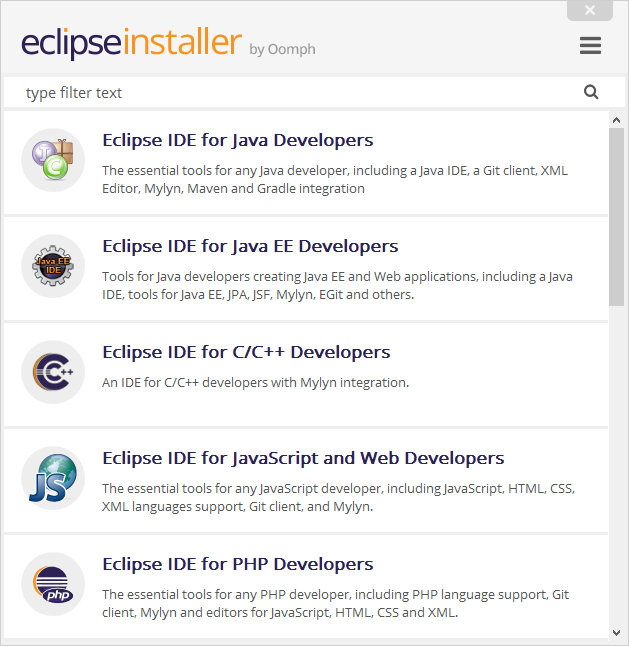
- The Eclipse IDE for Java Developers includes all of the tools you need to write Java code.
- The Eclipse IDE for Java EE Developers includes those tools, plus some extra tools for writing server code.
So if you’re going to write server code, then you should install the Java EE version. Otherwise you should just install the Java version. But you can always upgrade from Java to Java EE later, so for now I would just choose the Java version. Install Eclipse wherever you want (the default location it suggests is fine). After the installer finishes, launch Eclipse!
Workspaces
The first thing Eclipse will do is ask you for a workspace directory:
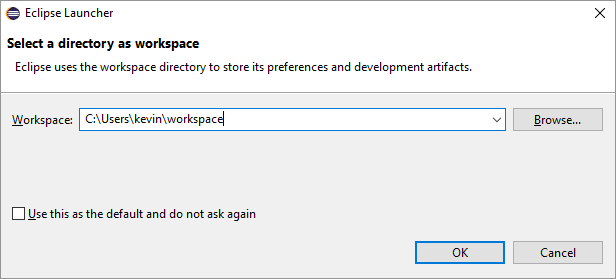
Eclipse needs a place to put your code and your settings, and that’s what a workspace is. The directory you choose here will be where your code and settings files are saved. You can choose whatever directory you want here (again, the default is fine).
Starting out, you’ll probably only use one workspace, so you can also check the “Use this as the default and do not ask again” checkbox as well. But as you write more code, you might want to split it up into multiple workspaces: you might have the stuff you work on for your job or for school in one workspace, and the stuff you work on for fun in another workspace. You can worry about that later. For now, just click the OK button!
That will finally open up Eclipse, which by default will show you a Welcome screen. Freel free to close that tab, and uncheck the “Always show Welcome at start up” checkbox. You should see something like this:

Eclipse has a bunch of different tools and buttons, but don’t feel overwhelmed. We’ll focus on the ones you care about, and you can ignore the rest for now.
Projects
Eclipse organizes code into projects, so before we can start writing code we have to create a project. Go to File > New > Java Project:
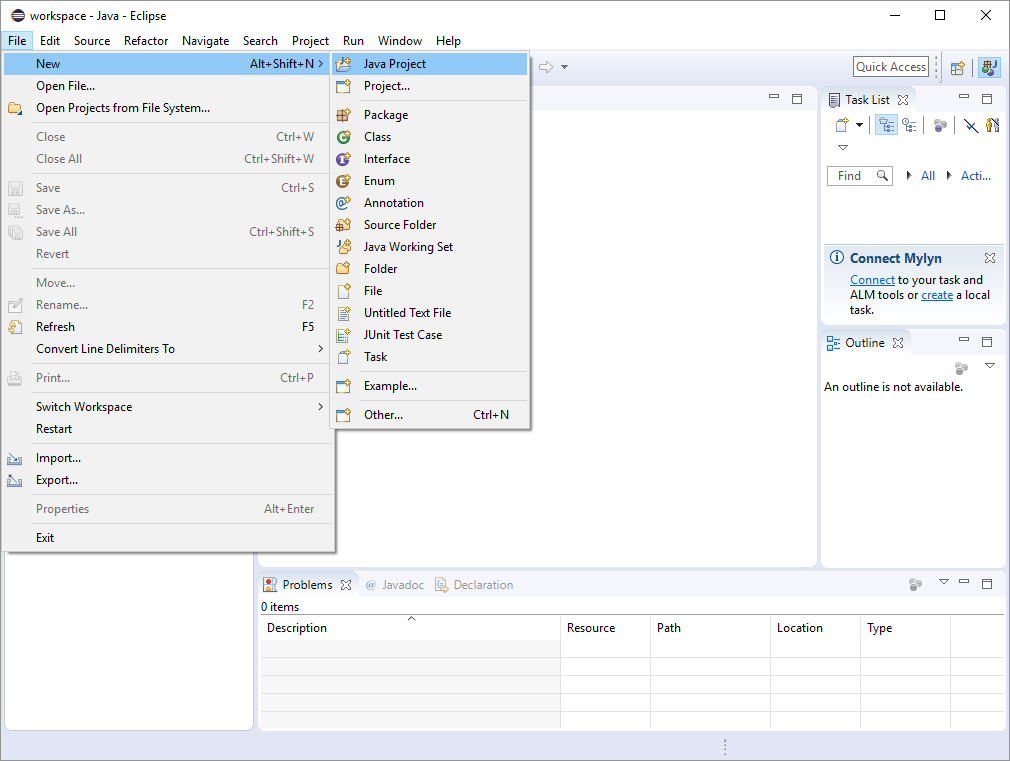
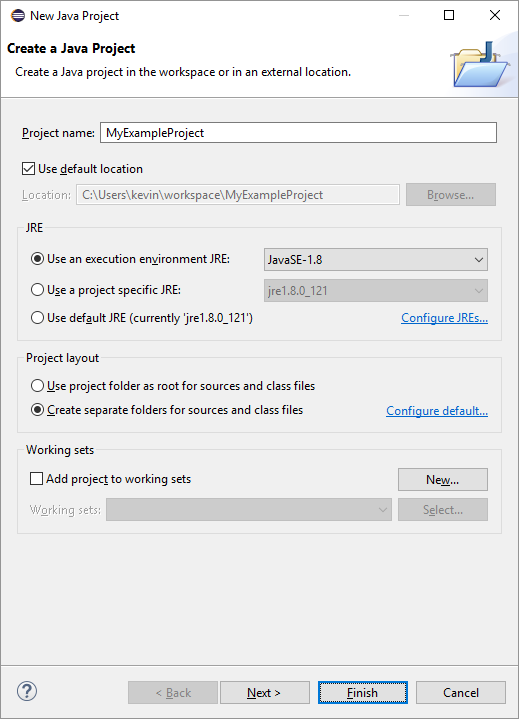
This opens up the New Java Project dialog. This dialog lets you change settings for your project, but for now just give your project a name and click the Finish button.
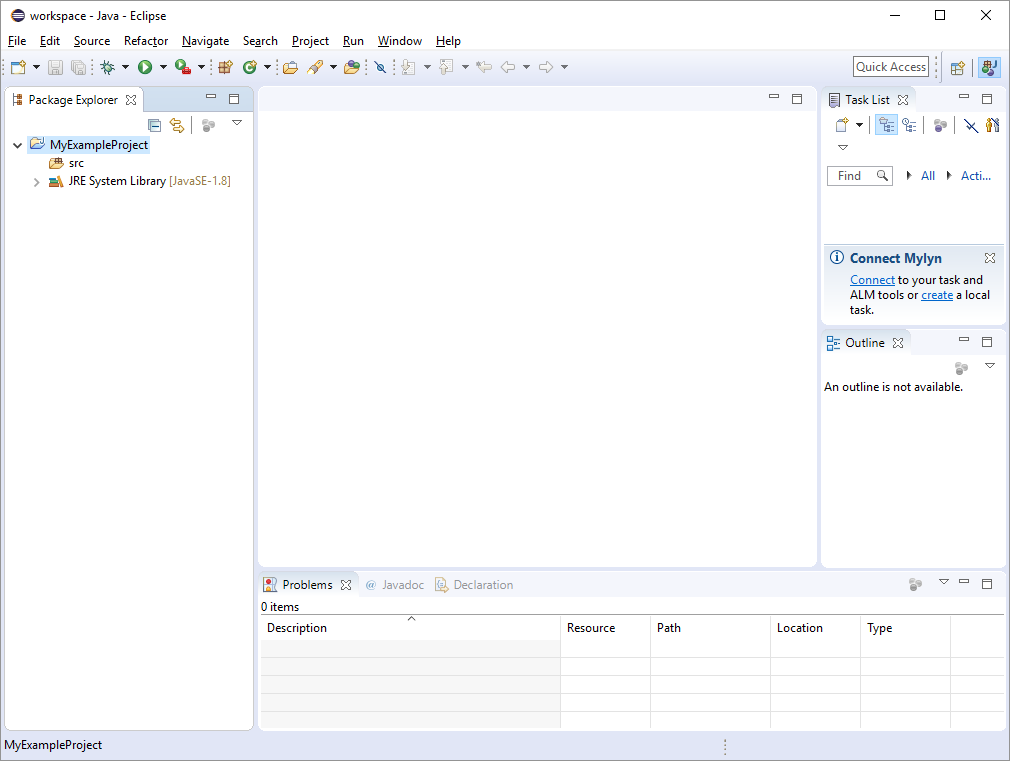
Now you should see your project in the Package Explorer tab in Eclipse:
Classes
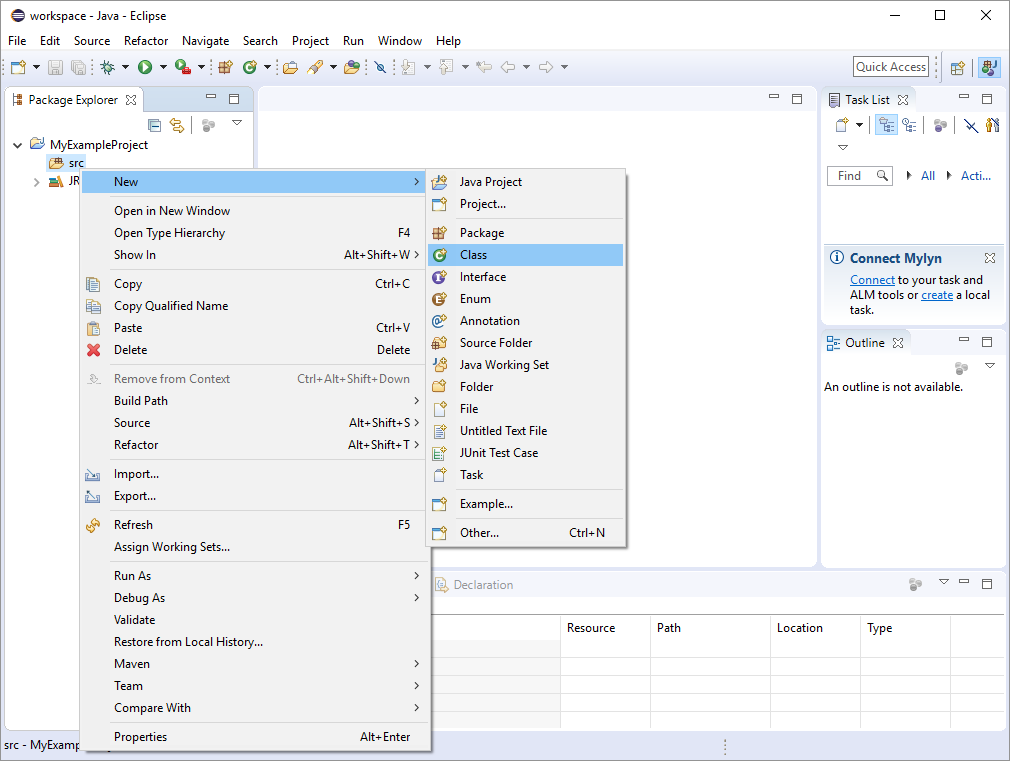
Now that you have a project, you can finally start writing code. First, create a new class by expanding your project in the Package Explorer, then right-clicking the src directory, expanding the New menu, and then clicking the Class option.
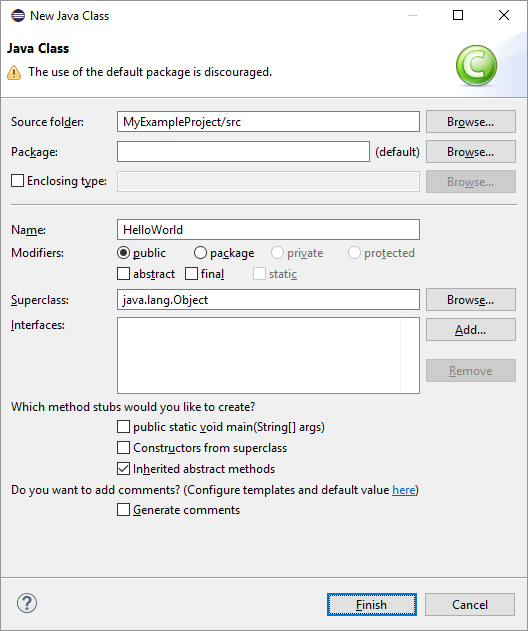
That brings up the New Java Class dialog. This dialog contains a bunch of options you can set, but for now just give your class a name and click the Finish button.
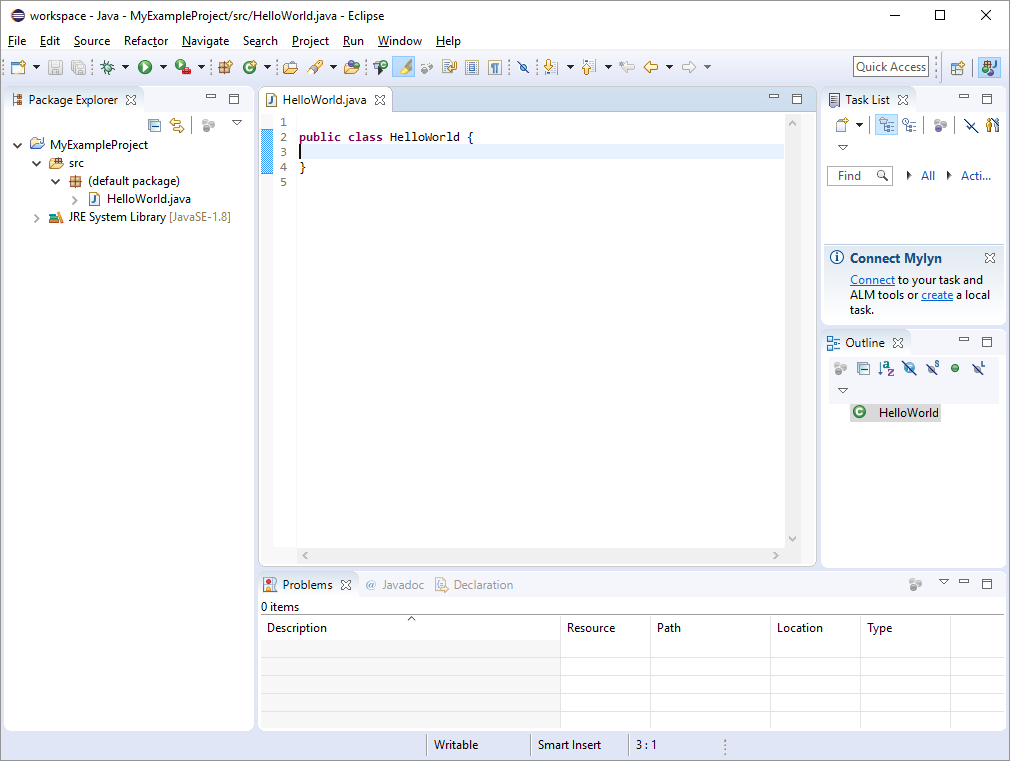
This finally gives you a Java class you can type your code into!
Writing Code
You can type your code into Eclipse (after creating a project and a class) just like you could in a basic text editor. Let’s start by writing a simple program:
public class HelloWorld {
	public static void main(String[] args){
		System.out.println("Happy coding!");
	}
}
As you start typing this into Eclipse, you might notice little windows popping up:
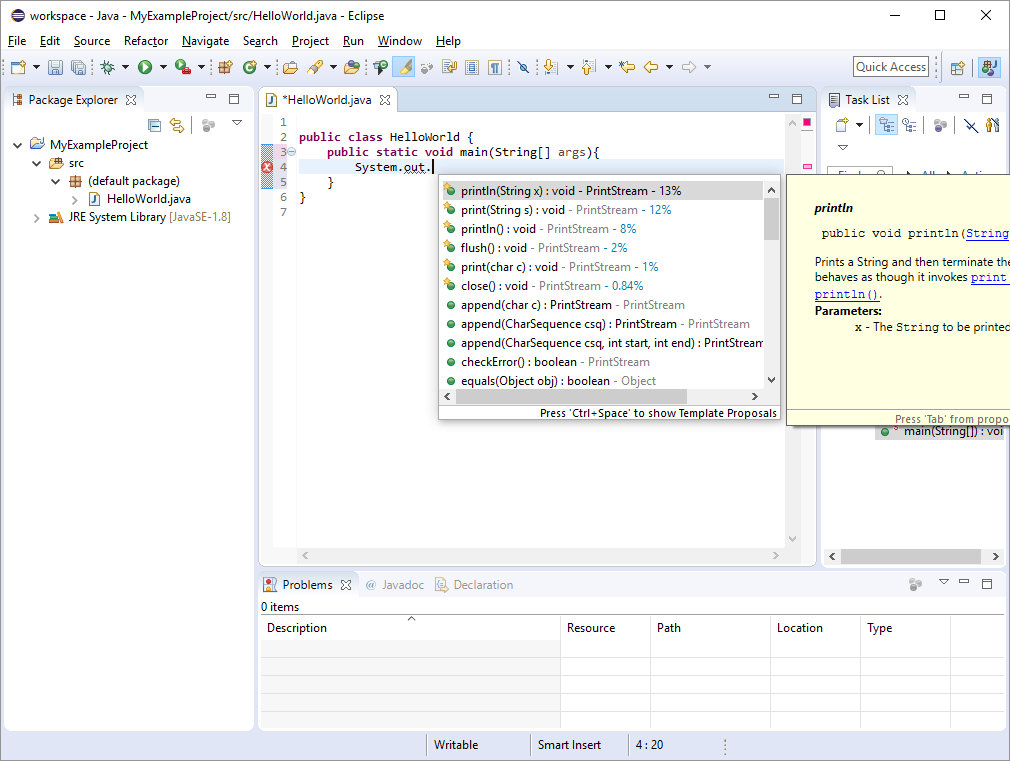
These are autocomplete suggestions, and they give you quick information about which functions you can call, as well as their documentation from the Java API. For example, the above autocomplete suggestion is telling us about all of the functions we can call on the System.out variable, and it’s even giving us the documentation for the println() function from the Java API.
This can be a nice way to find out what functions an object has, or exactly what parameters a particular function wants. But don’t become too reliant on autocomplete! You should know that this same information is available in the Java API, and you should know how to look stuff up outside of Eclipse.
Anyway, when we have the above program typed into Eclipse, we can run our program by clicking the play button (it’s the green circle near the upper-left corner of the screen). No need to go through the command line!
Compiler Errors
As you type code into Eclipse, it will automatically try to compile your code whenever you make a change. This gives you immediate feedback when you make a mistake without going through the command line. For example, type this beginning of a program:
public class HelloWorld {
	public static void main(String[] args){
		JFrame frame = new JFrame("Hello World");
	}
}
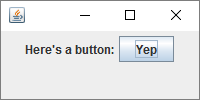
You’ll notice that Eclipse shows a red underline under the JFrame references, which means there are compiler error at those positions. Notice that you don’t have to manually run the compiler to get these errors, Eclipse is constantly running it for you automatically. If you mouse over those red underlines, Eclipse will show you the compiler error in a popup:
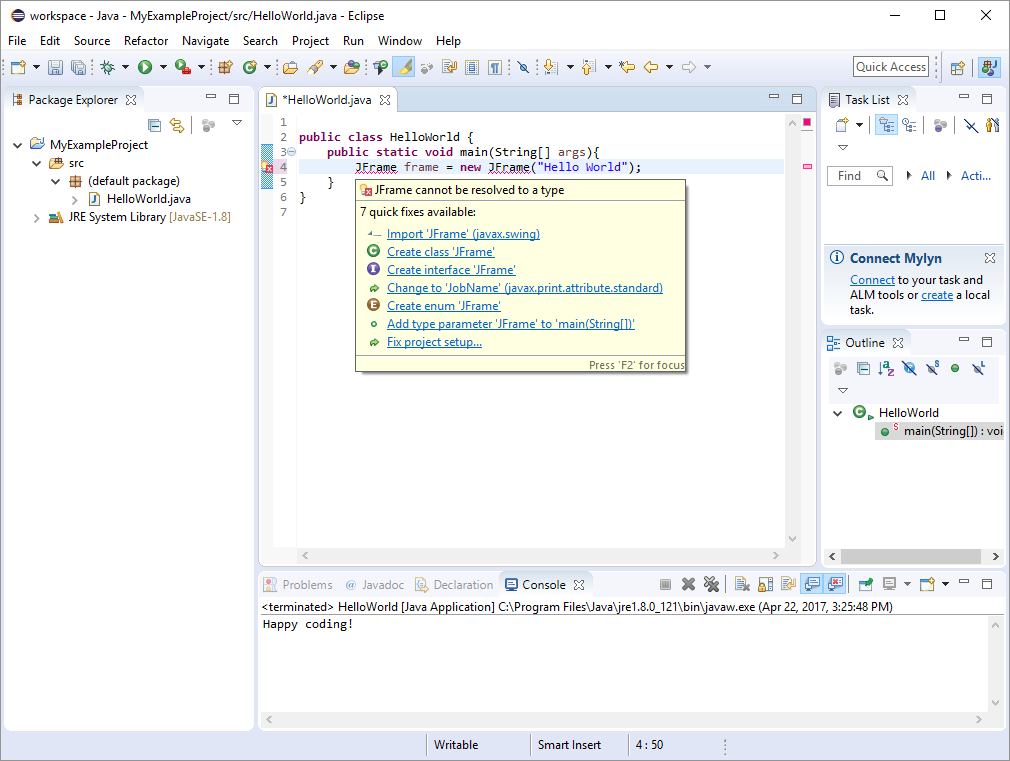
In this case, the compiler error is because we haven’t imported the JFrame class yet. Also notice that Eclipse has suggestions on how to fix the error, and if you click the Import 'JFrame' (javax.swing) option, Eclipse will automatically add the import statement for you! Try completing the code so a window saying “hello world” displays when you run your program.
Eclipse doesn’t know how to fix every compiler error, but it does have reasonable suggestions for many of them. And being able to see the compiler errors as soon as they happen instead of waiting to run the compiler yourself is a huge benefit.
Also note that Eclipse will also show you various warnings as a yellow underline. This is stuff like unused variables or statements that don’t actually do anything. These aren’t errors and won’t prevent you from running your code, but they usually indicate that something isn’t quite right with your code.
Classpath
Remember from the Java libraries tutorial that we can use a Java library in our code by adding the library’s .jar file to the classpath when we compile and run our code. We did this through the command line using the -cp argument. We can also use Java libraries in Eclipse by setting our project’s classpath.
To set your project’s classpath, right-click your project, and then click the Properties option. This brings up a dialog with all the settings you can specify for your project. Click the Java Build Path menu, and then the Libraries tab, which takes you to this screen:
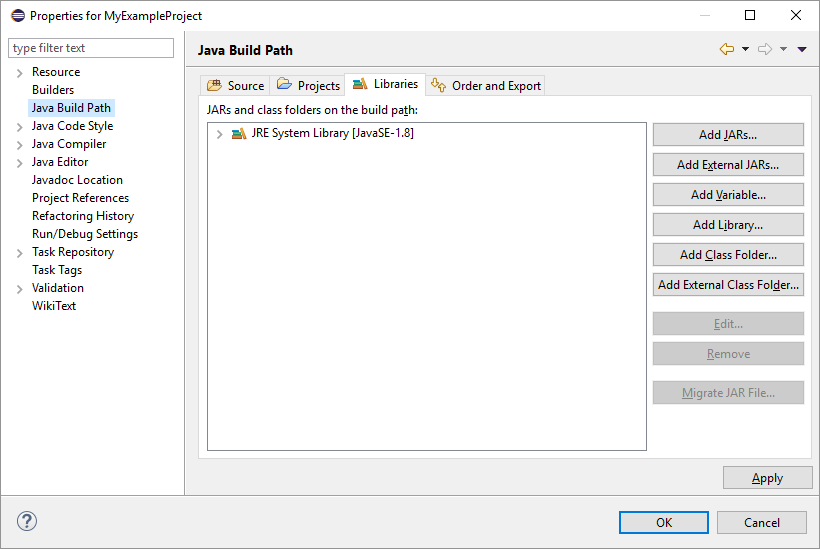
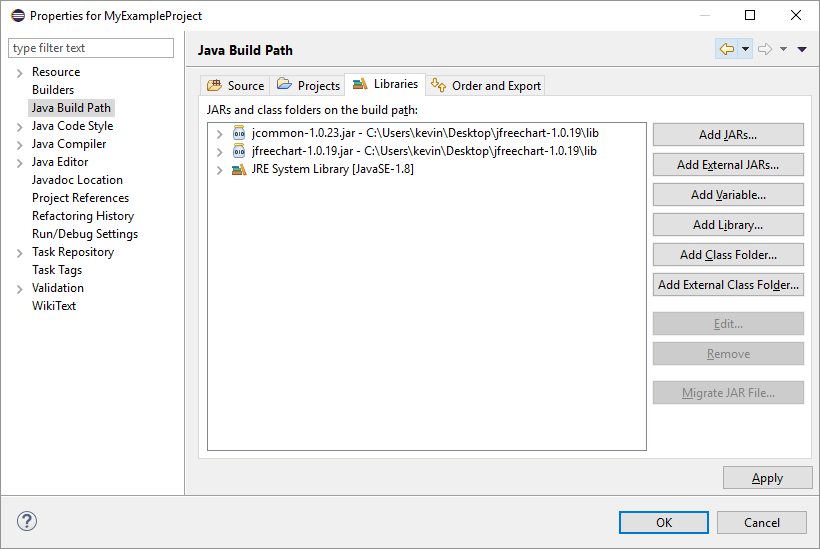
This is your project’s classpath, and any library jars you want to use should be added here. Let’s add the JFreeChart jar file that we used in the the Java libraries tutorial. Click the Add External JARs... button, and then navigate to wherver the JFreeChart jars are. Remeber that JFreeChart requires two jars, so add them both. Your classpath should look like this:
Now that we’ve set our project’s classpath, click the OK button and let’s write some code that uses the library.
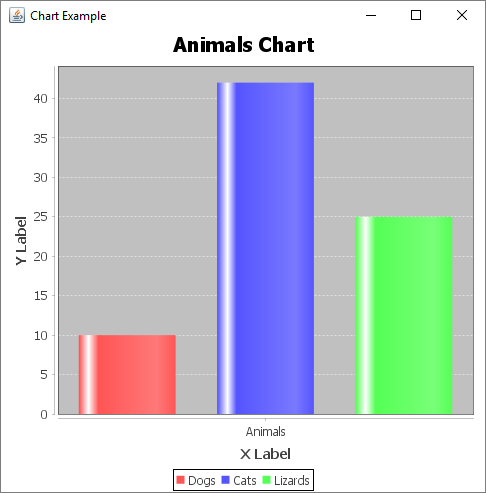
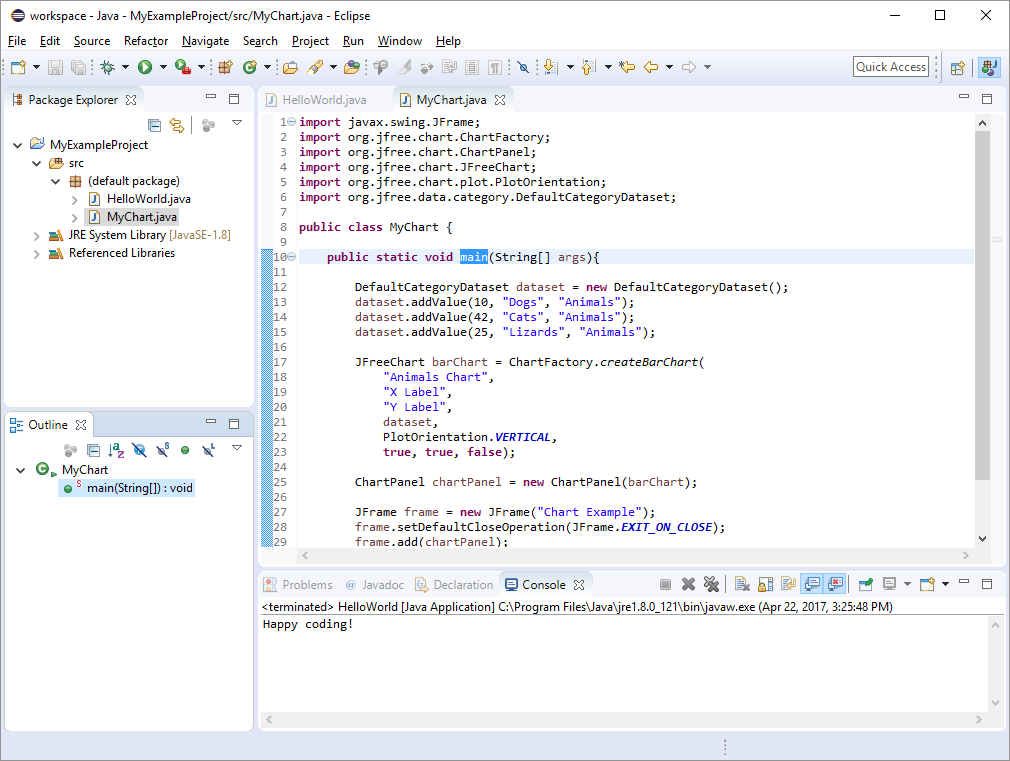
Create a new MyChart class and type this into it:
import javax.swing.JFrame;
import org.jfree.chart.ChartFactory;
import org.jfree.chart.ChartPanel;
import org.jfree.chart.JFreeChart;
import org.jfree.chart.plot.PlotOrientation;
import org.jfree.data.category.DefaultCategoryDataset;

public class MyChart {

	public static void main(String[] args){

		DefaultCategoryDataset dataset = new DefaultCategoryDataset();
		dataset.addValue(10, "Dogs", "Animals");
		dataset.addValue(42, "Cats", "Animals");
		dataset.addValue(25, "Lizards", "Animals");

		JFreeChart barChart = ChartFactory.createBarChart(
			"Animals Chart",
			"X Label",
			"Y Label",
			dataset,
			PlotOrientation.VERTICAL,
			true, true, false);

		ChartPanel chartPanel = new ChartPanel(barChart);

		JFrame frame = new JFrame("Chart Example");
		frame.setDefaultCloseOperation(JFrame.EXIT_ON_CLOSE);
		frame.add(chartPanel);
		frame.setSize(500, 500);
		frame.setVisible(true);
	}
}
Now you can run this code using the run button, and you’ll see a window that uses the JFreeChart libary to create a bar chart:
Notice that a project can contain multiple classes that contain a main() method (so far ours contains both a HelloWorld class and a MyChart class), and Eclipse will run the one that you currently have selected.
Eclipse Views
You’ve probably noticed by now that Eclipse has a bunch of buttons, menus, and tabs. That’s because Eclipse contains a bunch of tools that make coding easier, but looking at all of them at once can be overwhelming. You can ignore most of these for now. I’d start by closing the Task List and Connect Mylyn tabs.
You can also drag the tabs around to organize them however you want. For example I usually like the Outline tab to be on the left side of the screen instead of the right. Try dragging it so it’s below the Package Explorer tab, like this:
Eclipse calls these various tabs views, and you can see more of them by going to Window > Show View > Other..., which shows a hierarchy of every view you can see in Eclipse. This is also helpful if you accidentally close a tab- don’t worry, it’s still here in this dialog!
For now, here are the views you probably care about:
Package Explorerlists all of your projects, and all of the classes within each project.Outlinelists all of the variables and functions within the selected class.Consoleis where output like runtime errors andSystem.out.println()statements go.Problemslists any problems your code has. This is especially useful for “invisible” problems that aren’t tied to a specific line of code, such as classpath issues.
You can also mouse over any button to get a description of what it does.
Debugger
Hopefully you’re already familiar with debugging from the debugging Processing tutorial, so I won’t go into too much detail about exactly what debugging is. I just want to point out that Eclipse has its own debugger, which can be extremely useful for tracking down logic errors.
To use the debugger, first set a breakpoint in your code by clicking a line number in the class you want to debug. Then click the Debug button (it’s the little bug-looking icon next to the Run button). This will run your code until it reaches the breakpoint, at which point it will open up the debugging perspective, which is a predefined set of views that help with debugging.
At this point you can step through your code and see the value of variables and exactly what code is being executed, just like you could in the Processing editor.
When you’re done debugging, click the stop button and switch back to your regular perspective using the dropdown in the upper-right corner, or by going to Window > Perspective > Open Perspective > Java.
Other Eclipse Features
Here are a few useful features that we haven’t covered yet.
- Want to see where something is defined? Right-click it and then click
Open Declaration. This will take you to the line that declared it. Try this with classes, functions, and variables. - Want to see every place in your code that calls a particular function or uses a particular variable? Right-click it and then click
Open Call Hierarchy. This will open theCall Hierarchyview, which shows you every place in your code that uses the function or variable. - Want to rename something? Right-click it and then click
Refactorand then clickRename. This will change the name in every place that uses it. - Want to automatically generate constructors or getters or setters? Check out the
Sourcemenu. - Want to quickly highlight every place in a class a function is called or a variable is used? Just click on the function or variable and then look in the right margin- the colored squares show where that function or variable is being used.
- Want to change the color of something? Try right-clicking it in the right margin and then clicking
Preferencesto change the color of something specific, or manually openWindow > Preferencesand then type the name of what you want to customize or navigate toGeneral > Editors > Text Editorsto customize your colors. - Want to use a dark theme? Go to your Preferences and then to
General > Appearanceto choose a theme.
Summary
Eclipse can make your life much easier if you’re dealing with complicated code that contains multiple class files that each contain a bunch of variables and functions.
But it’s important to understand what Eclipse is doing in the background instead of just relying on Eclipse to do everything for you. For example, you should understand that the red underlines in Eclipse are coming from the Java compiler, and that clicking the run button in Eclipse is running your program using Java. You should understand what the classpath is. And you should understand that autocomplete is using the Java API to show you suggestions. That way when you find yourself in an environment that doesn’t support Eclipse (I promise that will happen), you can still use a basic text editor and a command line to get the job done.
You also shouldn’t feel like you need to use Eclipse. If you’re comfortable using a basic text editor and the command line, more power to you! I usually use a basic text editor and the command line for smaller projects that only contain a couple classes (I don’t feel like going through all the Eclipse setup just to run a simple program), and I use Eclipse for more complicated code bases where navigating between files becomes more important. Like everything else in coding, it really comes down to personal preference.
Homework
- Create an Eclipse project that contains the classes you’ve written for previous homeworks.
- Familiarize yourself with the Eclipse debugger by stepping through your code.